Showing posts with label Folk Art Butterfly. Show all posts

Thursday, April 11, 2024

B Spring Daffodils and Tulips Table Decor Sign

Hey crafty friends,
So glad you stopped in today! It is my turn to share on the Cottage Cutz blog. So I created this cute "B" sign that will be a part of my table decor.


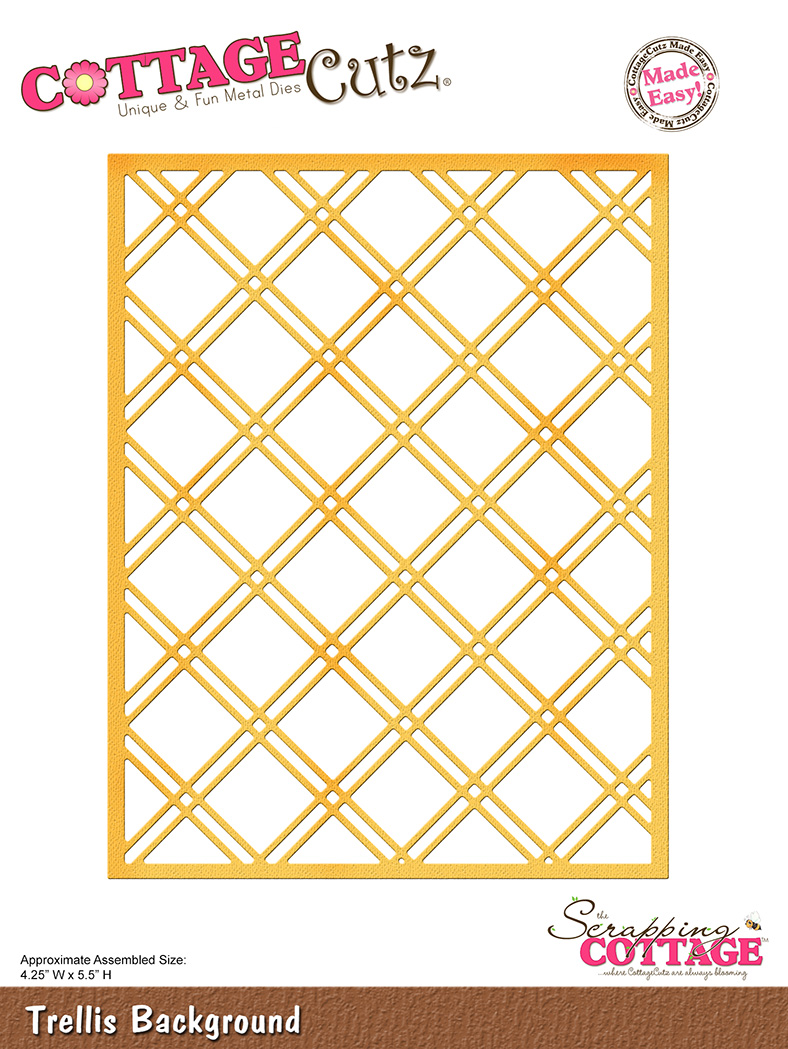
Here's another view of my sign. I started with a piece of white cardstock measuring 5x7. I then added a mat of some designer paper I created. I then cut out the pretty Trellis background die. I layered that onto some cream cardstock. I cut the B out of some yellow cardstock and then cut out the daffodils, tulips and butterfly from some cardstock and then colored and shaded the various white pieces.  In case you're wondering I used a capital B as that is the first letter of our last name :-).


Here's a closer look at the pretty folk art butterfly. I colored the detail pieces with my yellow markers. However the wings were cut from some red cardstock.

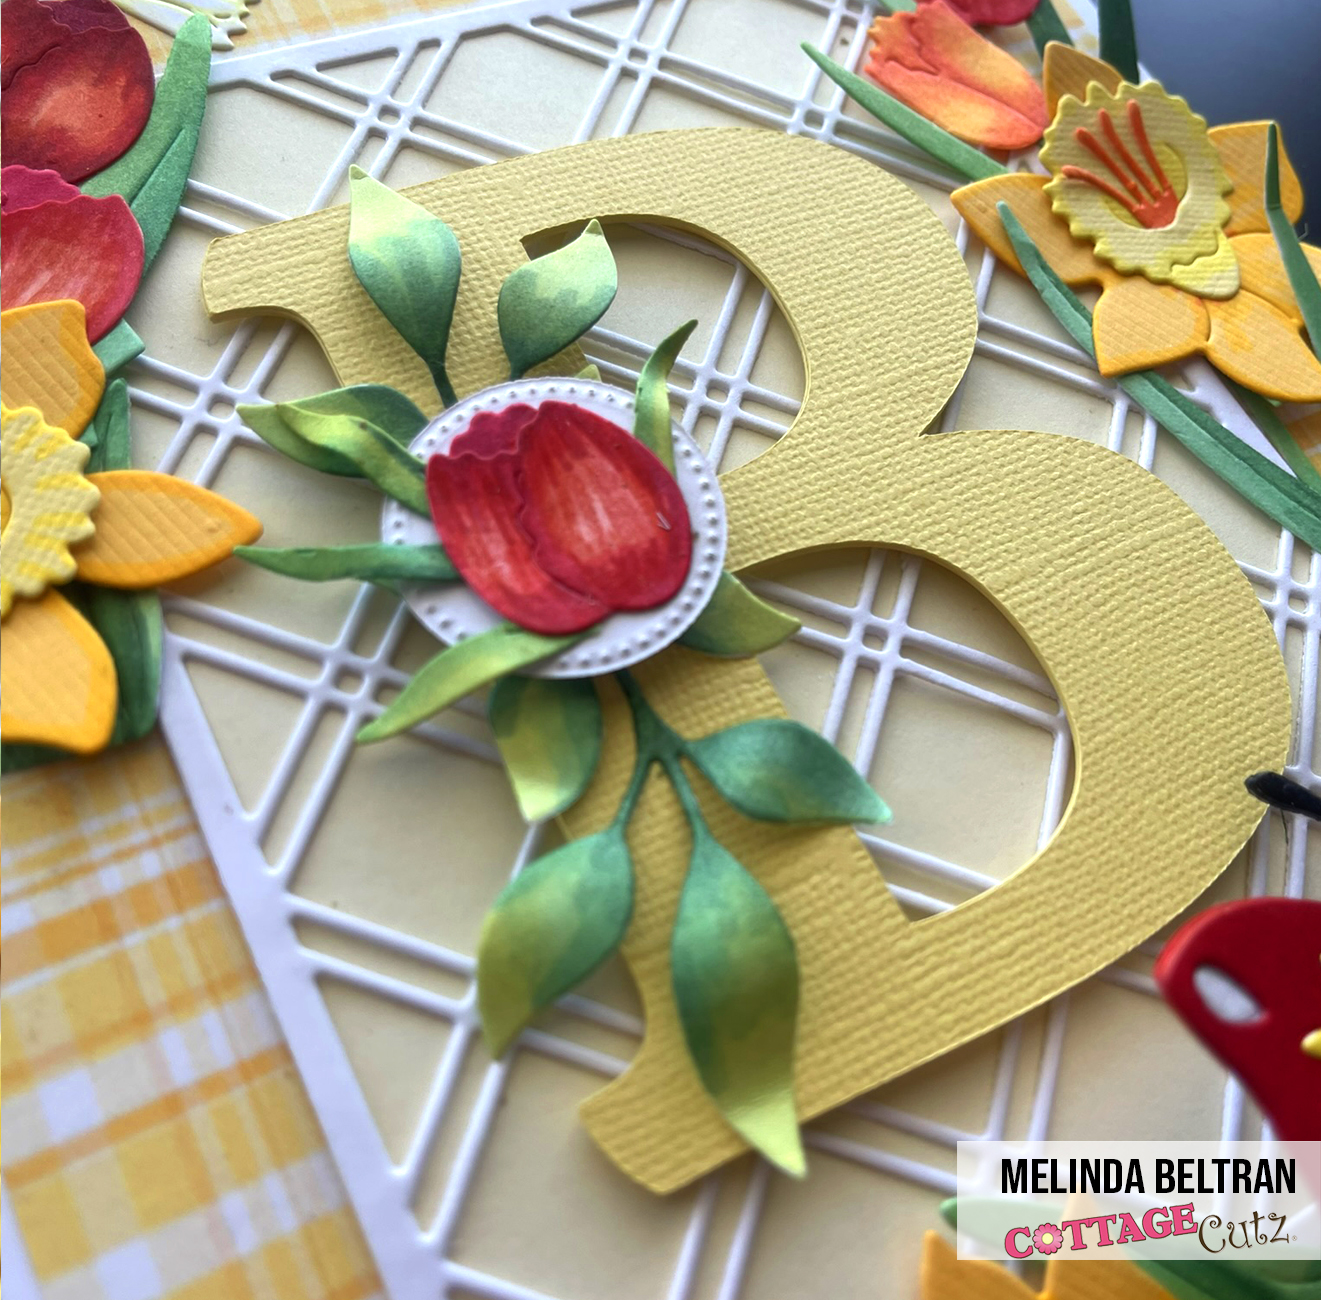
I used the smallest pierced circle die to place a tulip head onto with some of the foliage. All of the leaves started out as plain white cardstock. I just used my markers to color them. I mounted the B onto some foam tape and then onto the mat. This gave it some lift and I thought it made it look very nice.


Here is one last look at my completed sign. I thought it turned out so festive and with a ton of cheerful spring vibes.


Dies Used For This Project

Spring Daffodils

Spring Tulips

Folk Art Butterfly

Pierced Circle Set

Trellis Background


Well, that about covers it for today. Be sure to come back real soon. You will want to keep up with all the beautiful projects the design team is creating.  Don't forget to follow Cottage Cutz on all their social media accounts too! Links are below.
Until the next time, have a wonderfully crafty day!
Melinda


Head over to Cottage Cutz and do a little shopping today!

Get Social With Cottage Cutz

Saturday, September 02, 2023

Sending Birthday Wishes

Hello CottageCutz friends! Thanks for taking the time to stop and visit with us today. It's Mary Marsh here bringing you the Saturday edition of the Blog.

Our new Folk Art release is still available in the online store at 35% off individual dies. There are 19 new designs that are so perfect for cardmaking, journaling, and scrapbooking.

In fact, we are having a big Labor Day sale going on now. The savings are up to 65%. Check it out here. 

Today for your viewing pleasure, I am featuring the Folk Art Butterfly die on a birthday card. So, let's get started with some details of how I created this card. 

Design Steps:
I started my card this week using the colors from the Splitcoaststampers color challenge #963. We were to use highland heather, parakeet party and daffodil delight for her color trio. Optional was to make it a birthday card. I thought these would be perfect colors for the butterfly. 
highland heather, parakeet party, daffodil delight

I cut the butterfly in the three challenge colors and attached to a panel of designer paper. This one has a gray background and gray is an allowed neutral in this color challenge. I also stamped my birthday sentiment in highland heather ink. 
Gray Designer Paper: 4 1/2" x 5 1/2" 
Next, I cut all the elements that would surround my butterfly image and also my sending phrase. I used the Sending Hugs Bear, Folk Art Flowers Mixed and the Little Flowers dies. Again, all cut in the challenge colors. 
I attached the new pieces with a clear drying glue. 
To finish my card, I attached the image panel to the highland heather card base and scattered a few hearts. 
Card Base: 4 1/2" x 5 3/4"
Well, that's it for this post. See you next Saturday.

Reminder: Marla has a video up on the CottageCutz YouTube channel. Click here.


Tuesday, August 22, 2023

Shabby Butterfly Fall Card

Happy Tuesday crafty friends!
I hope your Tuesday is off to a great start! Today I am sharing a card I made with some beautiful Cottage Cutz dies. Take a look at what I created.
A top folding card with a gorgeous Butterfly front and center! The butterfly is the Folk Art Butterfly Die.

I started by taking a plain white piece of cardstock and spritzing some of my blue ink spray onto my cardstock mat.

I then took some gold paint and swashed it over my blue spritzing. I then edged the paper with my blue ink. You will see that on the next photo.

I then added some of my die cuts at the top and the bottom. The deer horns are from the Deer Floral Spray.

Here is a closer look at my beautiful butterfly. I started with it as plain white cardstock. I then added some of the same gold glitter paint as a base. I then added some brown inking to the edges. I used my blue markers for some of the decorative pieces. I used brown marker for the leaf motiffs and then dotted the wings with my brown glitter. I added some foam underneath to give it some lift.

Here is a closer look at the pretty flowers and pinecones. I added those to the center of the bottom spray.


Here's a closer look at the top spray. I added a bow with some of the sweet little flowers. I used my nuvo drops for the center of the bow. I added the finished piece to my cardstock base and done!

Here is one last look at my finished card. I think it turned out so pretty. It doesn't have a sentiment on it yet as I haven't decided if I am going to use this as a thinking of you or a birthday card. 


Dies Used

Folk Art Butterfly


Holiday Mason Jar


Well, I hope this card gave you some fun inspiration! It is always nice to have cards in all seasons. Until the next time, have a wonderfully crafty day!

Saturday, July 29, 2023

Trifold Miura Card

Hello crafters!  

It's Kris here, sharing with you the Saturday edition of our blog with a fun fold card featuring our Folk Art collection.


This card style was a first for me... it's called a Freestanding Trifold Miura card.  I will say in all honesty, this card does have that wow factor as most fun folds do, however I found it a li'l fussy to get it to stand up on it's own.  The trick is to not stretch it out while displaying it... try to keep it half-way folded.  


I choose some beautiful Fall papers (Doodlebug Design) to use with the Folk Art Fox and Folk Art Butterfly and Folk Art Trees.  

CUTTING:
Card Base (Lemon-Lime Green) = 10-1/2" x 5-1/2"
Patterned Paper #1 (Leaves) = (cut 2) 5-1/4" x 3-1/4"
Patterned Paper #2 (Plaid) = (cut 2) 3-1/4" x 1-3/4" 
White cardstock = 5-1/4" x 3-1/4"

DESIGN STEPS:

Card Base--
--  Score along the 10-1/2" side at 3-1/2" and 7"

-- On the 3-1/2" score line, measure down 2" and place a pencil mark.  Score from the top left corner of card down to the 2" mark.  Score again from that 2" mark up to the top of the 7" score line.

-- Turn cardstock 180 degrees and repeat Step #2

-- Fold and burnish on score lines so that one "V" folds back and the other folds inside the card.  

** Below is a pic of the back side of my base, just to show you better where the score and tick marks are  (I didn't want to draw on the front side) 


-- With patterned paper #1 vertical, measure down the right side and place a pencil mark at 2".  CUT diagonally from that 2" mark up to the top left corner.

**IF your pattern has a random pattern like mine, you can repeat the same process with the other patterned paper #1 piece.  

**IF your pattern has a definite up and down pattern, you will need to cut the OPPOSITE angle to fit the right side of card.


6.  Adhere to card sections as pictured.


-- With white piece vertical, measure down 2" on right side and place a mark. CUT from that 2" mark up to top left corner.  

-- Turn 180 degrees and repeat.  Adhere to center of card.


-- With pattern #2 vertical, CUT diagonally from top left corner to bottom right corner.  

-- On the 2nd one, CUT from top right corner to bottom left corner.  (Even if the 2 pattern pieces are the same pattern, you will need to cut opposite diagonals.)  


--Adhere to triangle sections on card base.


-- Die cut Folk Art Butterfly , the Folk Art Fox and Folk Art Trees and assemble.


-- I decided I wanted something for the fox to stand on to break up the patterned paper a bit so I cut a piece of woodgrain paper to 3-1/4" x 4" and followed the same instructions (measured 2" and cut diagonally to the corner) and then I die cut the top with the Hills Slimline die.


-- I chose some stamps and stamped a couple of them following the angles of the papers ☺  Hello Beautiful and Just a note are from the Butterfly Gala set (SU!) and the You Foxy Thing came from Foxy Thing stamp set (La-La Land Crafts).


Thank you so much for looking!  I hope you are inspired to get crafty with your favorite CottageCutz dies!

~Kristine

PRODUCTS: