Showing posts with label Double-Stitched Oval Set. Show all posts

Monday, January 01, 2018

January Birthday Card

Hi, Lois here wishing you a happy 2018!  I hope you and your family had a wonderful Christmas and are looking forward to a happy and healthy new year.

We all need birthday cards throughout the year, and CottageCutz has a series of stamp/die combos that can help you with that.  There is a set for each month of the year, celebrating the "flower-of-the-month."  My card today is for January and the Carnation.


The layout is simple, making the carnation the star of the show.  To begin my card, I stamped and colored the images.


I then cut them out with the coordinating dies.


The pieces for the card base are as follows:

Green base piece - 8 1/2" x 5 1/2" (scored at 4 1/4")
Patterned paper - 4" x 5 1/4"
Green oval - largest Stitched Scallop oval
White oval - next to the largest Double-Stitched oval


Constructing the card base was simple.


I added large foam pop dots to the back of the die-cut images, trimming the one for the butterfly just a bit.


I then adhered the die-cut images to the front of the card.


I added three sequins and brushed the carnations and butterfly with a clear Wink of Stella brush.  You may be able to see some of the "glitter" on the images.   IRL it is much more visible.


This again is my finished card.


There is a huge after Christmas sale going on right now with savings up to 80%. Check it out here.

CottageCutz dies  used on my card are:

http://www.scrappingcottage.com/cottagecutzcarnation-januarystampanddie.aspx


http://www.scrappingcottage.com/cottagecutznestedstitchedscallopovalset.aspx

http://www.scrappingcottage.com/cottagecutzdouble-stitchedovalsetbasics.aspx

Friday, April 07, 2017

SWEET BABY CARDS


Hello dear friends !!!!

It's Anita here with another post with beautiful CottageCutz products. Did you see the beautiful baby theme dies that have been launched recently. They will surely win your heart... So cute they are!!!!

I have not yet started working with them , but then I am showing some old dies that are so beautiful that I love creating baby theme projects with them.

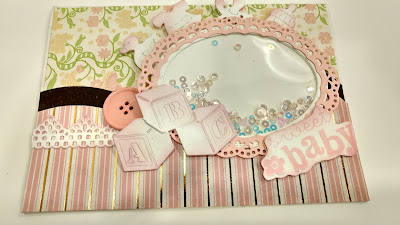
Here I have made a boy and girl shaker card using CottageCutz dies.

you can check all the baby themed dies here.


To make these cards, cut a card base 7" x 5". 
Adhere matching baby themed pattern papers. 
Cut 2 ovals from the stitched oval die. 
Cut 6 frames using stitched oval die. Adhere the three frames together one, for each card.
Adhere the large oval on the card base. Add sequins and add the transparent sheet cut to oval size. 
Adhere the frames forming a shaker card. Die cut all the baby themed pieces and distress accordingly pink and blue for the cards. Adhere on the card as shown. 
Add sentiment.

It is so much fun and easy to create these beautiful cards with CottageCutz dies.
List of Dies Used.


Do visit the CottageCutz blog and the store for amazing products and inspiration. Thanks for spending time here. Have a nice day.


Monday, March 20, 2017

Framed Hummingbird

Lois here with a very simple card for you today.  I just got a few new-to-me CottageCutz dies and was anxious to play with them.   I was intrigued by the Pierced Wide Frames and wanted to give them a try -- today I used the Ovals -- along with a sweet Hummingbird die.


Supplies used on this card are:

Heavyweight white cardstock 8 1/2" x 5 1/2", folded in half, and a piece 4 1/4" x 5 1/2" to cut the frame
Colored cardstock - Blue, Green, Pale Plum, Yellow, Pale Blue
Patterned paper - Shades of Plum
Ink - Memento Tuxedo Black; Ranger Distress Tumbled Glass, Mowed Lawn, Victorian Violet
Copic marker
Black ink pen
Liquid glue
Roll of foam adhesive tape
Sponge daubers

To start my card I cut out the various pieces of cardstock for the hummingbird and frame.


I then added some depth to the pieces by sponging on some ink to the bird and flower pieces and added a bit of color to the bird's beak with a dark yellow marker.  Using the black ink pen I emphasized the eye of the hummingbird (not shown in photo).


I cut a strip of foam adhesive tape, cut it into narrower strips, and adhered it in pieces to the back of the oval frame.


To make the background for my "picture," I cut an oval from the pale blue cardstock.  You could use any oval die which would fit -- I used the double-stitched oval because it was close at hand.  The stitches were not going to show, so it didn't really matter.


I then constructed my card using the die-cut pieces and stamped the sentiment.   Here it is again.


CottageCutz dies used on this card are: