Showing posts with label Crab. Show all posts

Sunday, July 02, 2017

Under the Sea Life

Hi!

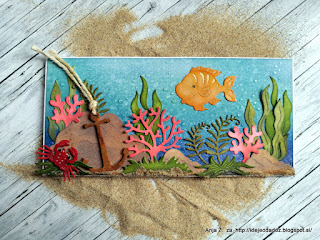
It's Anja here and I have a summer card for you today. Summer has officially started and I can't wait to go to the beach, soak up the sun and get my feet wet. But for now a sea scene will have to do.


For this card I used:
- Cottage Cutz dies (Under the Sea, Anchor, Happy Fish 1, Crab, Mushrooms & Greenery),
- Distress Inks (Broken China, Stormy Sky, Faded Jeans, Chipped Sapphire, Cracked Pistachio, Mowed Lawn, Forest Moss, Peeled Paint; Abandoned Coral, Barn Door, Fired Brick, Black Soot, Scattered Straw, Wild Honey, Spiced Marmalade),
- Distress Oxides (Vintage Photo, Walnut Stain, Peeled Paint),
- white Hero Arts pigment,
- white card base (21 x 10,5 cm),
- watercolor paper (20,7 x 10,2 cm),
- Ranger Multi medium Matte,
- Glossy Accents Glue,
- white and black pen,
- brown acrylic paint,
- brown foam,
- cinnamon and nutmeg mix,
- beach sand,
Wink of Stella glitter brush pen,
- white string,
- paper glue. 

First I made the background. I used watercolor paper and blended different shades of blue Distress Inks.


I started with light colors and added darker colors in the end. I blended the shades with Cracked Pistachio. I finished it off with a few drops of water and dried it with heat gun.


Then I die cut and colored all the greenery and creatures.


For the anchor I used a technique I learned on one of Pete Hughes's classes. I wanted the anchor to look old, like it under the sea for quite some time. I painted it with brown acrylic paint and before it dried I sprinkled cinnamon and nutmeg all over it. It gives it a rusty edge. I die cut additional anchor from foam to add a bit of dimension.


Then I glued all the pieces to the card. I put a generous amount of Multi medium matte at the bottom of the card and sprinkled it with beach sand to make it look more realistic. Then I added a few greenery pieces on it. I let it dry then.


And for the final touch I added some glitter on the fish, using Wink of Stella brush pen and some bubbles with Glossy Accents.


And this is how I made my under the sea scene.


Hope you like my card. I'm wishing you a fun filled Sunday :)

Take care,
Anja Z.


Wednesday, June 08, 2016

Fancy Pocket Plus Father's Day Card


Hello Scrapping Cottage friends! Thanks for taking the time to stop and visit today. It's Mary Marsh here bringing you the Wednesday edition of the Blog.

Today for your viewing pleasure, I am featuring a new die set from the May release. I have used the Fancy Pocket Plus die along with dies from the March Nautical release and created a Father's Day card. This big day is approaching quickly so time to get busy making a card for your Dad, hubby, sons etc.

I started my card this week with the idea of using the Fancy Pocket Plus die and from there my Father's Day card developed. So let's get started with some card details.

Once I decided on a nautical theme, I looked through my patterned paper stash to see what would work best. I already had my color scheme somewhat figured out.  Then I found this great paper that had a map on it and one of the colors I wanted to use. This was a good start.

Card base: 4 1/4" x 5 1/2"
Patterned paper: 4 1/8" x 5 3/8"

 
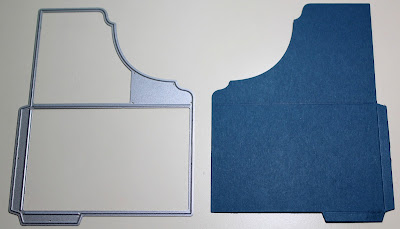
Once the base and layer panels were cut, I started on my pocket. This new fancy pocket plus die makes it so easy to create a pocket for your card. No more measuring and scoring, It's all figured out for you with this die.


Once it's cut all you have to do is fold on the score lines and then tape together. Easy Peasy! I used Scor-tape to secure it. It's a strong double sided adhesive so you don't have to worry about the pocket coming apart.


assembled pocket

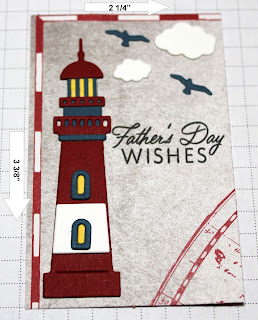
Now that I had my pocket assembled, I cut more of the patterned paper to make an insert for the pocket. This piece is 2 1/4" x 3 3/8". I decorated this with the lighthouse w/clouds die and stamped a Father's Day sentiment. 

 
The outside of the pocket is adorned with the pelican die and some starfish cut with the paddles & rope ladder die. I added a small clip to the insert to make it easy to remove from the pocket and for added interest.
 
 
I taped this pocket to the front of my card base along with a sailboat. Used the sailboat large die and cut with a deep red cardstock to complete the front of my card.
 
 
Stamped another sentiment on the inside and also decorated it with the rope from the paddles & rope ladder die and a crab using the crab die.
 
 
And, that's it for me for this week. But wait, last week I promised a giveaway if you left me a comment with other ways to use the garden friends die set. I liked the idea that Karen Briguglio gave me. She suggested using the dies as a topper for canning jars. She would make some trail mix and give it to someone going camping. Creative idea!
 
Well, Karen I will be sending you the extra set of card elements I cut out last week. Get in touch with me at mrmarsh917@msn.com and give me your mailing address. I will get it out to you in the mail.
 
So friends until next time........inky hugs!!!
 
http://www.scrappingcottage.com/cottagecutzfancypocketplus.aspx
http://www.scrappingcottage.com/cottagecutzlighthousewclouds.aspx
http://www.scrappingcottage.com/cottagecutzpelican.aspx
http://www.scrappingcottage.com/cottagecutzsailboatlargeelites.aspx
http://www.scrappingcottage.com/cottagecutzcrab.aspx
http://www.scrappingcottage.com/cottagecutzpaddlesandropeladdernet.aspx


Tuesday, April 19, 2016

A beautiful underwater world

Hi, Janja here!

The new CottageCutz flourish & flowers dies are already on my desk. But before I start with them, I want to lead you in a beautiful underwater world. Let's see what is hiding in the coral reef.


For the card we need:
  • white card base: 10.6 x 5.3", folded
  • blue or patterned paper: 5 x 5"
  • patterned paper in the sand color: 5 x 1"
  • white and color cardstock
  • distress inks: peeled paint, mowed lawn, worn lipstick, dusty concord, festive berries, aged mahogany, mustard seed, rusty hinge, pumice stone and black soot

First, we prepare cutouts shaded with distress inks. We prepare a larger number of cutouts, because the card is made inside and outside.
 

For corals, underwater plants and coral reef, I used the die - under the sea. The die offers a lot of elements that you can optionally attach to the background. Some of cutouts are fixed directly to the background and for the remaining we use adhesive pads. 
In this beautiful environment, I added a crab, a starfish and a fish.
 

In the interior of the card, the background is prepared the same way as the front side of the card. 
From the white cardstock we cut out a circle (the largest die of a set) for text. The edges are covered with the stitched circle frame (the largest die of a set). With the remaining cutouts we create a beautiful underwater world.


And don't forget on our April challenge - anything goes. You still have time to share your projects with us till the end of the month. Two lucky winners will get the nice award.
Dies, which I used at work:


Have a nice day. 

Janja

Friday, April 15, 2016

Decorated Nautical Frames

Before I start with today´s project I would like to tell, that I'm very sorry that I had to remove some of your projects from our first challenge. Namely some linked projects didn't use only CottageCutz dies (which is the only restriction our Challenge has). You are more than welcome to participate at our challenge, but please, use only CottageCutz dies and not any other dies. Thank you. You still have time to participate till the end of the month. Your project can be linked at the end of this post.

We all collect many photos from our vacations and what do you think about custom frames for such photos? Or to frame the quotes you like. I will show you how to change two ordinary wooden frames into these two:


Supplies:

Two wooden frames for photos size of 4 x 6 inches
Cardstock: White Cardstock for die cuts
CottageCutz Dies: Listed Below
Distress Ink: Brushed Corduroy, Gathered Twigs, Weathere Wood, Rusty Hinge, Fossilized Amber, Hickory Smoked 
Embossing Powder: gold and Distress Vintage Photo, white and grey watercolor paint from a tube or white acrylic paint
Other: Scissors, Paper trimmer, Sizzix machine, VersaMark stamp pad


1. Let's start with first frame. Color the surface with brush and white paint first. Let it dry.


2. Now color the surface gently with grey paint. Apply small amount of color on your brush and be gentle by applying the color otherwise grey will totally cover the white paint.


3. Take the second frame and Gathered Twigs or any other brown distress ink or dye ink ink pad. Apply the color directly with the ink pad on the frame as shown on the photo.


4. With the Anchor and  Maps and Spyglass die cut the Anchor, Map and Spyglass out with some white cardstock. 
5. Apply Versamark stamp pad on the whole surface of the Anchor and  Spyglass die cut pieces and embossed all these pieces with gold embossing powder.


6. Apply Versamark stamp pad, but this time just on some spots:


7. Now embossed all pieces again with Distress Vintage Photo embossing powder.


8. You will get rusted look, because after powder will melt, it will mix up with golden powder.


9. Now cut out all other pieces out of white cardstock. I used following dies: Lantern, Crab and Paddles and Rope Ladder. Rope was colored gently with Weathered Wood distress ink. All orange pieces were colored with Rusty Hinge and Fossilized Amber distress ink. Pedals were colored red and the Lantern were colored with Hickory Smoke and Brushed Corduroy distress ink. Also map was partly colored with Brushed Corduroy and partly with blue distress ink

10. Glue all pieces on both frames.


Now all you have to do is to design some quotes in Word and print them or frame photo from your vacation.

I hope this inspires you to decorate your own frame which you don't like or you just want to give them special look.

Have fun creating!