Showing posts with label Country Farm Cows. Show all posts

Sunday, September 04, 2022

Labor Day SALE and a Bday Box Card

Happy Labor Day Weekend friends!  Kris here with a Birthday Box Card that I made for my daughter who loves cows and she was so excited to get this!  Before I get to it, I want to remind y'all of the BIG LABOR DAY SALE!! Up to 65% OFF so many dies -  Sale ends Thursday, September 8, 2022 at 9:00 PM Pacific Time so HURRY OVER and save!!!  

Also - be sure to check out our NEW CHRISTMAS RELEASE which is also on SALE!

I purchased these adorable Country Farm Cows at last year's Labor Day Sale & right now ALL of the dies I have used on my card today are 40-60% OFF (except the balloon on the back as it's retired.)  I have listed and linked all the products I've used on my card at the end of this post! ☺


This next one is of the BACK of my card - empty space to write a personal message.

And yes it does fold flat to fit into an envelope! 


Design Steps:

1.  I cut a white rectangle using the largest die from the Nested Wacky Stitched Rectangles - then stenciled some clouds with Tumbled Glass Distress Oxide ink.  *Optional:  I then cut off 5/8" from the bottom of my rectangle to fit the size card I was wanting to make, but it's not necessary.


2.  I cut a piece of blue cardstock at 3-1/4" x 4-7/8" and mounted my cloud layer on top.  *If you didn't want to cut the bottom off of your cloud layer in step #1, then you would cut your blue piece at 3-3/4" x 4-7/8" ☺


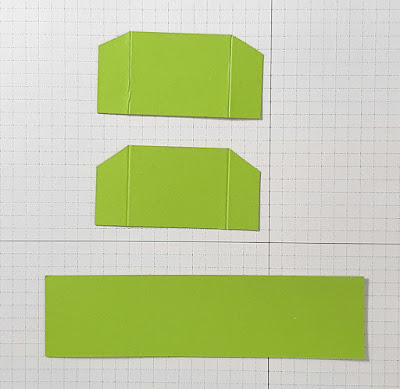
3.  I cut (2) pieces of green at 2-1/2" x 1-1/4" - then scored 1/2" from each end and mitered the top of flaps.  These are my side pieces.

4.  I cut a piece of green for the front of box at 1-1/4" x 5"


5.  I cut a couple different colors of green (can be all one shade) into strips at 5-3/4" x 1-1/2" and scored 3/8" in from each end.  These are the inside "shelves" that we will attach our cows to later. 


6.  I then used various dies from the Hills Slimline set to cut the very tops off of each shelf piece.  


7.  I then cut the side flaps down along the score line as shown below:


8.  Next, with my 2 side pieces, I glued the left flap to the bottom left edge of my cloud piece, and the right flap to the bottom right edge of same piece as shown below.


* For the next few steps, we're not going to do anything with that right flap.  Just going to work on the left side.

9.  I added glue to the left flap of my side piece and attached the left side of my front piece.


10.  Decide which hill you want to be furthest back and add glue just to the left flap and bump it up to the score line of your side piece as shown below, making sure the flap is below the top edge of your side piece.


11.  Fold that hill over to the right and add glue to just the left flap of your middle hill.  Then attach it up to the scored line of the back hill as shown below.


12.  Fold that hill over to the right and repeat for the front hill.


13.  Add glue to ALL 3 tabs on the hills fold your right side piece over onto them.

14.  Add glue to the flap of your right side piece and attach your front panel onto it.


15. Die cut a fence using the Farm Fence Slimline die.  Add glue to the back leaving the top horizontal beam w/out glue as it will be sticking above your green front piece a li'l bit.  Attach to the front panel. 


16.  Die cut, color and piece together Savanna trees, Country Farm Cows, and Happy Birthday w/ Shadow.


17.  I added glue just to the lower portion of my sentiment and attached it to the top of my card base as shown below.

18.  I attached my die cuts to the various hills as shown.


19.  For the back of card, I cut a white piece as in step 1, cutting off 5/8" from bottom.  Then I cut a piece of green cardstock cutting the top with a Hills die and the bottom portion with the same Nested Wacky Stitched Rectangle die.  I also cut a cute balloon and done!

Here are the Products I Used:


THANK YOU for taking time to visit today!  I hope I inspired you to make a box card with your favorite CotageCutz dies!  

I'll be back tomorrow with a card from the NEW CHRISTMAS RELEASE!

~Kristine

Sunday, July 11, 2021

Life Is Magic

Hi!

It's Anja here. I have another farm inspired card for you today. This time I made a card with lovely cows.

For this card I used:

- Cottage Cutz dies (Country Farm Cows), 

- Distress and other dye Inks,

- craft card base (15x15 cm),

- white card stock for die cuts and background 814x14 cm),

- black pen, 

- white ink,

- silver pigment ink, 

- gold pigment ink,

- black pigment ink,

- sentiment stamp,

- acrylic block,

- paper glue. 


First I cut and colored the cows. 

Next I did the background. I colored the grass and the sky on the white paper.

I glued the background on the card base and added the cows.  Last I stamped the sentiment to the right corner.

 
And my card was done.


And that's all from me for today. Have a nice week and see you again next Sunday. 

Anja Z.


Cottage Cutz dies I used:


Wednesday, July 07, 2021

Boots and Bling - it's a Cowgirl Thing!

Hello!  This is Sukie and today I have a quick card to share. The Country Farm die release was perfect for creating this all occasion card which came together very quickly!  There's a brand new release of Slimline dies in the store too, be sure to check them out while they are on sale!

Since I had the cowboy paper in mind for this card, I selected some coordinating card stock colors for all of the die cuts. The die cuts are from the Dog in Cowboy Boot, Country Farm Cows (fence) and the Mail Tag Set.
I wanted to showcase the patterned paper for this card so I kept my card base very simple and adhered the set of tags on top.  The double tags were tied together with some jute twine.
The fence was adhered along the bottom edge of the tag, slightly overlapping it.
The sweet doggy in the boot was affixed on top of the tag with the fence behind.
The fun sentiment was stamped on a hand cut flag.  I tied some more of the jute together and added it to my car as an embellishment. 
Here are the die sets used on my card, available in the store:

Friday, July 02, 2021

Udderly Amazing

Happy Friday!  It's Jeanne today with a slimline card featuring some cows from the fun, new Country Farm release.  I used several of the slimline dies and the Country Farm Cows.

I started with this sketch from Splitcoaststampers.  When I saw the sketch I knew these cows would be perfect.

To start I cut the cows from white cardstock and colored using Distress Oxide inks.

These are the colors I used for the cows.  For my black I colored the cardstock with a black Copic marker.

I cut the base rectangle from the largest of the Nested Stitched Rectangles.  I used the third largest Rectangle and cut two - one from green and one from white.  I used the Clouds Slimline to create a stencil and stenciled the clouds on the white rectangle.  Using the Grass Slimline I cut the grass and glued it to the cloud panel.

For the sketch I needed to cut the cloud panel.  I wanted my stitched lines to be on the inside under the sentiment circle, so I cut 5 1/2 inches from the right.

Then I switched the two sides so my long side was on the left and the stitching in the middle.

I added the cows to the left side....

and heat embossed my sentiment in white on a red circle.

Be sure to visit the online store where there is huge July 4th sale going on right now.  Lot's of great dies are on sale including the Country Farm release.  And there is a NEW release of slimline dies that feature wonderful and unique designs!

Products used:


Thanks for visiting today.  I hope you have a fun and creative weekend!