Showing posts with label CottageCutz Victorian Fence. Show all posts

Thursday, March 22, 2018

Easter Bunny

Hello Scrapping Cottage Buddies!

It is Pam from Stamper at Heart Blog Spot creating with you today! And before I get started I wanted to give you a heads up about the sales we are have at our store.  We have a Collection of new release dies called Rise and Shine that are currently 25% off and they are just so much fun!  To see some card samples from the design team click here and here!

Now on with today's card!  I am on my last Easter card for my friends and family in fact most of the cards are just about to go in the mail at the end of the week.  This is my last one and I just love how this little guy turned out in his overalls with the little buttons!


Designer Steps:
 1.  Start with an A2 white card base and cut a 4 x 5 1/4 piece of blue card stock.  Run the blue card stock through a cloud embossing folder
 2. Cut out the greeting using the Happy Easter Phrase die and white card stock.  Glue the phrase to the upper part of the blue embossed panel
 3. Cut out the white fence using the Victorian Fence die.  Then glue it just below the greeting
 4.  Next cut out a strip of green card stock 4 x 1 1/4 and 3 grass strips using the Spring Grass die
 5.  Layer the grass onto the bottom part of the card as shown
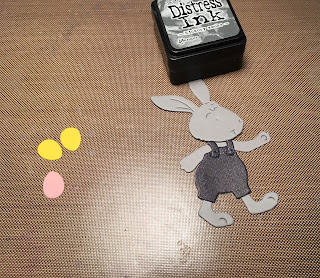
 6.  Using gray card stock and the Mr. Peter Rabbit die cut out the body.  Next use the same die and cut out the overalls in a denim DP.  Also using the same die and cut out the Easter eggs using yellow, orange, and pink card stock
7.  Shade the bunny with a gray ink then glue on the overalls add the black pearl eye and tiny buttons.  Glue the eggs into the grass and one in the bunny's hand and your card is complete.

Cottage Cutz Products


I hope that you are finishing your Easter cards too and that this little card has given you some inspiration!  As always thanks for stopping by!
Blessings
Pam


Thursday, January 18, 2018

Fox and Friend!


Good Morning Scrapping Cottage Family!

It is Pam sharing ideas with you today!

I can honestly say I am almost done with my Valentine's Day cards!  I can't wait to send them off to friends and family!
The one I created for you today is one of my favorites!  I love the little fox and his birdie friend!

Designer Steps:
1.  Start by using the Sweet Fox die and cut out a rust colored fox and a light tan fox.
2.  Use the rust colored body of the fox and ink the edges for depth.  Use the light tan for the chest and tip of the tail.  Also ink the edges of both of those pieces.  With your makers color the tan bird blue and the wing dark blue.  Color the heart red, the nose and eyeball black
3.  Assemble the pieces as shown above.  I used a white gel pen for the eye dot
4.  Next cut out the grass using the Spring Grass die and green card stock.  Cut out the fence in white using the Victorian Fence die.  Cut out the piece of cloud DP with the largest Double Stitched Rectange die.  Glue all pieces to the DP
5.  Add the fox to the DP by tucking it into the grass
6.  Use an A2 white card base with an embossed inset
7.  Place a piece of fun foam on the DP panel and pop it to the card front.  Add the sentiment and your Valentine is complete
Cottage Cutz Products


This card is such a sweet Valentine and it was very quick and easy!

Blessings
Pam

Thursday, April 20, 2017

Welcome Baby!


Good Morning Dear Scrapping Cottage Friends!

I am happy to show you another one of the new baby dies that was just released.  I have had two great nephews born in the last 6 months and they came down to visit from Ohio.  They were both just so adorable.  So needless to say I am in the baby mood!  Today I am showing you a card using Sweet Baby Lamb.


Here are my design steps for this sweet baby card!

1.  Use an A2 white card base cut a piece of cloud designer paper using the second largest Pierced Rectangle die then glue to the center of the card front
2.  Cut a white fence using the Victorian Fence die, cut green grass using the Spring Grass die and cut a pink frame using the Pierced Wide Rectangle Frame Set.  Glue the fence and the grass to the bottom of the sky.  Then add dimension tape to the frame and mount it

3.  Cut and assemble all the little critters and accessories from the Sweet Baby Lamb die set


4.  Use the second to the smallest Cross Stitch Circle dies and cut a white circle.  Stamp the sentiment and add a button with some pink and white bakers twine


Here are the Cottage Cutz Products I used to create this card!


These new baby dies are so sweet!  I hope you will make a new mom very happy by making her a card to celebrate having her new little one!

Blessings
Pam


Saturday, March 21, 2015

Miss Lily Garden Bunny Treat Bag

Hello everyone, I've been on a roll using the Springtime CottageCutz Release. I just LOVE them all! So for today I made a Treat Bag for Easter using the Darling Cottagecutz Miss Lily Garden Bunny Die, along with a few other CottageCutz dies.

I started with a treat bag, then added some design paper, border, and some ric rac. Next I layered with CottageCutz dies, and added some trim, and ric rac to the bottom of the bag. The bows were made using seam binding, and lastly I added some gem hearts that I had laying around.

CottageCutz Dies Used all are linked to the Scrapping Cottage.


Thank you for looking and have a lovely day!
Hugs to all,
Cheryl