Showing posts with label CottageCutz Double Stitched Rectangle Dies. Show all posts

Saturday, November 12, 2022

Gingerbread and Cocoa Easel Card

Happy Saturday Cottage Cutz Friends!
Melinda here with you, and today I am sharing a cute and easy Christmas themed easel card I created with some dies from the FABULOUS Part2 Christmas release!
Here is my finished card. It is an A4 sized card. I created an easel card base to give this little card some extra wow. My card features one of the super adorable Ginger friends. I also included the phrase die, Cookies & Cocoa with those cute chocolate chip cookies and that adorable cup of cocoa. I also used the tree from the Merry Christmas Tree die from the Christmas Release Part 1.  I mounted the cookies and the cup of cocoa onto the smallest nested stitched doily from that die set. I then layered some patterned paper mats onto the two different largest sized scallop stitched rectangle dies for some extra layers and dimension. To keep the Easel open, I added some layers of the double-stitched rectangle dies and used some thick foam tape to give them some lift. I added the "Tis the Season Sentiment" to those dies along with some patterned and cardstock mats.


Here's a closer look at the front of the card standing in the easel position. Here you can see all of the fun dimension I added to the die cuts with some foam tape. For the cup of cocoa, I added some dimensional white paint and some stickles glitter to add some dimension to the "whipped cream". I also added some stickles to the cute little hearts and the little snowflakes.

TIP: Making an Easel card is super easy!
Simply score the top of your card in half. Then cut a piece of the same base of cardstock paper you are using and cut it to the same size as the top. You will always adhere it to the lower half of the scored top only. This will allow the card to lay flat for giving and storing and will allow the top to stand once you use something in the inside to create a "stop".


Here's a look at the inside of the card. I used a Scallop Stitched Rectangle die and mounted it to the top of the inside of the card. This is where I will write my personal greeting.

Here's a closer and side view of the inside, "Tis the Season" sentiment. You can see I added some glitter to the sentiment. It adds a nice touch without being too overbearing.

Here's a closer look at the sentiment "Cookies & Cocoa" die. I cut them out of some plain white cardstock. I then colored them in with my markers. 


Here's a view of what the card looks like closed.

Here's a closer look at the gingerbread girl. I cut her out of some gingery brown cardstock. I edged her with some chalk and then added the cute little stitch lines. I colored her bow and scarf with some pink markers and my spectrum noir glitter pen. The photo doesn't capture the subtle glitter from the pen. I also added some stitch lines to her scarf and bow. 


Don't forget to head over to the CottageCutz YouTube channel and check out all of the amazing projects on there. Our video team is doing a wonderful job of filling the channel with all sorts of creative content! You don't want to miss it!

Dies I Used


Double Stitched Rectangle Set


Nested Stitched Doily Set


Nested Scallop Rectangle Set


Here's a look at the entire release. Be sure to head over and grab them while they last!


Well that about covers it for today! Until the next time, have a wonderfully craft-die day!
Melinda Beltran

Tuesday, April 12, 2022

Have Faith Easy Easel Card

Happy Terrific TuesDIE Scrapping Cottage friends!
Melinda here with you for another fun Tuesday. My project today features some dies from the fabulous new Australian Friends Die Release!!! Here is what I created.

This super cute and very easy easel card!


To create the base:
I started with a piece of 4.25 x 11 white cardstock. I folded that in half at 5.5"

I then folded the right half, which would be the "top" in half again. I just folded that half to the 5.5 fold I made first. I burnished it with my bone folder.

Here is what the base looks like once you have made the two folds. EASY PEASY!

I then cut a separate piece of 4.25 x 5.5 and that became the "top" of my card. I simply attached it with some adhesive to the bottom half of that top fold.... tent if you will in the picture above.

Here is a side view to show how I attached it once it was done.


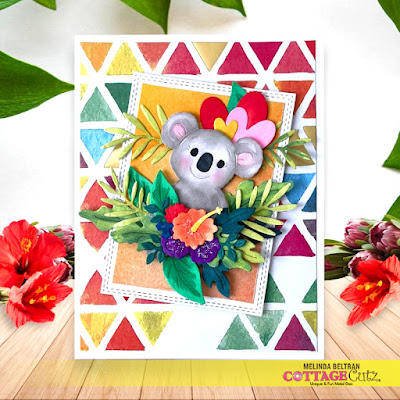
To make a "ledge" where the top can "stop" and be held in place I used the double stitched rectangle die set to create this sentiment. I hand wrote the word "Have" and then die cut faith from the Faith Sentiments die set. I cut out a couple of sets of that adorable Koala die from the new release and added some flowers to the corner of the sentiment. I added some foam tape under the rectangle when attaching it to the base. That gives it just enough lift to allow the top to catch

Here's a closer look at that sweet Koala. I nestled her among all the pretty foliage and flowers that come with the die. To finish off, I added a few hearts from the hearts slimline die. I love all the hearts that come out of the negative space of that die in just one pass! I added all of that to one of the double stitched rectangles. I used some fun and super colorful patterned paper from Paper House Productions.

Here's a view of the front finished.

Here's a view of the side of the card. You can see that I added a piece of white cardstock to the top half of the base. This is so I can write a note to the recipient. 


Here is the fantastic new collection 
FROM DOWN UNDER!
Hurry for a limited time...
New CottageCutz 
Australian Friends Release
Save 30% on Individual Designs
14 New CottageCutz Designs

PLUS FOR A LIMITED TIME....

The Dies I used to create this project:
In case you didn't hear, The CottageCutz YouTube channel is filling up with beautiful projects and great how-tos!  Head over and check out the latest video! 

Well that about covers it for today! Until the next time, have a wonderfully crafty day!
Melinda Beltran

Tuesday, February 15, 2022

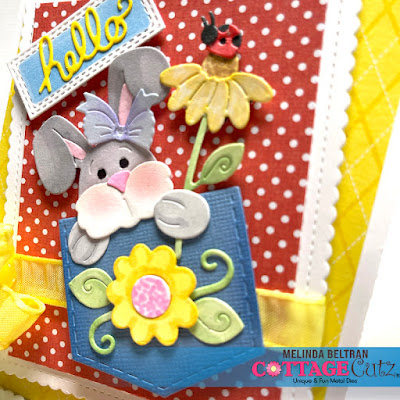
Hello Spring Peeker Bunny Easel Card

Happy Terrific TuesDIE Scrapping Cottage friends!
Melinda here with you today. I am super excited to be sharing with you today. Tuesdays will be my new day to post! So today I am sharing a cute little card I created with dies from the new SPRING RELEASE! Here's my project.

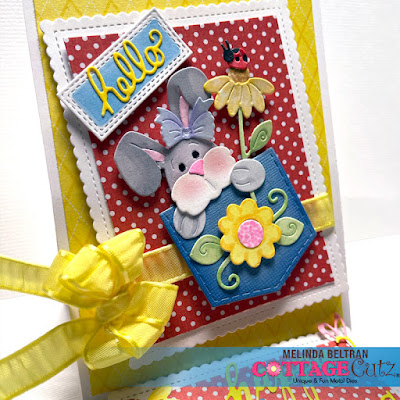
I created this cute Easel card featuring the Bunny in Pocket Die.


To create the Easel Fold

I started with a piece of cardstock measuring 4.25 x 11. That is exactly half of a letter size piece of cardstock. I folded it at the 5.5 mark. That is in half. I then folded the "top" or the right side in half again. I simply folded it to the center fold line.

Here's a picture of the two folds. It is hard to se the center fold on the left, but it is there.

Next I took a piece of white cardstock and cut it to 4.25 x 5.5. I added a pretty patterned paper mat to the top. That mat measures 4 x 5.25. I put adhesive on the bottom half only of the top folding. Next I put the mat onto the top part and lined up the bottom and sides. So only half of the mat is adhered to the base.

Here's a view of the side of the card with the base. This shows you that the mat is only attached to that bottom half. Once that is done, I went ahead and assembled my layers and the main die onto the card.

Here is the panel I added to the "bottom inside" of the card. This piece acts as a stopper of sorts for the top piece. It allows for that piece to be on top.


Here you can see all the fun dimension the layers have. I put some foam tape behind the mats to get them a little extra dimension. I added a sweet little bow in a matching yellow ribbon.

All of these pieces with the exception of the pocket started out as plain white cardstock. I have used this sweet little die in a couple other projects, but this one has a gray bunny. The others I colored that sweet little bunny in more of a brown. If you would like to see those projects head over to that blog post. CLICK HERE.


Here's another look at my finished project.


The Dies I used to create this project:


I used the Stitched Scallop version. That one is currently unavailable, but this is an excellent alternative.


In case you didn't hear, The CottageCutz YouTube channel is up and running.  Head over and check out the latest video! There is a giveaway for subscribing too!

Well that about covers it for today! Until the next time, have a wonderfully crafty day!
Melinda Beltran

Thursday, June 24, 2021

Greetings!

 Hello Scrapping Cottage Friends 

It is Pam creating with you today!

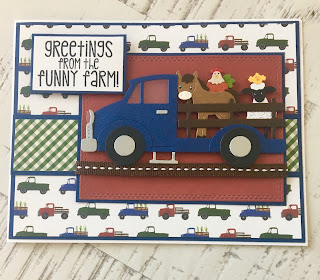
Our design team is continuing to fashion some ideas for you to use from the new collection called COUNTRY FARM! It has the so many incredible dies.  Everything from Tractors to Cowboy Chicks!  Each die is just full of awesome details and can be used for so many different occasions.  Today, I am using the Farm Truck w/Animals.   I really love this little truck it can be filled with all kinds of fun things.

Design Steps:

1.  Using the Farm Truck w/Animals die cut out the truck pieces: navy, silver, dark brown, black and acetate.  For the animals brown, dark brown, tan, rust, green, red, yellow, black, white
2.  Glue the truck together with a fine tip glue.  Glue the animals together and then glue them into the truck
3.  Use a white A2 Card base, use a 4 x 5 1/4 piece of tractor DP and mat it with the navy blue.  Use a 1 x 5 1/4 piece of checked green DP and mat it with navy blue.  Using the second from the largest Double Stitched Rectangle die cut out a piece of red.  Take the red rectangle and mat it onto navy blue
4.  Wrap the red double stitched rectangle with a piece of brown stitched ribbon as shown.  Next pop up the truck as shown
5.  Glue the navy blue matted farm truck DP to the A2 white card base.  Glue the navy blue matted green checked strip to the front as shown
6.  Glue down the double stitched rectangle with the truck to the card front as shown and add the sentiment which has been stamped and matted onto navy card stock.  Your card is complete!

CottageCutz Products


Thanks so much for stopping by.  I hope this fun little card gives you a boost of inspiration to create your own adorable farm card!

Blessing and Take Care
Pam