Showing posts with label Cottage Cutz Cross-Stitched Circle Set. Show all posts

Thursday, August 15, 2019

Strawberry Cupcake

Hello Scrapping Cottage Friends

I am on a cupcake roll!  This is another cupcake from the birthday release.  I am in love with all of them.  I put a group shot of the 3 cupcake cards I have made at the bottom of this post.  I think they would make an adorable gift set.

Designer Steps:
 1.  Cut all of the pieces out of white card stock using the Birthday Cupcake w/Strawberry
2.  Color all of the pieces with your favorite markers.  Then glue the pieces together
 3.  Use an A2 white card base cut a piece of dark red card stock just slightly smaller then the card front.  Cut a piece of strawberry DP 4 x 5 1/4.  Glue the strawberry paper to the dark red card stock.  Cut a piece of green polka dot DP 1 1/2 x 5 1/4.  Layer it onto dark red card stock
 4.  Glue the green polka dot strip to the bottom section of the strawberry DP and add the ribbon
 5.  Using the Cross Stitch Circle die the 3rd from the largest cut a white circle.  Place dimension tape on the back of the cupcake and add it to the circle
 6.  Put dimension tape on the back of the circle and pop it to the card as show below
7.  Take the whole panel and glue it to the white card base.  Add some glossy dots and your card is complete

CottageCutz Products

Here are the three cupcake card!  I love the cheery bright happy colors!
Hope you have a wonderful day! And thanks so much for stopping by!
Blessings
Pam


Thursday, April 25, 2019

Fairy Dust!

Good Morning Scrapping Cottage Friends

It is Pam sharing with you on the blog!

Today, I am sharing another whimsical die from our new collections call 
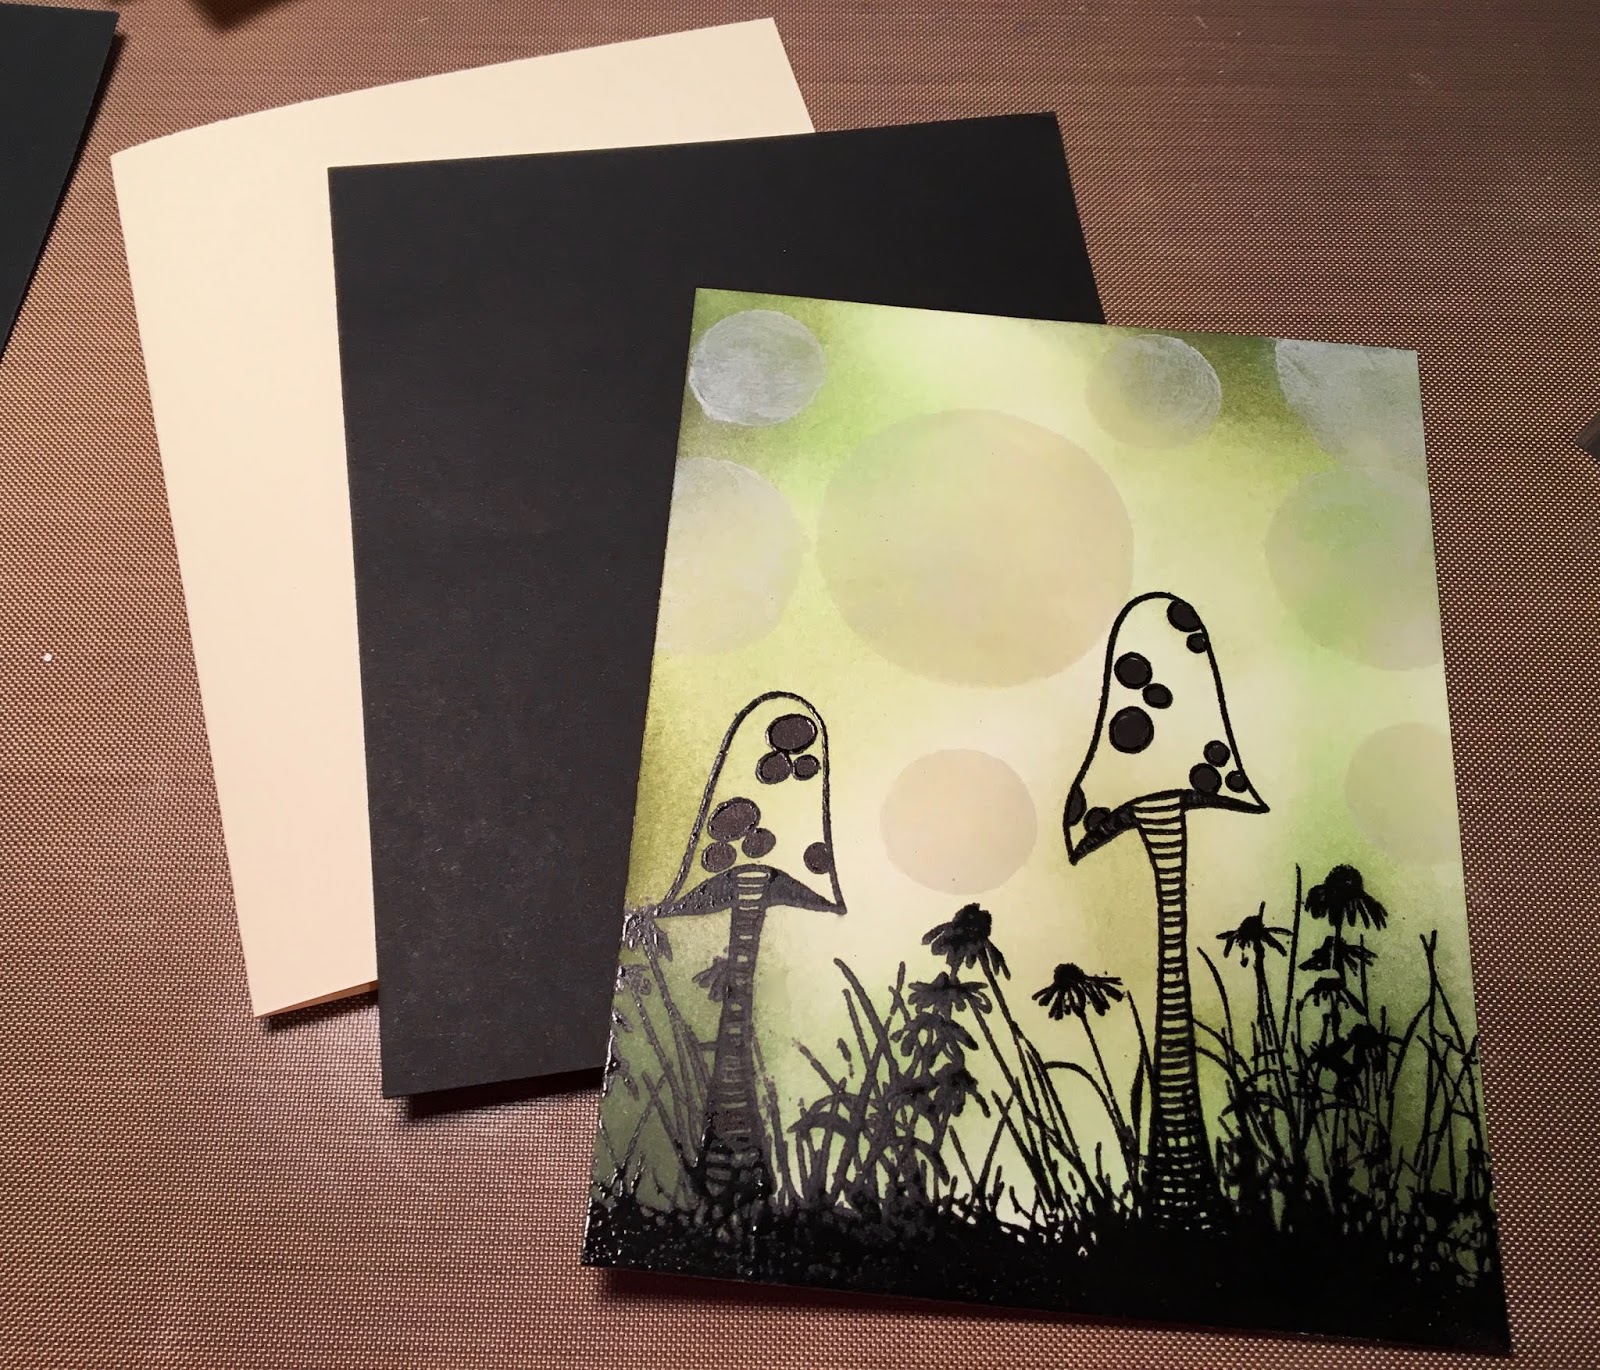
Magical Fantasy!  This group of dies are so much fun to work with because you can really let your imagination go wild!  I have created a fun bokeh background for my fairy.


 Designer Steps:
 1. Use a 4 x 5 1/4 inch piece of smooth white card stock. Before I stamped I used an embossing buddy to remove any oils on the card stock.  Next stamp the mushrooms with Versa Mark ink. I used black embossing powder and heat set
 2.  On the bottom of the card I stamped a field of flowers and grass with Versa Mark ink.  Then I used black embossing powers and heat set
 3.  Using 3 different colors of green ink to create the background by sponging it on
 4.  Get some unwanted card stock and the Cross-Stitched Circle dies to create your 3 different size circle stencils
 5.  Use white opaque ink and a dabber to ink inside the different size circles.  I just placed the circles randomly on my background
 6.  Using the Magical Fairy die cut out the fairy in black then trace her dress to back it with black card stock
 7.  Stamp your sentiment and layer it onto black card stock

 8.  Use a cream colored A2 card base and a slightly smaller piece of black.  Glue the black to the card and then add your stamped background.  Place your fairy on top of the tall mushroom add the glitter to the wings and mushroom stem.  Then add the sparkle stars and white dots to the sky.  Glue down your sentiment and your card is complete
CottageCutz Products


Make sure and stop by our sale this brand new collection is 25% off!  You really don't want to miss out on this fantastic sale!

Blessings
Pam


Thursday, January 24, 2019

Lucky Cupcake!

Hi Friends!

It is Pam creating with you today.  And I have some great news for you!! We are have a 25% off sale on our new Valentine's and St. Patrick's Day dies.  I can't wait for you to see them.  They are just so adorable you are going to want the whole collection.

Today, I am using the St. Patrick's Day Cupcake.  We also have a cupcake for Valentine's Day.  Both of them make fantastic cards or fun embellishments for a baked gift.


Design Steps:


1.  Use an A2 size white card base.  Score at 2 1/8 then flip the card over and score at 2 1/8 again.  This will give you a gate fold card
2.  Cut 2 strips of green card stock at 2 x 5 1/4 and 2 DP strips at 1 3/4 x 5.  Glue them together
3.  Glue the panels to the front of the card

4.  Open the card and cut a piece of light green card stock 5 1/4 x 4.  Glue to the center of the inside
5.  Using the St. Patrick's Day Phrase & More die cut out the sentiment.  Using the St. Patrick's Day Cupcake die cut out extra clovers and coins.  Glue them to the inside as shown and shadow with matching ink
6.  Using the St. Patrick's Day Cupcake die cut out the pieces for the cupcake.  I used green, yellow, black, and brown card stock
7.  Cut out a white circle using the 3rd from the largest Cross-Stitched Circle die.  Add shading to all of the pieces using coordinating ink colors
8.  Assemble the pieces after you have finished shading
9.  Use the 2nd from the smallest Cross-Stitched Circle die to cut the back layer for the sentiment
10.  Cut a 11 x 1 1/2 strip of green then layer a piece of embossed white card stock 4 1/4 x 1 on the middle section.  Wrap the strip around the card to form a band and tape or glue the back closed.  Glue the circle to the middle of the band and pop on the cupcake.  Add the sentiment as shown and your card is complete

CottageCutz Products


Thursday, May 31, 2018

Gorgeous Tulips

Good Morning Friends!

It is Pam creating with you today!

We have a number of sales going on in the store today!  Including a look at our new release which is Just for Guys!!! Which is also on sale for 25% off!  So please check out the online sales!

Today, I am using one of the dies from the Mother's Day release.  I think it is just beautiful and can be used for anniversary, birthday, sympathy and thank you.

Design Steps:
1.  Using the Bouquet of Tulips die cut all of the pieces out in white
2.  Use your markers to color and shade the flowers
3.  Assemble the flowers and tape or glue them to the back of the pitcher.  Glue the bow to the pitcher as shown

4.  Use a black A2 card base cut a piece of polka dot black DP slightly smaller then the base.  Use the second from the largest Cross Stitched Circle and cut a black circle.  Also using the Expression Thanks die cut 3 out and layer one on top of the other.
5.  Pop the pitcher to the black circle and then add to the card.  Glue the thanks to the card as shown
Cottage Cutz Products


Thanks so much for stopping by today! And make sure to take some time for yourself to be creative!

Blessings
Pam