Showing posts with label Circle dies. Show all posts

Wednesday, June 22, 2016

~All About The Journey~


Hello Scrapping Cottage friends! Thanks for taking the time to stop and visit today. It's Mary Marsh here bringing you the Wednesday edition of the Blog.

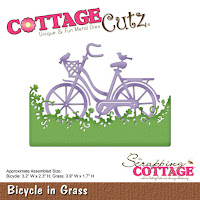
Today for your viewing pleasure, I am featuring a new die set from the May "This and That" release. I have used the Bicycle in Grass die to create a graduation card. We had 3 high school graduations in our family this month plus 3 other of our friends' kids graduated.
 
This card I created for a young woman that we know through our church. I didn't want to create the typical grad card so I made something different an out of the graduation box. It makes me look at m dies in a different light when I am in that mode.
 
So let's get started with some details on exactly what I did here. Since I had already decided on the bicycle die, I looked through my patterned paper for something that would coordinate. Voila! I found this paper with bicycles on it and I liked the color scheme. So I was off and running (lol)!!!
 
Card Base: 5 1/2" x 4 1/4"
Patterned Paper: 5 3/8" x 4 1/8"
 
Next, I cut my bicycle with a maraschino red cardstock. I used the buttons from the Fancy Pocket Plus die and cut them in a honey card stock. For added interest, I used the red cardstock and laced it through the button holes.
 
Decided to place the bicycle and grass in a circle die.  I used a cloud template to sponge in my background clouds with tumbled glass distress ink. It bumps the background up a notch.
cloud template sponged with distress ink
 
sponging finished on circle die

I wanted a different sentiment on the front of the card. Not the usual graduation message. I saved that for the card inside. I found this sentiment stamp but it was too long for my size circle. So I pulled out my stamp positioner and made it a 2 liner.
 
When I use a cling mount stamp, I line it up first on grid paper and then use my clear block to pick it up. This way it's on the block straight.


 Now it's time to mask off the part of the sentiment you don't want stamped. I used painters tape. Ink it up and stamp it on the imaging sheet.  I didn't remove the painters tape at this point.
 
 
 I placed my bike and grass on the circle and then lined up the imaging sheet, with the inked side up. Once it's positioned where you want it, you remove the sheet and stamp the sentiment. Then just repeat this process for the 2nd line of stamping. I took photos of this step and then decided to do the cloud sponging. 


 Now that all the 2 line stamping and background sponging is done, I assembled my card. I added 2 hearts to the top left. These are also cut from the Fancy Pockets Plus dies.


I completed the inside of the card with the typical graduation sentiments. Cut the sentiment layer with the largest CottageCutz rectangle die. Then I cut another layer 1/4" larger in red cardstock.
 
 
Well, friends that's it for me for another week. Just a reminder that our 3rd Challenge is in full swing with a pocket theme. get info here. Until next time........inky hugs!!!
 

http://www.scrappingcottage.com/cottagecutzbicycleingrass.aspx
http://www.scrappingcottage.com/cottagecutzcirclesetbasics.aspx

http://www.scrappingcottage.com/cottagecutzstitchedcirclesetbasics.aspx
http://www.scrappingcottage.com/cottagecutzfancypocketplus.aspx


Monday, March 14, 2016

Lisbeth Butterfly Card

Hi Everyone, Jenny here to show you how to make this sparkly 3D butterfly card. It is a fast card to make so consider making a few.

Let’s get started!

Take a 4.25 x 5.5 piece of cardstock and use this for your base. I used purple, you can use any color. Just match your decorative elements to your selection. I did a fun spray background, you could skip this part to speed up your card making but it adds another layer of texture. Take a piece of white cardstock measuring 4 x 5.25. (I used watercolor paints to match my cardstock choices, pink and purple) Take an old tooth brush and load it with some inky paint. Run your nail down the bristles and spray some color on your paper. The spray is light but noticeable. That is why I used watercolor paints, it dries light. Since I didn’t use a lot of water, the paper did not warp. Set this paper aside to dry.


 While that layer dries, select a complementary paper color and cut a circle with the Circle Set. (Use the third circle from the outer edge) Then cut a white circle with the Stitched Circle Set. (Use the fourth one from the outer edge). I used a pink outer circle with a white inner stitched circle. Attach them together with your favorite adhesive. Set aside and pick two colors for your butterfly. I chose purple and pink. Cut a base butterfly using the solid butterfly from the Butterfly, Lisbeth set. Cut a detailed butterfly from your other choice of color (I added some extra sparkle to my detailed piece with a Wink of Stella pen. This again is optional.). Don’t forget to cut a body too.  Layer them together and add liquid glue along the center piece. Do not glue down the wings. That is where we will get our 3D effect. Add the body on top of the detailed layer as shown. When the body dries, take a pencil or dowel and curl the top layer of the wings around it. This will lift the wings and also show the sparkle details.
 

 To get the dimensional wording, I used fun foam. If you don’t have fun foam you can cut the wording out several times on white cardstock and glue them together to form the base and attach the top layer with your choice of color paper. I used fun foam and cut out the words, “Thinking of you” from CottageCutz Thinking of You set. I cut a set out of pink cardstock and added some Wink of Stella again, to add some sparkle and make it coordinate with the butterfly.


Now that the main piece is dry, take some coordinating washi tape and add some strips down the front of the card as shown. This adds more dimension without adding bulk. ( If you do not have washi tape tear some strips of decorative paper and attach. Use what you have on hand. If you want you can add ribbon, twine, or leave it blank)
 

 Assemble the components as shown in the picture. Attach the white painted cardstock to your base layer.  Layer the butterfly circle piece you created with dimensional squares to give more drama. Attach the “Thinking of you” embellishment with your liquid adhesive. Then you are finished. If you would like more “sparkle” as I did, add some colored sequence randomly around the card.