Showing posts with label Circle Window Slimline. Show all posts

Tuesday, July 25, 2023

Gift Basket Banners With Cottage Cutz Dies


Happy Tuesday crafty friends!
I hope your week is off to a fabulous start! Today I am sharing a fun project...err should I say projects created with some fun dies from Cottage Cutz. Here is what I created.
I created these fun gift baskets and used some dies to create the little banners on each one. It is kind of hard to see them here in this group photo. I wanted to share the whole finished set first. 

Here's a photo of one of the gift baskets before I put the cello wrap and bow, etc. on it. I got these baskets from Hobby Lobby on clearance! I had to make 4 baskets for a teacher appreciation event our Chamber of Commerce is hosting next week. I filled the baskets with items that a teacher can use. I decided to decorate the baskets with these cute hanging banners. I strug the 4 banner panels along some jute and then used some wood beads inbetween each panel.


Here's a look at the #1 banner. I used Kraft cardstock to cut out the double stitched rectangle mats from that set. I then cut some black cardstock to create some mats. I used some foam tape between the two Kraft layers to give it a little more dimension. The Award cup and #1 are from a die as well.


Here's a closer look at the puppy with apple and star banner.

Here's a closer look at the folk art fox die on a banner.

And last but not least, here is a close up of the All star banner. 


Heres a closer look at one of the baskets once the cello wrap was on.

Here's a closer look at the one basket that is a rectangle basket. I was only able to find one rectangle so the other three were in the baskets.


Folk Art Fox


Double Stitched Rectangle Set


Patriotic Pennants (For The Doggie and the bow on the apple and the stars)

Circle Windows Slimline Die (For the Apple)


Baseball Phrases (for #1 and for the All in All star)


Well that covers it for today. Be sure to head over to CottageCutz.com. They are currently having a Christmas in July sale and have some of their world famous Christmas dies on sale!


Don't forget to head over the Cottage Cutz YouTube Channel. There you will find some great video tutorials! Check back each day to see what the rest of the super talented designers are up to! 

Until the next time, have a wonderfully crafty day!

Tuesday, January 03, 2023

Slimline Birthday Puppies Card

Happy Tuesday Cottage Cutz Friends!
Melinda here with you, and today I am sharing a fun and cheerful slimline birthday card. Here's a look at my finished project. I used the sweet little Christmas Puppies Dies from this year's Christmas release.
My card is pretty straightforward. It is a side folding slimline card. I started with a white card base. I cut a piece of paper to 8 x 9. I folded it in half at the 4" mark along the 8" length. I then cut a piece of red cardstock paper at 3.75 x 7.75. After I added that to my card base, I cut out the slimline circle windows base out. I then cut out a piece of the cute dotted patterned paper from doodlebug. I used some foam tape to give the slimline circle window base some lift. I then went to work cutting out the cute little puppies from some plain white cardstock. I then colored them with my markers.

Here's a closeup of the Happy title and the cute puppies in the first - top circle. The Happy title comes from the Fifties Phrase 1 die. I cut those pieces out in plain white and then used my markers to color the backgrounds.


Here is another closeup showing the cute puppy on the second window. I colored him with my markers and then put the paws along the rim.

In this final closeup, I have two more of the cute puppies. I colored them with my markers along with the Birthday sentiment. As for the hearts, I cut out the Whimsical Hearts Slimline die. You get a TON of hearts as part of the negative spaces. I love using them. I colored them with my same markers.

Dies I Used


Today's the last day for the fabulous New Year Sale! So head over and do some shopping and grab some terrific dies at a super price!


Well that about covers it for today! Until the next time, have a wonderfully craft-die day!
Melinda Beltran

Thursday, October 06, 2022

Halloween Kitties

Hello Scrapping Cottage Friends

Super Excited to announce we have a brand new release just in time for all of those amazing Halloween cards everyone makes!! The collection has 22 fabulous dies that are going to make those scrapbook layouts and cards look SPOOKTACULAR!!!  The dies are currently on sale so make sure you get them while they last at this special introductory offer!!

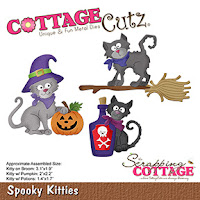
Today, I am using the Spooky Kitties.  It has so many cute pieces.  These pieces could be used in a variety of different ways!  For this card I decided to make a slimline.

Designer Steps:

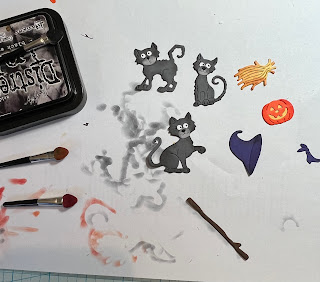
1.  Using the Spooky Kitties die cut out the following colors of card stock:  orange, purple, brown, light and dark gray, yellow and white.  Ink the various pieces with TH inks and then assemble with a fine tip, fast drying glue.  I used a black Glaze Sakura pen for the eyes

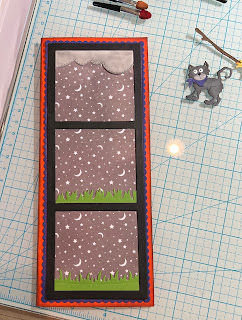
2.  Use an orange 3 1/2 x 8 1/2 card base, cut a piece of purple card stock using the largest of the Slimline Scallop Stitched Rectangle dies, Cut a piece of DP 2 3/4 x 7 3/4,  and finally cut a piece of black using the Window Slimline.  Ink the edges of the orange base in black ink
2.  Glue the purple scalloped rectangle to the orange base then glue down the DP.  Before adhereing the black window frame to the base cut two pieces of green grass using the Grass Slimline die and cut a light gray cloud  using the Clouds Slimline.  Glue the pieces to the back of the black windows as shown above and cut off the extra.  Ink the clouds with a black TH ink
3.  Glue the black windows to the card base do not glue the tops of the grass so you can tuck your cats down into the grass
4.  Arrange your kitties in each of the window glueing the pieces flat to the card base make sure you tuck the kitties feet into the grass.  Add the sentiment and your card is complete

CottageCutz Products


Please make sure to check out this amazing Halloween release right HERE!


We have more inspiration on our YouTube Channel check it out HERE

Thanks so much for stopping by!  And I will see you next Thursday.

Blessings and Take Care


Tuesday, July 19, 2022

Berry Sweet

Hello Scrapping Cottage Friends, 

It is Pam sharing with you today!

We have a new release and it is just plain adorable.  It is called Strawberries and Bees perfect for those fun summertime cards. There are 16 designs in this new collection and you can get the individual dies for 30% off right now! This sale will not last so shop today to get the incredible savings.

Here is my card for today using three new release dies Strawberry Treats 1Strawberry Treats 2, and  Berry Phrases.


Design Steps:
1.  Use a white slimline for the card base measuring 3 1/2 x 8 1/2, cut a piece of white card stock 3 1/2 x 8 1/2 with the Circle Window Slimline die and your final piece is a checked blue DP at 3 1/4 x 8 1/4
2.  Glue the blue checked DP to the white card base and then glue down the Circle Window piece.  Using the Berry Phrase die cut out the Berry in red and the Sweet in black.  Glue to the center circle
3.  Using the Strawberry Treats 1 die cut out the pieces in pink, brown, red, white and green.  Assemble with a fine tip glue
4.  Using the Strawberry Treats 2 die cut out the pieces in pink, brown, red and green.  Assemble with a fine tip glue
5.  Glue the cake in the left circle and the icecream in the right circle 

6.  Using the same dies cut out a few extra strawberries and add then to the card as shown.  To complete the card add some silver sequins

CottageCutz Products

Here is the new release so please check it out in our store today!!

We have more inspiration on our YouTube Channel check it out HERE
Thanks so much for stopping by!  And I will see you next Thursday.

Blessings and Take Care