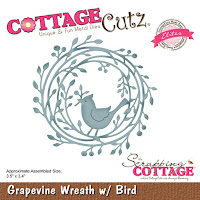
Our Christmas Part 2 dies are available, and on a 25% sale, in the online store. There are 29 new designs in this release. The Christmas Part 1 dies are still on sale as well for a limited time.
The DT has been showing sample cards with the new dies. So if you haven't seen them page back and take a look at all the beautiful eye candy.
For my card today, I am using two of the new dies from Christmas Part 2. I am featuring the Grapevine Wreath w/Bird and the Country Merry Christmas Phrase. So let's get started with some details on how I created my card.
Step 1: This week I started my card with a sketch. I had this one saved to one of my Pinterest boards and I thought it would work well with the dies I used. This sketch gave all the measurements so it made it easy for me to do the cutting. Instead of an oval on this sketch I used my wreath.
Step 2: I already knew I wanted to use this red gingham patterned paper so I layered it with white cardstock and then red for my card base. For the center rectangle, I decided to use wide (1.5") ribbon and layer red ribbon (5/8") over that. Just in case the measurements are to small to read, I have listed them below.
Red card base: 4 1/4" x 5 1/2"
White layering panel: 4" x 5 1/4"
Gingham patterned paper: 1 7/8" x 5"
Die cut the wreath and the merry Christmas phrase using white cardstock.
Step 3: Now that all the card elements are prepared, I am ready to start card assembly. Attached the gingham paper to the white layer panel with double sided tape. Then I adhered the ribbon with Tombow power tabs. I like to use this adhesive with ribbon because it gives a strong hold.
Next, I attached the white wreath and the corner flourishes. I used glue dots on the bird and then Ranger multi matte medium sparingly on other parts of the wreath. I didn't want the wreath to be completely attached. I like the look of it being lifted slightly off the ribbon.
To complete my card I attached the red card base.
Well, that's it for me for this week. I hope I have given you an idea for using this new Grapevine Wreath die. It's a card that you could easily make multiples of. By changing the card colors this could also be a fall wreath for a harvest or Thanksgiving card.
See you next Saturday!
Dies I used to create card:

Red card base: 4 1/4" x 5 1/2"
White layering panel: 4" x 5 1/4"
Gingham patterned paper: 1 7/8" x 5"
Die cut the wreath and the merry Christmas phrase using white cardstock.
Step 3: Now that all the card elements are prepared, I am ready to start card assembly. Attached the gingham paper to the white layer panel with double sided tape. Then I adhered the ribbon with Tombow power tabs. I like to use this adhesive with ribbon because it gives a strong hold.
Next, I attached the white wreath and the corner flourishes. I used glue dots on the bird and then Ranger multi matte medium sparingly on other parts of the wreath. I didn't want the wreath to be completely attached. I like the look of it being lifted slightly off the ribbon.
To complete my card I attached the red card base.
I used the Merry Christmas phrase on the inside of my card. I punched a few white dots and scattered them around the sentiment. I never do much with the inside of my cards. My focus is always on the card front.
See you next Saturday!
Dies I used to create card:


3 comments:
This is a really pretty card, Mary. I love red and white checks, and the paper makes a wonderful background for that lovely white wreath.
Love the large checked background perfect for the beautiful wreath!
I love this card Mary. The checks accentuate the wreath so well!
Post a Comment