Wednesday, September 11, 2024

Winter Whimsical Village


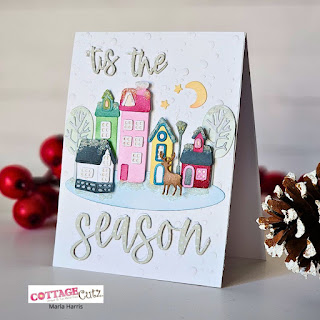
Welcome back, friends. Marla, here today and I thought I would pop in to share this adorable Christmas card I created using "Winter Whimsical Village" from CottageCutz.


I began by using the "Winter Whimsical Village" die to cut out all of my images using Accent Opaque 100 lb. card stock. I was careful to place all of the pieces for each house in their own little pile, before I got to work on inking.


I am a superfan of Catherine Pooler's inks and especially adore the "Spa Collection" colors. For my project, I used "Buttercream, Seafoam, Sage, Hot Tub, Stone Blue, Peppermint Scrub, Pink Champagne and Clay Mask." I also used the neutral tones of "Slate, Over Coffee and Macchiato." I enjoy ink blending, so this is typically my go to for die cuts to customize the images. After I completed the coloring process, I assembled all of my pieces and added foam tape to four of the five houses and the deer.


I considered inking a background but settled on a simple white one. I did want texture, so I used a retired Simon Says Stamp 3D embossing folder to add texture to my card. Any snowy embossing folder would work. I love the clean and simple appearance, and I think it keeps the focus on my scene.


After searching through my dies, I thought the CottageCutz "Tis the Season" die was the perfect sentiment for my card. The playful font worked well with my whimsical village. I die cut it twice from the white cardstock and once using a sage green polka dot patterned paper from my stash. I stacked and glued the white layers together and offset the sentiment cut from patterned paper.


Finishing off the card, I adhered my embossed panel to an A2 top folding card base. I laid out my design and adhered all of the piece to the card front. For a touch of sparkle, I added Nuvo "Fresh Snowfall". I love how small touches, such as this, add so much charm to the design.


Thank you so much for joining me today. I hope this jump start to Christmas gave you some motivation to get inside your craft room. Until next time.....Marla




Head over to Cottage Cutz and do a little shopping today!

Get Social With Cottage Cutz


Monday, September 02, 2024

Halloween Box Card

 Hello Scrapping Cottage Friends

We have a HUGH LABOR DAY SALE GOING ON RIGHT NOW! Check out the fantastic savings HERE. (Sale ends Friday Sept 6th)

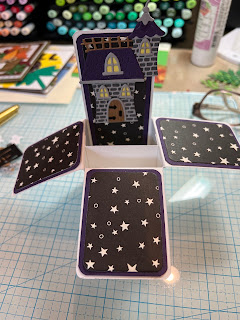
It is Pam here making a small box card for Halloween.  This little box will fit into an A2 envelope so they are easy to mail to friends and family.  The dies I am featuring today:  The Spooky Halloween Castle and the Halloween Victorian Gate are the two main ones.

                       Background Photo by FreePiks

Design Details:

1.  Rather then me explaining the box card base I am attaching a short video https://www.youtube.com/watch?v=XIcjFCe8H74

2.  Your box card should look like this when complete


3.  Use the following dies to create the scene for your box: Spooky Halloween Castle, Halloween Victorian Gate, Spider Web, and Spooky Tree Gnome

4.  Begin to decorate the box.  The flaps and bottom of the box I used a layer of purple measuring (6 each) 2 x 2 5/8 then added the DP measuring (3 star and 3 check) 1 3/4 x 2 1/2.  The back of the box is 5 1/4 of purple and white measuring 5 x 1 3/4

5.  Add the grass 3 pieces measuring 2 x 1

6.  Finish adding the die cut pieces


We have more inspiration on our YouTube Channel check it out HERE

Thanks so much for stopping by! 

Blessings and Take Care


Head over to Cottage Cutz and do a little shopping today!

Get Social With Cottage Cutz

Friday, August 23, 2024

Autumn Friends


Welcome back. Today, I am sharing my first autumn themed card of the year. I've had this sweet "Autumn Friends" die from CottageCutz in my craft room and it was finally time to put these cute critters on a note card.


I began by die cutting all of the images using white cardstock. I die cut them twice and I ink blended them with Distress Ink. I used a combination of "Walnut Stain, Gathered Twigs, Vintage Photo, Antique Linen, Peeled Paint, Twisted citron, Forest Moss, Barn Door, Crackling Campfire, Spiced Pumpkin, Fossilized Amber and Peacock Feathers." Since I had die cut each piece twice, I adhered the two layers together before assembling the images for dimension.


Next, I cut a white piece of cardstock to 3.75"x 5" and used a mask stencil with an oval cutout, from my stash, to create grounding for my scene. I used a combination of "Peacock Feathers, Tumbled Glass, Mowed Lawn" and Forest Moss" for the background.


After adhering my 4.25" x 5.5" pattern paper to a top folding A2 card base. I built my animal scene. The only place I added foam tape was to the back of the fox and pumpkin.


That completes my card. Thank you so much for joining me today. Until next time..... Marla


Head over to Cottage Cutz and do a little shopping today!

Get Social With Cottage Cutz