Friday, September 09, 2022

Merry Christmas Tree

Hello CottageCutz friends! Thanks for taking the time to stop and visit with us today. It's Mary Marsh here bringing you the Friday edition of the Blog.

It's new release time!!! We have new dies in the online store. It's time for our Christmas release and we have 21 new designs for Christmas Part 1. They are currently on sale for 30% off retail.

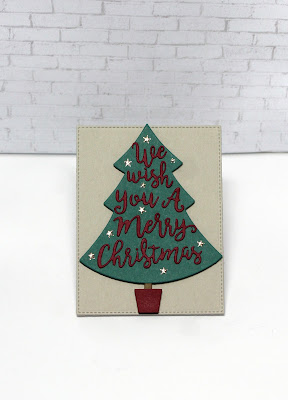
There is a great selection of religious, whimsical and some super cute birds and animals. All of your Christmas card making ideas are covered in this release. Today for your viewing pleasure, I am using the new Merry Christmas Tree die. So let's get started with the details of how I created this card. 

Design Steps:

Since I knew what die I wanted to use this week, I just needed a layout to show it off well. I checked out some sketches online and then found this one from Splitcoaststampers SC922.  I thought it would work perfectly and allow me to use designer paper to take the card up a notch. 
Now that I had my layout, I looked for a designer paper. I found a pattern that's from a 2018 collection that I liked. It has copper accents, so I used a brushed copper cardstock as an accent layer.  I attached it then remembered I forgot to take a photo (LOL). The card base is a rich wine shade- it's named merlot.  

Merlot Card Base: 4 1/2" x 5 3/4"
Brushed Copper Layer: 4 1/4" x 5 1/2"
Designer Paper: 4 1/8" x 5 3/8"
I cut the tree image in a blue-green cardstock paper and the Merry Christmas phrase in a rich wine shade both coordinate with the designer paper. Used the largest (3 1/4" x 4 1/4") Stitched Rectangle die cut in a sand cardstock as the frame for the tree image. 
Now for the element of the sketch with the horizontal lines, I decided not to cut the designer paper into strips. Instead, I cut 1/4" strips of the copper brushed cardstock and used those to divide the designer paper. Sketches are open to your interpretation, as long as you keep the layout looking similar.  
Next, I attached the tree to the rectangle image panel with dimensional adhesive. Then the rectangle panel to the designer paper layer also using dimensional adhesive. This adhesive was just a bit thinner to give a slight lift from the designer paper.  I also cut new stars for the tree image in copper brushed cardstock. The photo above shows them in gold. Added a few enamel dots to the image panel just for interest. 

To complete my card, I attached the panels to the card base with double sided adhesive. That's it for me for this post. I hope I have given you an idea for a way to use this new die. See you next week. 
Reminder: Our YouTube Channel has a new video from Linh Van. There is a giveaway for being a subscriber, liking the video and leaving a comment. Click here.

Die I used to create card:


Thursday, September 08, 2022

Last Day for the Labor Day Sale - Christmas Reindeer

Hello Scrapping Cottage Friends

It is Pam crafting with you today!

TODAY IS THE LAST DAY FOR THE LABOR DAY SALE WITH SAVINGS UP TO 65% OFF!  It ends tonight at 9:00 PM Pacific Time.  Click HERE to grab your savings before it is to late.

Included in this fantastic sale is our  NEW RELEASE!!!  THIS COLLECTIONS IS PERFECT FOR AN EARLY START ON YOUR CHRISTMAS CARDS!!   The release is Christmas Part 1 and has 21 fantastic dies. The release includes everything from Gnomes to Reindeer!! 

Today,  I am sharing a card with Jolly Reindeer w/Sleigh and the Christmas trees from Christmas Tree Peekers.  


Design Steps
1.  For the base of the z-fold card I used a red piece of card stock 4 1/4 x 11.  Fold the card in half and then fold the front fold in half again.  Cut 2 white panels at 2 5/8 x 4 1/8 and one at 5 3/8 x 4 1/8
2. Run the panels through an embossing folder for the snowy effect.  Glue the panels to the red base
3.  For the little z-fold cut a red strip 1 x 11 inch strip.  This strip is scored at 2 3/4 x 5 1/2.  The white pieces measure 5 3/8 x 3/4 and two pieces 3/4 x 2 5/8.  The white pieces are then embossed and glued to the red strip
4.  Glue the z-fold strip to the card.  I find the best way to do this is to close the card. Place the glue on the first portion of the long strip and on the last flap.  Lay the strip which is fold down on the closed card
5.  The card should look like this if the strip is placed correctly
6.  Using the following dies Jolly Reindeer w/Sleigh and Christmas Tree Peekers cut out the pieces in: red, brown, dark brown, silver, tan, blue, gold and green.  (The trees are not pictured)
7.  Use ink to shade the reindeer and bag.  Assemble the pieces using a fine tip glue

6.  Add the two reindeer and the sleigh to the front of the card on the 1 inch strip using a fine tip glue as shown above
7.  Open the card and add the third reindeer and a tree.  To finish the card off I added another tree on the back panel,  Merry Christmas, topped the trees with gold stars and added a few snowflakes


CottageCutz Products


Don't forget to check out all of the new release Christmas dies! You don't want to miss out on the great prices!


We have more inspiration on our YouTube Channel check it out HERE

Thanks so much for stopping by!  And I will see you next Thursday.

Blessings and Take Care


Wednesday, September 07, 2022

Here Comes Santa Clause!


Hi everyone! Linh here and I have a new video up on the Cottage Cutz YouTube channel. The holidays will be here before you know it!  The first Christmas collection has just released and there are some really fun sets to play with.  On this card, I'm featuring the Nordic Santa & Reindeer along with the Wintery Village to create this fun night scene! They say a picture is a thousand words, so I've left the sentiment off this time.


Tuesday, September 06, 2022

Easy Birthday Card

Happy TuesDIE Cottage Cutz Friends!
Melinda here with you on another Terrific TuesDIE. Today I am sharing a fun and very easy card I created featuring dies that are part of the Great Labor Day Sale Happening Now!

Here's a look at my completed card. This is a shot of the outside and the inside.


Here is what it looks like when closed. It is a standard A2 side folding card. 

The base of the card is a piece of Kraft cardstock cut at 5.5 x 8.5. It is folded to make it a 4.25 x 5.5 size. I then cut two pieces of patterned paper at 4 x 5.25. I mounted them on to each side of the inside of the card. 

Next I cut a piece of Kraft cardstock to 1.75 x 8.5. I then folded it in half and then folded those two halves in half again. This made four equal panels. I then made sure the folds were valley, mountain and valley. I then cut a piece of patterned paper to 1 5/8 x 4. I folded that in half with a mountain fold. Once I did this, i adhered the patterned paper to the center of the Kraft paper strip. Mountain on mountain.


I then applied adhesive to the backs of the two end squares. I adhered one side down roughly in the center and about a half inch from the edge. I then held the folded squares down and closed the card. I burnished the card onto the square with the adhesive so that upon opening back up, it would be solidly adhered to the opposite flap.

I opened it back up and then decorated the flap. I added a scallop, eyelet stitched square from the die set to each end. To their centers I added a piece of matching paper and then a pretty butterfly from the Kayla butterfly die. To the center two squares, I added a smaller square in Kraft cardstock with two hearts from the Stitched heart die set.

Here is another photo of the card opened.

Here is a closer look at the front of the card opened. I added a mat of patterned paper and then two hearts, one white and one Kraft from the stitched heart set. I added another butterfly. For the butterflies, I started with plain white cardstock (actually one was Kraft cardstock) and then colored them with my markers to give them that gradient colored look. I adhered the butterfly to the center of the heart. I die cut the happy birthday in white cardstock and then used my markers to color them as well. For the happy, I just angled it around the heart as I adhered it. For the dot of the "I", I used some stickles.

Here is one last look at the finished card. This is a real easy and quick way to add a little extra something to your cards with minimal extra effort. Plus the sky is the limit on the sizing and style options for this. It is a real easy go to!


Don't forget to head over to the CottageCutz YouTube channel and check out all of the amazing projects on there. Our video team is doing a wonderful job of filling the channel with all sorts of creative content! You don't want to miss it!

Nested Stitched Eyelet Square Set

Stitched Heart Set

Happy Birthday W Shadow


Don't forget about the great Labor Day Sale Happening now!
Sale ends Thursday, September 8, 2022 at 9:00 PM Pacific Time.
Shop Now For Best Selection!!!!


Well that about covers it for today! Until the next time, have a wonderfully craft-die day!
Melinda Beltran


Monday, September 05, 2022

Peeking Reindeer Window Shaker


Happy Monday CottageCutz peeps!  
 
Kris here with a card featuring the cute Peeking Reindeer Window die from the NEW CHRISTMAS RELEASE!  I thought with all the open spaces, it would be perfect for making into a shaker ~ and I even had some snowflakes and star sequins to put inside! 

Great News for YOU!!

This whole Christmas Release 1 bundle is 50% OFF for a limited time! And the individual dies are 30% OFF!!

And don't miss our BIG LABOR DAY SALE!! Up to 65% OFF so many dies -  Sale ends Thursday, September 8, 2022 at 9:00 PM Pacific Time sHURRY OVER and save!!!  

~ DESIGN STEPS ~

Creating the Card Base:

The design papers I used are from the Christmas 2019 collection at Divinity Designs.  The glittered cardstock is from the Park Lane collection at Joanne's.

From the following, I cut and attached in this order:

Thick White Card Base:  5-1/4" square 
Purple Cardstock:  5-1/4" square
Large Snowflake Layer:  5" square
White Glittered Cardstock:  5" x 2" - cut the top off with a die from the  Hills Slimline set

Creating My Shaker:

1.  I die cut my Peeking Reindeer Window 3x:  white glittered cardstock, tan, and black.

Since this die is all one piece, you COULD cut it from white cardstock and color the different parts, but since I wanted the icicles to be sparkly, I went ahead and pieced my die cuts.  

2. From the glittered white die cut, I carefully cut away the images of Santa's sled and flying reindeer, leaving a nice straight edge for the window pane.   


3.  From the black die cut, I did the same, except I cut away the window pane and left the Santa & reindeer all in one piece.  I then glued it behind the window as shown.


4.  From the tan die cut, I carefully cut the reindeer out.  I then added some Vintage Photo Distress Oxide ink over his head and feet, and just a tiny bit of the antlers to give him more dimension.  I cut out the eyeballs.  (Sorry!  but they were brown after I sponged ink and wanted to color them green, so with scissors, I simply cut those away.)  I colored the eyeballs and nose with Copic markers.


5.  I added some 1/8" Score Tape around the outside edges of the window on the backside.  

6.  I cut a piece of acetate to 3-1/2" and attached it to the back of my window. 


7.  I then added 1/8" foam strips on top of the acetate, just around the outer edges.  Then added my shaker elements in the middle.  Removed the backing from the foam strips. 

8.  I cut a 3-1/2" square from the light purple with snowflakes paper from the design pack and placed it upside down on my foam strips to cover the back of shaker. 

9. Then I glued the shaker to my card front.


10.  I thought it needed a sentiment, so I cut a pennant from the Windows Slimline set.  Then I stamped "Ho Ho Ho" (from a Stampin' Up! stamp set) in light blue, medium blue and purple, fussy cut them out and glued onto the pennant.  Then I attached with thick foam strips to my card front, and done!


Thanks so much for PEEKING!  :)  

Products I used:


We'd LOVE to see what you do with this fabby Christmas Release!

~Kristine