Sunday, October 03, 2021

From our Gnome to yours

Good morning Cottagecutz Fans, it’s Wendy bringing you the blog today. I really hope your enjoying your weekends. Mine was spent crafting (of course) and long doggy walks with hubby and Border Terrier Betty. 
ANNOUNCEMENT: Don't forget to check out the new video on our YouTube Channel - there is a stamp giveaway for subscribing, leaving a comment and giving a thumbs up on the video. Click here. We are giving away the Country Farm Cows die that was used in the video.

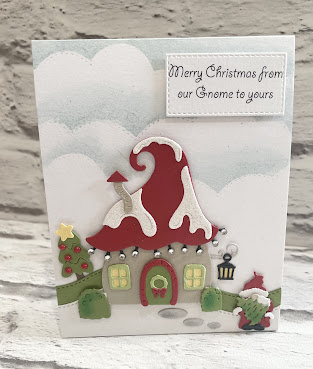
Todays card is made using my favourite die ‘Snowy Gnome Home’. What I like about this die is there are so many elements, you can just pick a few to use on a tag or mini card.


Firstly I made a white card measuring 5.5” x 4,5”. I then cut the ‘Slimline Clouds’ die so I could use it for a mask to create the background. I used quite a muted distress ink (Speckled Egg) as I wanted it to feel wintery. Again I have used a brush to apply the ink. Start half way up the card and move the mask up and you will get a really lovely design


Next I cut out the ‘slimline hills’ in both green and white. I thought this gave the appearance of snowy hills. I applied to my card and trimmed the excess


Now I have cut out all the elements from the die I wanted. I’ve assembled the smaller parts just so I don’t lose them


Finally I added all the elements on my card. To finish off I used some chalk to highlight certain parts, like the stones. I also used some flat back crystals t for the lights under the mushroom


I printed a sentiment to finish the card which I thought was cute. I used the nested stitched rectangles to cut it out. So that’s my card done


I really hope you like the card and it has given you some inspiration. So I will see you on Friday with another blog post. Have a wonderful week and make sure you find time to craft
Wendy

Dies I used


Saturday, October 02, 2021

Christmas Puppies

Hello Scrapping Cottage Friends,

It is Pam creating with you today!

ANNOUNCEMENT: Don't forget to check out the new video on our YouTube Channel - there is a stamp giveaway for subscribing, leaving a comment and giving a thumbs up on the video. Click here. We are giving away the Country Farm Cows die that was used in the video.

I have some great news OUR NEW CHRISTMAS RELEASE IS HERE!!  AND IT IS SO DARN CUTE!! AND EVEN BETTER NEWS IT IS ON SALE RIGHT NOW IN THE ONLINE STORE!  

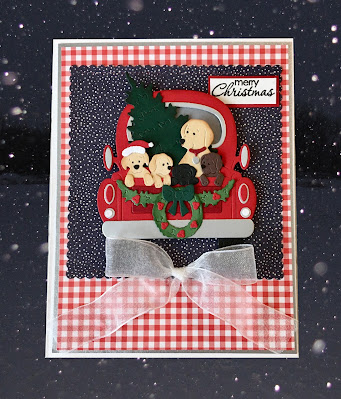
I am using what I think is the sweetest die in the collection. It is the Holiday Truck w/Puppies! 


Design Steps:

1.  Use the Holiday Truck w/Puppies and cut out all of the pieces using: green, dark green white, tan, black, brown silver red, and dark red
2.  Using a variety of inks and a small applicator shade the pieces and then assemble with a fine tip glue
3.  For the base use a white A2 card, silver card stock 4 1/8 x 5 3/8, red checked DP 4 x 5 1/4 and cut a piece of snowy DP cut with the largest Stitched Scalloped Square die
4.  Glue the silver to the base card next the red checked and last the snowy square as shown
5.  Pop up the truck, stamp and layer your sentiment on red glue to card and add the bow.  Your card front is complete

6.  I decided to use some of my scrapes inside the card so I added a 1/2 x 4  strip of the red check paper and one of the little pups

I had two wonderful labs so this card is really special to me.  The white lab was Cookie and the black lab was Magic.  I miss them so much!  They were such fantastic dogs!  Don't forget to check out the sales things go pretty quickly!!

And don't forget to check out the CottageCutz YouTube channel. We are starting to publish videos there again. If you subscribe, comment and like the video, you will have a chance to win the Country Farm Cows die used in the video. 

Blessings and Take Care

Pam

CottageCutz Dies


Friday, October 01, 2021

Special delivery


Good morning wonderful Scrapping Cottage fans. I hope you’ve had an amazing week. We’re already at Friday, where did the week go? It's Wendy bringing you the end of the week blog today and here’s today’s card


So we are in October which is my favourite month as I have my birthday, and I also get to do a blog post on my birthday, so expect something sensational!

I'm very excited to be using some of the new Christmas designs which are AMAZING! You just have time to get 30%  off the dies if you order by 9pm PCT


So here’s a light tutorial for you.

I’ve started with a navy slimline card and have added some snow using the ‘Hills Slimline’ dies. I love the versatility of these dies so one to pop in your basket. The second layer has been mounted with 1mm 3D foam pads so I could slot various items behind there

To make the main body of the card I’ve used the ‘Santa’s delivery’ die. I love the cheeky Santa, the cute reindeer and the plethora of gifts. The large trees have also been taken from this die and I think Santa has been naughty and taken a star off the tree :-) Everything is very easy to assemble and what I like about CottageCutz is that the colours you need for each element are grouped on the die so you haven’t got card all over the die 

For the smaller trees I used the new ‘Ice Skating Kids’ die

Finally I used an older die but still really handy and that is ‘Santa stuck in Chimney’ I thought this was great to leave the presents in.

As it’s the weekend, I have a bonus card for you


This is such an easy card to make. I have used the new ‘Joyful Snowman’ die. All of the elements to spell the word Joy have been cut out 3 times and layered to give them a chipboard effect. I have also used the ‘Nested stitched Scalloped Rectangles’ to put on the base card. I have finished off by using a white pen to highlight the gold elements and some flat backed pearls on the holly

I really hope you like the cards and you’re inspired to start making your Christmas cards 

Have a wonderful weekend and make sure you have plenty of time to craft.

ANNOUNCEMENT: Don't forget to check out the new video on our YouTube Channel - there is a stamp giveaway for subscribing, leaving a like and a comment. Click here.

Dies I have used


Thursday, September 30, 2021

Announcing Additions to the Design Team

Today I have the pleasure of announcing two new additions to the CottageCutz Design Team.


Melinda Beltran 

Hello crafty friends, I’m Melinda. I have always had a crafty heart but fell in love with paper crafting by learning to scrapbook several years ago. I enjoy creating cards, scrapbook pages and fun dimensional and home decor projects. 

I enjoy blogging at My Paper Crafting and sharing with others! I have been married for 31 years to my better half who has always been so supportive of all my crafty endeavors. I have three grown children, two dogs, and one grandson!  I hope my creations will inspire you and encourage you to create and let your own crafty light shine! 

Melinda will be posting on the Blog on Sundays. 


Theary Chea
Hello there! My name is Theary Chea and I am a mother to three beautiful children. We live in Southern California along with our two fur babies. In my free time, I enjoy doing outdoor activities with my family and of course, crafting. 

Crafting has always been therapeutic for me, especially while caring for a family of five. You can find me on Instagram at CloudyCoralDesigns and YouTube at Cloudy Coral Designs 

Theary will be part of our YouTube team and posting on the 1st and 3rd Wednesdays each month.

And speaking of YouTube, CottageCutz will be posting on our channel every Wednesdays. The first video went live this past Wednesday. For a chance to win the Country Farm Cows die that was used in the video, go to our channel and subscribe, like and comment. Link to CottageCutz YouTube channel here. 


Wednesday, September 29, 2021

Country Farm Mini Slim Line Card


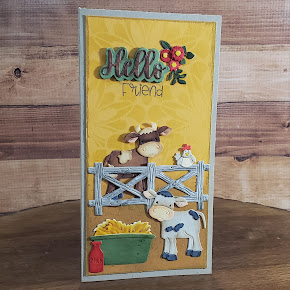
Hello, my crafty friends.  Marla here with my first design team project over on the CottageCutz YouTube Channel.  Today, my card features products from the Country Farm release.  I love farm animals, don’t you?  I appreciate how you can change colors and accessories and use the images for every season. 


I’d love for you to join me to see how this fall inspired card came together. While you are at it, don't forget to click "subscribe" and ring the bell so you are notified when a new video has been uploaded. Card details can be found here Country Farm Mini Slim Line

 Cottage Cutz products used:


Country Farm Cows


Farm Tractor w/Trailer


Hello w/Shadow


Tuesday, September 28, 2021

Baking Spirits Bright

Good morning happy scrappers. It’s Wendy bringing the blog to you today. I hope you had a wonderful weekend crafting. I think it’s Christmas all the way now :-)

Today I’m bringing you one of my favourite dies from last year, Baking Spirits Bright. I’ve also used a very old die which is still available and that’s the Baking Pan & Utensils


To make the base card I have used a stencil with brickwork and worked through Pumice Stone distress ink. Make sure you mask the area that you don’t want coloured. My preference for applying colour is with brushes 


Next I have cut out all the snowman and their accessories. I have started putting together some of the smaller items otherwise I am likely to lose them 


Next I have fully assembled the snowman and to add a bit of fun I have added some white gelato media so it looks like icing sugar / flour


Finally I have added all items to the card and also added that baking tray with a few gingerbread men. I’ve also printed some wording to add to my card as I couldn’t find a stamp that was appropriate


I really hope you like the card. Have a wonderful day and make sure you make time to craft
Wendy
Here are the dies I used


Monday, September 27, 2021

Slimline Windows
Hi everyone my name is Monica and today is my first official post for The Scrapping Cottage and I am so excited to have been given this amazing opportunity. Today I am sharing a slimline card which features the super cute "Farm Animals" from the Cottage Cutz shop!! 
SLIMLINE CARD FRONT

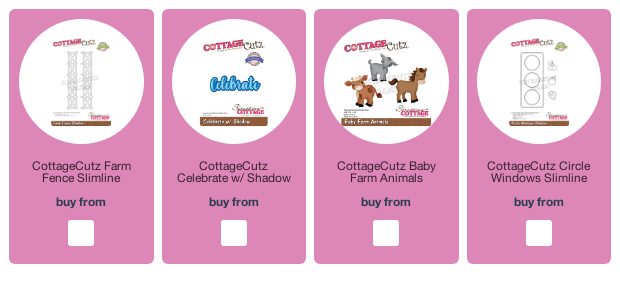
1.  I used watercolor paper (Fabriano) and die cut the "Circle Slimline Window" 

2.  Once done I then took a cloud stencil I had in my stash with some oxide ink in "Broken China" and blended some clouds on the front in various places

3.  I made the center circle a shaker by covering the opening with acetate and then used foam tape along the outer edge of the circle - next drop in some shaker elements and walla instant shaker!


4.  I die cut the farm animals on some blending paper and colored each with my copics and added a touch of shading to bring my animals to give them some life and finally I used the Celebrate Shadow sentiment to finish my card off…


Below is a quick video show you how I created this fun slimline hopefully it’s not too painful to watch 😜


PRODUCTS USED:

Sunday, September 26, 2021

Furever Friends

It's Anja here for my last Sunday post. Before I show you my latest card I have an announcement to make. After four and a half years as a Cottage Cutz Design Team member I decided to take some time away from crafting. There's a new exacting role waiting for me in the next weeks and I'll have a lot less time for crafting. 

It was so much fun making all the cards and paper projects using Cottage Cutz dies. Thank you to The Scrapping Cottage team for giving me this opportunity. This dies are forever going to be my favorite dies to work with. And I hope that in between diaper changes and all the feedings I'll still be able to follow all the new releases and projects from the talented ladies on the team. And maybe also make a card or two :)

And now to my last card. I again combined a set of stamps and slimline dies. This time I made a bunch of furry friends with a scenic background.

For this card I used:

- Cottage Cutz dies (Lil' Bluebird Designs Forest Friends Stamp Set, Lil' Bluebird Designs Forest Friends Die Set, Mountains & Trees Slimline),

- Zig watercolor brushes (010, 029, 040, 041, 047, 052, 060, 061, 062, 063, 065, 066, 069, 070, 071, 072, 091, 093, 096, 099, 260),

- Distress Inks,

- watercolor paper for stamping,

- white card stock for die cuts and background (9,5x20,5 cm), 

- white card base (21x10 cm),

- black pigment ink,

- acrylic block,

- watercolor brush,

- washi tape,

- paper glue. 


First I stamped and colored all the images. I made more to have more options to make a scene in the end. This time I used watercolor brushes for coloring.  

Next I made all the background pieces. I used Mountains & Trees Slimline and it's so easy to make a beautiful background scenery with it. I just colored all the pieces with Distress Inks and glued one on the top of another. Then I glued this paper sandwich to the card base. 

Before adhering the last piece I stamped the sentiment in the right corner. 

Last I added all the animals and colored pieces and adhered it on the background scene. And my card was done. 


Thank you for visiting the blog and leaving all the comments. I hope that my projects gave you some crafty inspiration over the years.

I wish you all a nice Sunday and all the best in the future.

Anja Z.


Cottage Cutz stamps and dies I used: