Tuesday, September 14, 2021

Happy Birthday from the Safari Gang


Hello wonderful Cottagecutz friends, thank you for taking the time to visit us today. It's Wendy bringing you not only the blog, but my first blog with Scrapping Cottage. Today's slimline card is made with a birthday in mind but could be used for a birth announcement and many more occasions.


To begin with, I cut out a long strip from the 'Clouds Slimline' die onto white card to use as a stencil. What I really love about the slimline dies is that they are long enough to cover the whole of your card and then some. This means that you don't have to be so uniform with your positioning of the stencil. I used a distress ink and a brush to get the desired effect. Start approx. half way down the card and then move the stencil up to achieve a  perfect cloud formation


For the next part of my design I used the 'Grass Slimline' die. I cut it out twice. One approx. 8cm high at the tallest point and one approx. 4cm high. The tallest grass I adhered straight onto the card using an acrylic glue. The 2nd level I used 1mm foam pads but I only popped these on the bottom as I wanted to imbed some of the animals into the grass


Next I cut the remaining dies I needed for my project. I will list these at the end as I have used quite a few. I'm a fan of textured and pearlescent card and this will be a running theme for me through most of my posts


Once assembled, here is the basic card. It needs a few little touches to bring it to life though which I will show a couple of photos down


In anticipation of the final card, I just wanted to give you a top tip when gluing the sentiment to its shadow. Cut the desired word and pick up it up with low tack tape, that way you can add the glue exactly where need it and once you turn it over it is easy to transfer to the shadow or even directly onto the card


So, some finishing touches for the complete card. I have used some chalks to bring the tree to life as well as the water pool for the hippo. I also using flat backed pearls for the animals eyes as I think they look super cute and realistic. 


I really hope you like the card as I have had such fun making it

Dies I used to create the cards:


Announcing the new Design Team

Today I have the pleasure of announcing the newest members of the CottageCutz Design Team. 

We had so many wonderful applications, and really enjoyed viewing all your beautiful work & talent. It made the process of narrowing down quite difficult. We want to thank all of you who took the time to apply for the open positions.

So without further ado, please let me introduce the newest additions to our team:

Marla Harris
I have been married to my high school sweetheart for 37 years and am the mother of two grown boys. I gained a beautiful daughter-in-law in October of 2020 and I am anxiously awaiting the arrival of my first grandchild (spoiler, it's a girl) due October 3rd or sooner!

I have been making cards for about 7 years, but really became passionate about it two years ago. I am pretty eclectic in style and love to dabble in a little bit of everything. I am happy playing with florals, cute animals, stamps, dies, you name it and I love it.

I am so excited to be working with CottageCutz. Their products have been a staple in the crafting world for many years now, and I am honored to play my small part in bringing you design inspiration. I hope you'll join me on YouTube and we can get crafty together.

Monica Edwards
I am mother of two and one handsome grandson name Jace who is the apple of my eye. I make my home in Florida, the sunshine state.

I love all things crafty. I have been crafting as far back as I can remember. I truly love, through my work, to inspire others to step out of their comfort zone and do what they love most!  

Wendy Mind
I live in London England with my darling hubby and border terrier Betty. My crafting life began nearly 20 years ago and in that time I have written for the top craft magazines in the UK and have taught classes and demonstrated at trade shows. 

I found Scrapping Cottage about 8 years ago and I dread to think how many dies I own. I am so delighted to be part of the CottageCutz design team as they have a unique USP which fits with my style. I am a detail girl and I get this from the wonderful designs provide by the team.


Congratulations Ladies and welcome to the CottageCutz Design Team! We know our Blog viewers will love the designs you will share using CottageCutz Dies!!! 


Sunday, September 12, 2021

Birthday Wishes

It's Anja here. Today I have a simple card for a little girl's birthday. She loves pink color and cats. And with the new stamps and slimline dies it's so easy to make a quick and cute card for any occasion.


For this card I used:

- Cottage Cutz dies (Lil' Bluebird Designs Kitty Love Stamp Set, Lil' Bluebird Designs Kitty Love Die Set, Lil' Bluebird Designs Happy Birthday Stamp Set, Lil' Bluebird Designs Happy Birthday Die Set, Star Window Slimline),

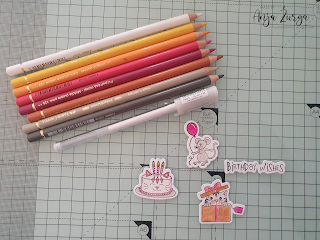
- Faber Castell Polychromos Color Pencils,

- patterned card stock for die cuts,

- purple card stock for card base (22,5x19 cm),

- black pigment ink,

- acrylic block,

- glitter brush, 

- white pen,

- washi tape,

- paper scorer,

- adhesive foam pads,

- scissors,

- paper trimmer,

- paper glue. 


First I stamped and colored all the images and the sentiment and cut it out. I used washi tape to hold the dies in place for the cutting part. I used white pen to emphasize the images. 

Next I made the card base. I trimmed and scored a piece pf purple card stock. I also used the Star Window Slimline with the patterned paper. 

Last I added the images a touch of glitter and used adhesive foam pads to attach it on the card base.

 
Then I assembled the card together and my project was done.  


And that's all from me for today. Have a nice week and see you again on Sunday.

Anja Z.


Cottage Cutz stamps and dies I used:


Saturday, September 11, 2021

Celebrate in the City

Hello Scrapping Cottage friends! Thanks for taking the time to stop and visit with us today. It's Mary Marsh here bringing you the Saturday edition of the Blog.

IT'S NEW RELEASE TIME! The Scrapping Cottage has just added a new brand to the company line. Lil' Bluebird Designs is being introduced with 16 new Photopolymer Clear Stamp Sets and 16 coordinating dies. There are stamps for so many of your card making occasions and then some. The coordinating dies just make it a perfect fit for your card making designs.

They are currently on sale at 25% off. And speaking of new releases, we have just introduced new CottageCutz Sentiments with Shadows. There are 12 phrases in this new release and you can pick these up at a 25% off price as well.
The shadow dies are so popular right now and they coordinate so well with the new Lil' Bluebird Stamps and dies.

Today for your viewing pleasure I have created a slimline card featuring the new City Skyline Slimline + Pinking Shear Edge Slimline dies. For my sentiment, I chose the new Celebrate w/Shadow die. 

I needed a birthday card for my nephew. I like to create his card with patriotic colors of red, white and blue. He is a vet and served 4 tours of duty in Iraq. And, I am proud of him and like to honor his service. So let's get started with some details on how I created my card.

Design Steps:
I wanted a fireworks background for my city skyline scene but I didn't have any of that type paper in my stash. So I looked on Pinterest and found some Fireworks paper that you could download for free. Whoo-hoo it was just what I was looking for! I printed it on 8 1/2" x 11" cardstock. So I will have some left to use on another project.
I decided I wanted the pinking sheer edge to frame my city scene. So I used the largest die 3 1/2" x 8 1/2" and cut in red cardstock. Then I took the next size die and cut again to get my frame. I like how it adds to the festive appeal of my card. The card base is also red.

Red card base: 3 1/2" x 8 1/2"
Designer Paper: 3 1/4" x 8 3/8"
Pinking Shear Edge: 3 1/2" x 8 1/2"
Next, I cut the city skyline in a royal blue cardstock. And the Celebrate phrase in red and the shadow in white for contrast.  
I decided to stamp some sentiments directly on the designer paper. I used the "celebrate" & "birthday wishes" words from the Lil' Bluebird Designs Happy Birthday set. And the word "party" from the Kitty Love set. 
Now that all my card elements are prepared,  I am ready to start card assembly. I attached the designer paper to the card base with double sided tape. The city skyline is also attached with double sided tape. 
For the pinking shear frame, I used Tombow Mono liquid glue. 
To finish off my card I added my celebrate phrase and scattered some sequins to the center of the fireworks. And, that's my sample for this week. 
I hope I have given you an idea for the new Slimline dies as well as the stamps from Lil' Bluebird Designs. See you next Saturday!

dies I used to create card:


Friday, September 10, 2021

Thanks A Latte

Happy Friday!  It's Jeanne today with a thank you card for the coffee lover in your life.  In my case the biggest coffee lovers I know are ME and my husband!  I drink it all day long and even have an espresso machine. Naturally I love the new Coffee Time stamps and dies from Lil' Bluebird Designs.


For this card I created my own patterned paper by stamping some of the images at random on a piece of 4 1/4 x 5 1/2 inch Crumb Cake cardstock.  I say random, but it wasn't completely.  I knew I was going to highlight one of the coffee cups so I needed to make sure at least one was off  center and did not overlap the edge.  To fill in the space between the cups I used the coffee beans.

For my color on this card I chose red.  I colored one coffee cup using Prismacolors and then die cut the Thanks w/Shadow sentiment in coordinating colors.  I used Soft Suede, a brown that is slightly darker than the Crumb Cake.

I stamped the sentiment Thanks A Latte slightly off center on my card using black ink.  I wanted to make sure it stood out from the background.

Then I added my sentiment with shadow on top.  This makes a strong focal point and covers the top line of stamping nicely.  I had originally planned to mask off the sentiment but this works just as well and is easier!


Finally I popped up my coffee cup using foam dots.

This card can be made in any color and would also look great on white with pastel colored images stamped in the background.

Be sure to visit the online store.  The big Labor Day Sale ends tonight September 10 at 9:00 pm Pacific!

Products used: 


Thanks for visiting today.  I hope you have a fun and creative weekend.