Thursday, August 19, 2021

Missing You

 Hello Scrapping Cottage Friends,

It is Pam creating with you today on the blog!

It is time to make the CottageCutz family a little bigger.  We are adding a brand new line of Photopolymer Clear Stamps call Lil' Bluebird Designs.  We are kicking off this new line with 16 new stamp sets that have coordinating dies.  Make sure to check all of them out by clicking HERE

 Today, I am featuring the Forest Friends set.  I have family all over the country so I love sending Miss You cards to them.

Design Steps:

1.  Use a Slimline card which measures 8 1/2 x 3 1/2.  Cut a piece of blue DP 3 1/4 x 8 1/4,  also cut out 3 white Windows using the Window Slimline die
2.  Stamp your images in Memento Black ink using the Forest Friends Stamp set
3.  Color the stamped images with Copic markers.  The colors I used are in the picture above.  After you are finished coloring use the Forest Friends Coordinating die set to cut them out
3.  Glue all three frames together then glue the blue DP to the back of the frame.  Use the Spring Grass die to cut out 2 pieces of grass on green card stock.  Cut the grass down to 2 1/2 inches and glue them into the bottom two frames as shown

4.  Using the Lighthouse w/Clouds die cut out 2 white clouds. For the little hearts I used the Love Cupcake die and red card stock.  I cut out 3 hearts.   Glue all of your pieces into the frame as shown above.  Add the sentiment, sequins and hearts and your card is complete

CottageCutz and Lil' BlueBird Designs


Thanks so much for stopping by today!  Please check out all the adorable new stamp set we have in the online store!
Blessings and Take Care
Pam

Wednesday, August 18, 2021

Birthday Wishes!

Hello!  This is Sukie and I'm back with a post for my design team day!  For today's card I went with a CAS (clean and simple) design with a pop of color for the background.

The images were stamped with the Lil' Bluebird Designs Happy Birthday stamp set and cut out with the die set.  I colored the images with some bright and cheery distress inks and a watercolor brush.
The panels for my card base were cut with the Cottage Cutz (retired) Stitched Wide Rectangle Frame and Stitched Rectangle Set.
Once I stamped the sentiment on my card panel, I layered the 2 panels on a standard A2 card base which was inked on the edges to coordinate with my stamped images.
The banner was stretched across the top of my card for a fun and festive look on my card.
Next, the 3 presents and gift bag were lined up horizontally in the center of my card.
For a finishing touch, I added a couple of matte enamel dots amongst the presents.
Here are the products I used to create my card:

Tuesday, August 17, 2021

CottageCutz DT Call

CottageCutz
Design Team Call

We are looking for Design Team members who are very active on social media. These sites include: Blogger, Facebook (page or groups), Pinterest, and Instagram. The position will be a 3-month term commitment with the option to extend. Term will be from September - December 31, 2021.

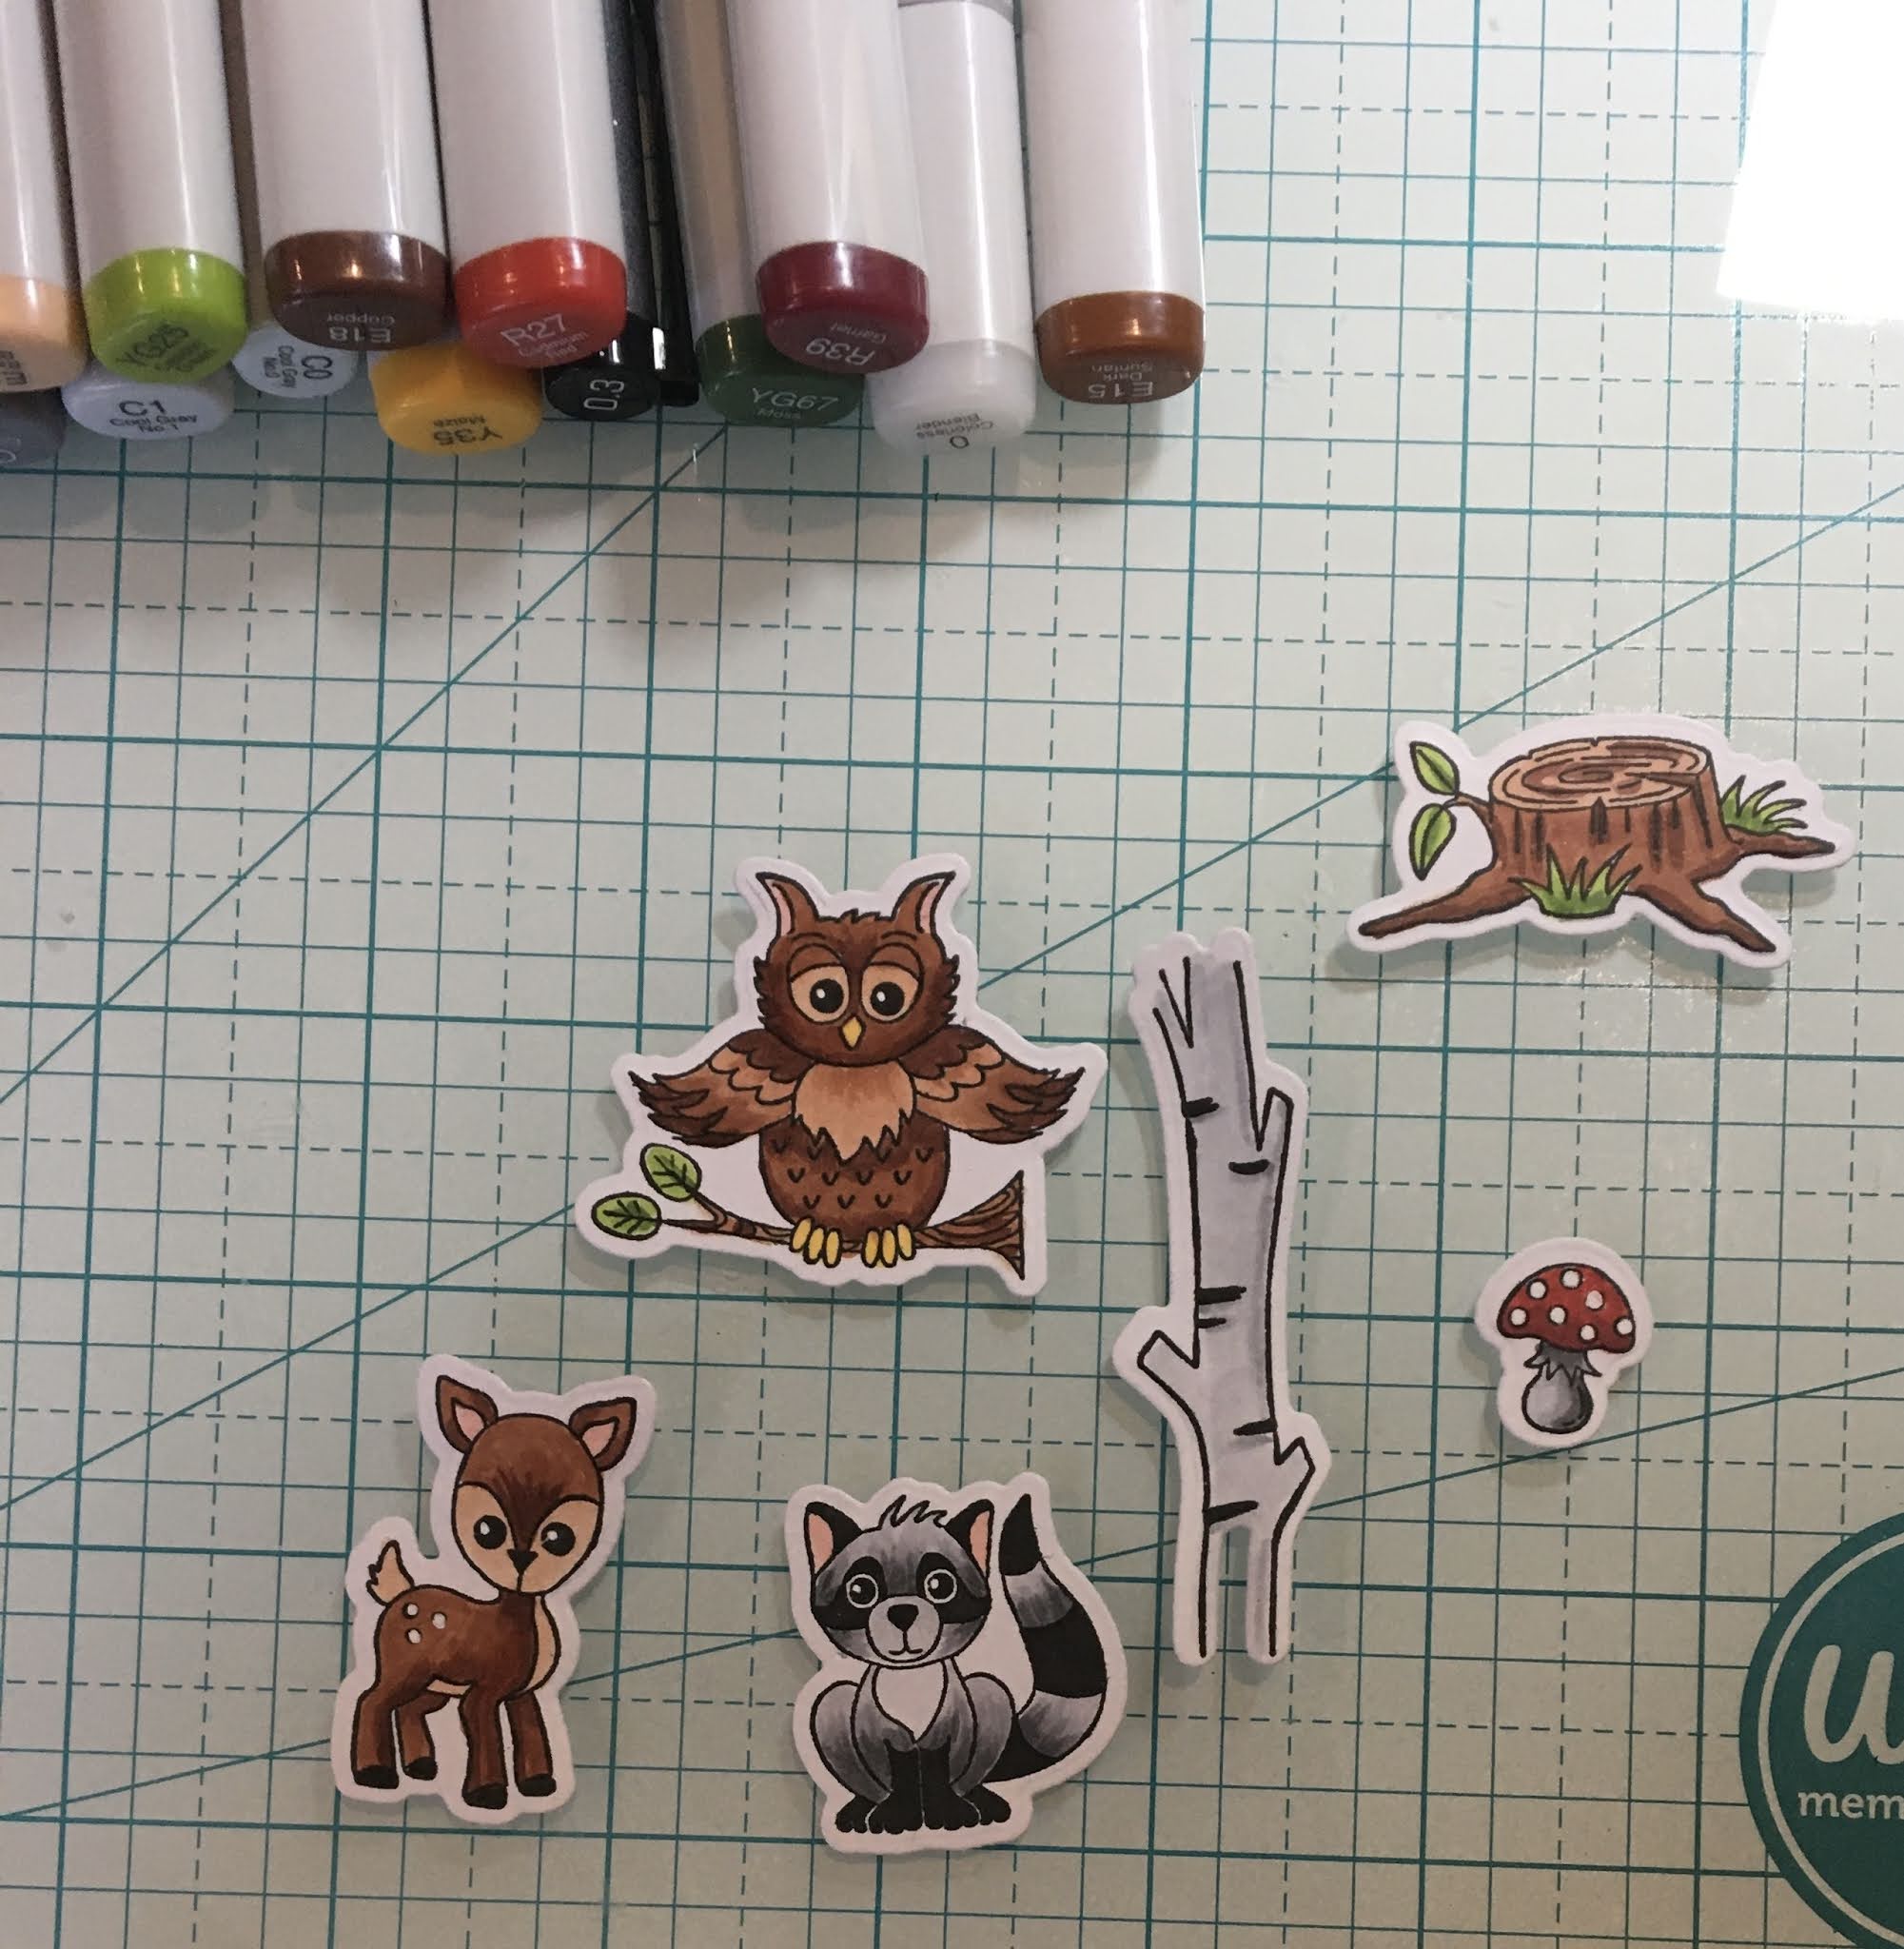
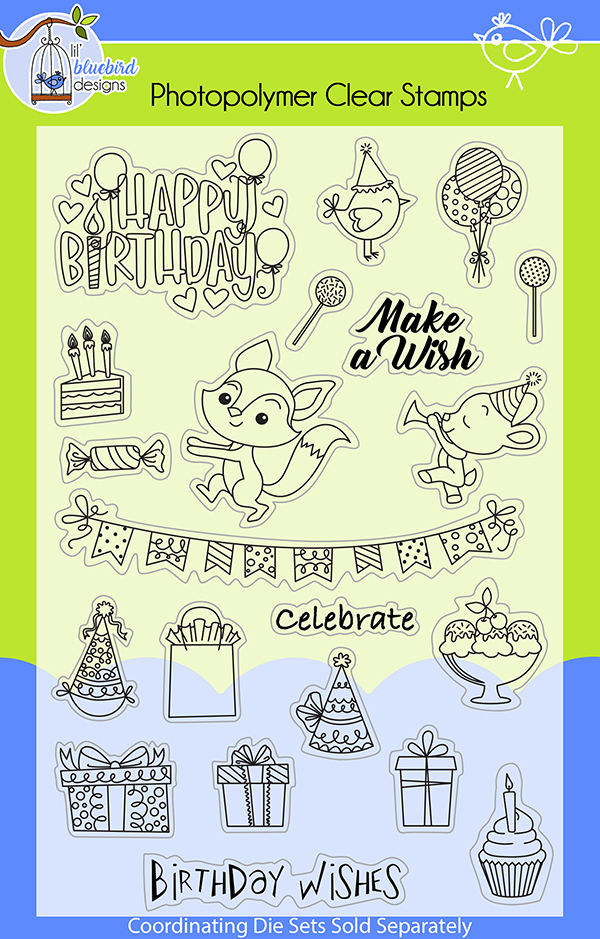
We specialize in universal metal dies for papercrafting. CottageCutz designs are unique, intricate, fun and whimsical. We have the largest selection of the most beautifully hand drawn designs. We also have just introduced a new line of stamps and coordinating dies under the brand name Lil' Bluebird Designs.

We are looking for dependable, energetic, enthusiastic and talented designers who enjoy papercrafting with die-cutting as well as working with stamped images. We are looking for designers to showcase CottageCutz dies and Lil' Bluebird Designs Stamps in different ways (layouts, cards, altered items, tags, etc.) shabby chic, vintage, simple, whatever your style may be, we would love to see what you have to bring to our team.

What we expect:

*Must have a personal active blog, or Facebook page.

*Good communicator, reliable, dedicated and on time with deadlines.

*Post to the CottageCutz Blog and your personal blog or Facebook Page 4 times per month using only CottageCutz dies or Lil' Bluebird Designs stamps.--No other dies are permitted.

*Actively promote CottageCutz product or Lil' Bluebird Designs on your personal blog, Facebook or Instagram accounts.

*List all CottageCutz dies or Lil' Bluebird Designs Stamps and appropriate links back to the store.

*Be able to give instructions to how you used our CottageCutz dies or Lil' Bluebird Designs Stamps.

*Access to camera that is able to take high quality well lit photos.

*Upload to at least 1 online gallery such as Splitcoaststampers or Instagram.

*Pin all projects to Pinterest.

*Create at least one project for each die or Stamp set given - All dies & stamps need to be used and featured in a project.

*Team spirit and able to follow directions accordingly

*Support DT members by commenting on their posts on the CottageCutz Blog.

Selected Designer will receive:

*Generous amount in product each month.

*Your name and picture linked to your blog from CottageCutz Blog.

*Worldwide exposure of your projects.

*CottageCutz Design badge to feature on your blog.

*Great product discount.

*Bonus given to those who are published in a printed crafting publication. CottageCutz or Lil Bluebird Designs must be listed in the supply list for your project.


To apply, please do the following:

1. Please e-mail Mary Marsh at mrmarsh917@gmail.com with the subject line: CottageCutz Design Team Call

2. Please attach 2 projects showcasing dies and 1 project showing stamped images that you have colored. These can be projects you have already done or current projects. We would like to see Cards, layouts, altered items, etc.

3. Links to your personal blog or Facebook Page and any online galleries where you upload your projects.

4. Tell us why you think you would be a perfect fit for the CottageCutz design team.

5. Please list current and past design teams.

** We will be accepting applications until August 31 and the selected stamper will be announced shortly after**. 

Monday, August 16, 2021

Sea You Soon!

Hello and Happy Monday!  This is Sukie and today I'm sharing an underwater card. Today's card features both Cottage Cutz dies and Lil' Bluebird Designs products.

The background for my card was created with the Waves and Nested Stitched Rectangles slimline die sets.  I used a variety of Oxide Ink colors to create the sand and waves on my card.  The waves and sand were splattered with some water and the sand was also splattered with some paint. I watercolored the images from the Under the Sea stamp set and used the die set to cut them out.  The images were nestled amongst the waves.  The bubbles and sentiment were heat embossed directly on my card.
Here are the products used to create my card:

Sunday, August 15, 2021

You Are Sweet

Hi!

It's Anja here for my Sunday post. My slimline dies have finally arrived and today I have the first card to show you. I used Vintage Trellis Slimline to make a beautiful background for the sweet strawberries. 

For this card I used:

- Cottage Cutz dies (Vintage Trellis Slimline, Springtime Strawberries, Strawberry),

- Distress Inks,

- white card stock for die cuts and background (21,3x8,7 cm),

- red card stock for card base (22x9,5 cm),

- vellum paper for background (21,3x8,7 cm),

- sentiment stamp,

- black pigment ink,

- acrylic block,

- eye shadow applicator,

- yellow liquid drops,

- paper trimmer,

- scissors,

- adhesive foam pads,

- paper glue. 


First I cut and colored the strawberries. I used this make up applicator to color the inside of the flowers. I used a bit of pink in the middle.

Next I made a card base from red card stock and cut all the other elements for the background.

Then I adhered all the above pieces to the card base. I added strawberries. I used adhesive foam pads to adhere the strawberries on the front side and regular paper glue for the inside. Next I stamped and cut the sentiment.

Last I added yellow liquid drops to the middle of the flowers and let it dry.

 And my card was done.


And that's all from me for today. Before I go I want to invite you to The Scrapping Cottage online store to check the new Lil' Bluebird Designs release. You can find lovely ideas on the blog by other Design Team members. 
 
Have a nice week and see you again on Sunday.

Anja Z.


Cottage Cutz dies I used:


Saturday, August 14, 2021

Heard You Caught a Bug


Hello Scrapping Cottage friends! Thanks for taking the time to stop and visit with us today. It's Mary Marsh here bringing you the Saturday edition of the Blog.

IT'S NEW RELEASE TIME! The Scrapping Cottage has just added a new brand to the company line. Lil' Bluebird Designs is being introduced with 16 new Photopolymer Clear Stamp Sets and 16 coordinating dies. There are stamps for so many of your card making occasions and then some. The coordinating dies just make it a perfect fit for your card making designs.


Today for your viewing pleasure I am featuring the new Love Bugs Stamp set and Coordinating dies. I created a get well card because I never seem to have any of these cards on hand when a friend or family member gets sick. So let's get started with some details on how I created my card.

Design Steps:

I started my card by ink blending the background using tumbled glass, broken china, hello honey and mowed lawn  distress inks. The cardstock is Bristol smooth from Canson.  I find that the inks blend so smoothly on this paper.

Next, I stamped, die cut and colored the images from the Love Bugs set. I used a combo of Alcohol markers and Prismacolor pencils and gamsol. 
I also stamped and die cut the sentiment that is part of this stamp set. The edges are sponged with Broken China distress ink. 

For the bug jar I decided to use white cardstock. Then I sponged the yellow, blue and green distress inks so it would appear as glass and you see the colors of the background behind it. I think it worked. 
This is a photo of the coloring mediums I used for my images. 
Now I am ready to start card assembly. I first stamped the bee "flight trails" in black ink. 
I attached the images to the background panel using dimensional adhesive. I cut the grass using the Spring Grass die from CottageCutz. 
To complete my card I added a white layering panel - measuring 3 7/8" x 5 1/8". Then the turquoise card base measures 4 1/4" x 5 1/2". After I took the above picture, I decided that I didn't like the darker green cardstock I used originally.  So I switched it out to a lighter green. 


   Well, that's it for me for this week. See you next Saturday!


Stamps & Dies I used to create card: