Friday, May 15, 2020

Father's Day Cat

Happy Friday!  It's Jeanne today and I have a Father's Day card for you using some of the dies from the new Gardening release.  I can't believe it's already mid May!  Father's Day will be here before you know it, so I thought I would start now.  Actually, any masculine themed card is something I always need and this could easily be a birthday card just by changing the sentiment!
I used various colors of cardstock to die cut the cat from the Garden Cat w/ Wagon die and the Lawnmower using the Lawnmower die.  I inked the edges with similar or matching ink to give the pieces some depth and shading.
I glued most of the pieces together but not all.  Some needed to be placed when I glued them to the card.

I wanted a lawn scene for the front so I stenciled the grass on a 4 1/4 x 5 1/2 inch white panel.  Then I stenciled clouds using a cloud stencil.  The grass stencil I used has a positive and negative edge, so after stenciling the grass, I used the other side to cover up the grass while I stenciled the sky.

I cut a panel from wood-look paper 4 1/8 x 5 3/8 inches and then used the largest of the Stitched Rectangle dies to cut down my stenciled panel.
After centering the stenciled panel, I laid out my cat and lawnmower.
I started with the cat on the left and then placed the lawnmower handle and grass bag.  You'll notice my sentiment in white - I also have the cat and lawnmower in white.  I often cut everything out of thin white cardstock and assemble (usually with only the essential shapes no details) so that I can play with the layout of my card.  I store these with the die so that the next time I want to use the image on a card I have it to "play with" again!
I settled on a grass green for the sentiment and mounted the panel to an A2 matching green card base.

Dies used:
http://www.scrappingcottage.com/cottagecutzgardencatwwagon.aspx

http://www.scrappingcottage.com/cottagecutzlawnmower.aspx
http://www.scrappingcottage.com/cottagecutzhappyfathersdayphrase.aspx
http://www.scrappingcottage.com/cottagecutzstitchedrectanglesetbasics.aspx

I hope you are inspired to create your own special card for Father's Day!  The new release has  wonderful dies for any man or woman who loves their yard!

Thanks for joining us today and have a wonderful weekend!

Thursday, May 14, 2020

Gardening Cat

Hello My Scrapping Cottage Friends!

It is Pam having fun with you on the blog today!

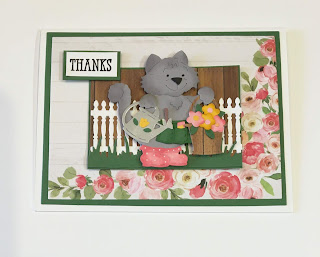
I have a wonderful sister who has a number of cats.  In fact we call her the cat whisperer!!  And she loves to garden and soak up the sun!  So this card will be a perfect thank you for her!

 (background photo Photo by Tim Mossholder on Unsplash)

Design Steps:

1.  The base is an A2 white piece of card stock.  Second layer is dark green card stock 5 1/4 x 4 and the flower DP is 5 x 3 3/4.  Glue the layers together as shown above

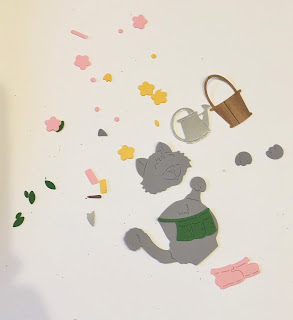
2.  Using the Gardening Cat die cut out the pieces using grey, pink, dark green, metallic silver, yellow and brown
3.  Shade all of the pieces using a variety of inks.  Add white polka dots using a Sukra white gel pen
 4.  Cut the fence using white card stock and the Victorian Fence die.  Also using green card stock and the Spring Grass die cut out the grass
5.  Use the Double Stitched Rectangle die cut out a piece of wood grain DP and layer onto dark green card stock.  Next glue down the grass and fence
6.  Pop the small fence panel to the card base and then pop up the cat and sentiment and your card is complete
CottageCutz Supplies


Thanks so much for stopping by today!  I hope you have a wonderful time creating!
Blessings
Pam


Wednesday, May 13, 2020

Good day, Sunshine!

Hello!  This is Sukie and today I have a project to share for my design team post.  I'm showcasing a couple of dies from the fabulous new Gardening release.
I cut out all of my pieces from the Puppy in Garden Cart and the Planter Box & Seeds die sets.  The oval is from the Stitched Oval Set.
I selected a whimsical floral pattern for my card panel and drew out the different colors for my die cuts.  A small strip of paper was punched with the Fiskars Scalloped Sentiment punch.
I created my card base by layering the pieces together and adding a stamped sentiment to the punched border.  The garden cart was centered inside the oval and adhered on my card.
Next, I tucked in the greenery along the punched border.  The seed packets and garden sign were nestled in between the greenery.
The fussy cut flag was adhered along the top edge of my card adding an extra pop of color to the gardening scene!
Here are the dies used on my card, available in the store:

Tuesday, May 12, 2020

To brighten your day

Hi Janja here. Welcome to the blog today.
As much as I love creating my cards with lots of cutouts, it’s fun to take a step back occasionally and create a simple card.


- CottageCutz die Gardening Tomte
- blank card: 4 ¼ x 5 ½" (10,8 x 14 cm), folded
- white cardstock: 3 1/2 x 4 13/16" (8,9 x 12,2 cm)
- different colors of cardstock
- different colors of ink pads
- white ink pen
- glue, double-sided adhesive tape

Start by die-cutting all the pieces for the main image out from different colors of cardstock. For greater depth, use ink pads that are slightly darker than the cardstock.


Then cut out a rectangle from white cardstock.
To add a little more depth to the overall look, leave the die in place and shade around the bottom with a grey ink pad and blender brush. You will get white unshaded edges at the bottom.
I printed this cute quote later on the top.


Trim the selected patterned paper to the size of a blank card. Stick it on the front of the card.


Completed card.


Thank you for stopping by.
Janja

Monday, May 11, 2020

Blooming Wagon 2

Hi Cottage Cutz fans!  It's Jeanne again today.  On Friday I posted a card and said that I had made two cards with the same die.  Today I am featuring the second card.
The sentiment here really guided the design of this card.  While working on Friday's card, I came across this sentiment and loved it but it did not work for that particular card.  However, it is a wonderful sentiment for a clean and simple card, so I created one using my leftover die cut pieces from Friday!
I glued all the pieces to an A2 panel that I had stamped with the sentiment - then I added a strip of washi tape.  I glued that to an A2 card base. A super easy, fun and understated card!

Here are both cards I made using the Garden Wheelbarrow die.
The colors of the cardstock and paper as well as the shading of the dies with ink can lend a totally different feel to cards created with the same die.  A great way to make the dies go further!

Dies used:
http://www.scrappingcottage.com/cottagecutzgardenwheelbarrow.aspx
http://www.scrappingcottage.com/cottagecutzgardenphrases.aspx

Thanks for stopping by today!  Be sure to visit the online store where select dies are on sale for a limited time!

Sunday, May 10, 2020

Thinking of You

Hi!

It's Anja here. I got my package of beautiful new Garden release dies this week. And first I made this simple card, using the wheelbarrow die.


For this card I used:
- Cottage Cutz dies (Garden Wheelbarrow),
- Distress Inks,
- white card base (15x15 cm),
- white card stock for die cuts and background (14x14 cm),
- silver pigment ink,
- black pigment ink,
- brush,
- sentiment stamp,
- water spritzer,
- heat gun,
- paper glue.

First I cut and colored the wheelbarrow.


Next I did the background. I used water spritzer to add some interest to the colored sky.


When the background was dried, I added the sentiment.


And at last I put all the pieces together and my card was done.


Have a nice week. See you again on Sunday.

Anja Z.


Cottage Cutz die I used for this card: