Thursday, November 28, 2019

Happy Thanksgiving

Hello Scrapping Cottage Friends!

HAPPY THANKSGIVING! 

I am so grateful for my family, friends and you!!!  I hope you have a wonderful time enjoying the delicious smells, tastes and fun this awesome holiday has to offer.  May you give thanks for all you have and God Bless!


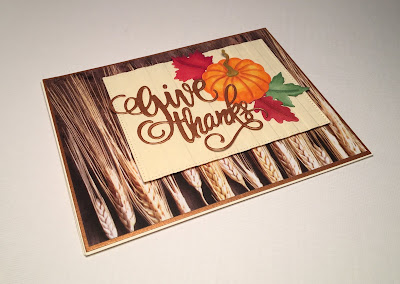
For this card I used a wheat DP for the background.  A cream colored card stock cut with the Pierced Rectangle and run through an embossing folder.  Next I cut the Give Thanks using copper metalic paper.  And finally I cut out the pumpkin and leaves in white and colored them with my Copic Markers.


Have a restful and joyous time with loved ones!!
Blessings

Pam

Wednesday, November 27, 2019

Artic Animals Black Friday Release 2019

Hello Scrapping Cottage friends! Happy Wednesday to you! Thanks for taking the time to stop and visit today.

We are sampling DT cards using dies from the new Artic Animals Black Friday release. There are 13 new designs in this release and they are currently on sale. You can get this entire release at an amazing price of under $70.00.

These new dies are so versatile, as you will see with the DT samples. They can be used for a variety of occasions. The baby Artic animals  would make cute baby shower invitations, a welcome new baby card or a child's birthday card. The other dies are great for a winter birthday, thinking of you, thanks and let's not forget our Christmas cards.  
 
So let's get started on the samples for today. The DT has created some beautiful cards with the Artic Animals.

Card 1: Our first sample for today is from Sukie Dhillon. She used the new Polar Bear Fishing and created a great winter scene shaker card. Her card inspiration came from the design on her patterned paper.

The polar bear looks so content sitting on the ice block, nestled in his cozy hat and scarf.  The scene is framed inside the Stitched Wide Rectangle Frame.  The extra fish swimming amongst the sparkly sequins adds a bit of whimsy to this card.  The sentiment is a coordinating element from the same paper pad and was tucked into the corner of the frame.
Card 2:  Our next sample is from Pam MacKay She used the Artic Moose & Polar Bear die and designed a playful and colorful Christmas card. She created a circular frame for the images using our Cross Stitched circle dies. The designer paper inside the frame reminds you of an early evening winter sky. I love how the animals are sending their Merry Christmas greetings from atop a snowbank.  The winter tree themed designer paper adds to the appeal of her card.  
 
Card 3: Our 3rd sample for today is from Jeanne Knobbe. She is featuring the Artic Whale & Narwhal and the Snowy Mountain dies to create this animated card. The whale is enjoying frolicking in the icy waters of the Artic. The waves were made with an embossing folder and then she fussy cut the top edge. Clear epoxy drops were used to replicate the whales splash. The punny sentiment is so perfect.
  
Well, that's our samples for today. Over the next several days we will have more group posts and show a sample for each new die. I hope the team has given you some fresh ideas on ways to use these new dies.
 
dies used to create cards:


Monday, November 25, 2019

Group Samples -Christmas Part 2

Hello Scrapping Cottage friends! Happy Monday to you! Thanks for taking the time to stop and visit today. We are sampling DT cards using dies from the Christmas Part 2 release.

There are 34 new designs in this release. This release has something for everyone. So if you prefer a more religious tone to your cards- we have you covered. If you like a more whimsical design featuring Santa, reindeer, gnomes, moose or even a hot chocolate theme you will find some really cute dies.
  
We thought you might like to have some new and creative ideas for your Christmas cards using the Part 2 dies. So let's get started with the cards for today.

Card 1:  Our first sample today is from Pam MacKay. She used the ever so cute Moose Pulling Gnome Sled to create her sweet Christmas card.  The pierced rectangle die was used as the background for her image. She created a mask for the snow and then a stipple brush to ink up her sky. Some white acrylic paint mixed with water was used for a snowy sky effect. This card would make a great Christmas card for all age groups.
Card 2: Our next sample today is from Janja Albreht. She used the Warm & Cozy Cocoa dies to create 2 amazing circular easel cards. This type of fold always has such wow appeal. Her images are mounted on burlap which just adds to the charm of her cards. This would be a great card for your coffee loving friend , or for a coffee gift card or even a winter birthday.
Photos of the easel cards when they are opened. Here is a link to a tutorial for circular easel cards.


Card 3:  Our last sample for today is from Jeanne Knobbe. She used the Holiday Gnomes w/Fox  & the Happy Ho Ho Ho dies to create an action wobble card. The curved panel, addition of the designer paper and the enamel dots add to the attraction of her whimsical card.
Check out this short video clip to see the cute little Gnome do a wiggle.

Well, that's our samples for today. I hope the team has given you some fresh ideas on ways to use these dies. Make sure you visit the Blog this week, we have a new release of dies coming and there will be group posts starting on Wednesday. The DT has made some awesome samples.

dies used to create card:
http://www.scrappingcottage.com/cottagecutzholidaygnomeswfox.aspx

http://www.scrappingcottage.com/cottagecutzmoosepullinggnomesled.aspx

http://www.scrappingcottage.com/cottagecutzwarmandcozycocoa.aspx

http://www.scrappingcottage.com/cottagecutzhappyhohoho.aspx


Sunday, November 24, 2019

Sparkle & Shine

Hi!

It's Anja here. Again I used an adorable die. This gnomes with a little fox are so cute. It was so much fun making this card.


For this card I used:
- Cottage Cutz die (Holiday Gnomes w/ Fox),
- Distress Inks,
- craft card base (15x15 cm) and card stock for cuts,
- silver pigment ink,
- white pigment ink,
- brush and tooth brush,
- black pen,
- white card stock for die cuts,
- water color paper for background (13x13 cm),
- sentiment stamp,
- embossing ink,
- water spritzer,
- white acrylic paint,
- white embossing powder,
- heat gun,
- acrylic block,
- paper glue.

First I colored the gnomes and the fox.


Then I started on the background. I used smooching technique for coloring. I tapped the color from the ink pads on my glass surface and sprayed it with water for the colors to mix a bit. Then I taped the paper on the mix of colors. I dried the paper  with the heat gun.


I did the same thing all over again. This time with only dark blue ink.


Next I colored the paper around the edges with white pigment ink. And then spritzed the snowflakes on top using white acrylic paint and brushes. Again I used heat gun to dry the paper.


Next I embossed the sentiment on a piece of craft card stock. I used white embossing powder.


When I had all the pieces ready I adhered it on the card base and my card was done.


That's all from me for today. Have a nice Sunday.

Anja Z.


Cottage Cutz die I used for this card:


Saturday, November 23, 2019

Merry Christmas Border Die

Hello Scrapping Cottage friends! Thanks for taking the time to stop and visit with us today. It's Mary Marsh here bringing you the Saturday edition of the Blog. 

We have the new release of Christmas Part 2 in the online store and they are all in stock and available for delivery. There are 34 new designs in this release. 

This release has something for everyone. So if you prefer a more religious tone to your cards- we have you covered. If you like a more whimsical design featuring Santa, reindeer, gnomes, moose or even a hot chocolate theme you will find some really cute dies.

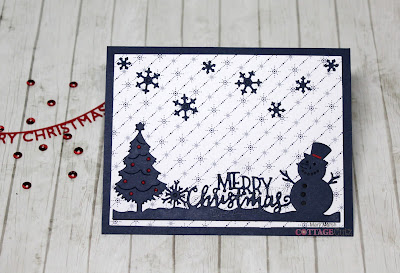
I actually do a combo of religious and whimsical for my Christmas cards. Today, for your viewing pleasure, I am going whimsical with the new Merry Christmas Border die. It's from the Part 2 release.   It's only a month until Christmas, so if you haven't started your cards as yet this die would be a good one to use to make multiples. 

I thought I would bring you a sample today that is on the clean and simple side. One that would be easy to mass produce since it's only a month until Christmas. We all have designer paper in our stash that we haven't used. This die is perfect with a snowy, snowflakes or starry background paper. So let's get started with some details on how I created my card.

Step 1: Since I had the die in mind to use, I looked for the right designer paper. I found this starry background paper and thought it would work well.

Navy Card Base: 4 1/4" x 5 1/2"
Designer Paper: 3 7/8" x 5 1/8"
The stars on the designer paper are a navy color and cutting the border image in navy would make it pop on the paper.


Step 2: Next, I started card assembly. The border image is attached to the background paper with glue dots and Ranger multi medium matte. I cut the tree again in red cardstock to add some red ornaments onto the tree. And, for the snowman I put a little red band on his hat. 
I decided to scatter a few snowflakes in no particular order to my card. I cut them with the Holiday Hedgehog die. Attached the card base and my card is finished.

I hope I have given you an idea for a way to use this new border die. See you next Saturday!

dies used to create card:


Friday, November 22, 2019

Christmas Cardinal

Happy Friday!  It's Jeanne today with a card using the Christmas Cardinal from the new Christmas release and an older die, Birch Trees.  I plan to send this card to a neighbor who collects cardinals.  She frames any cardinal Christmas cards she receives and displays them over the holidays.
This card would also make a wonderful masculine birthday card - just change the holly behind the bird to less seasonal greenery.  The Seasons Floral 1 and 2 dies have some lovely pine cones and leaves that would work well.
I cut all the pieces from white cardstock and shaded the cardinal and birch trees using Distress Oxide inks. The rest were colored with  Copic markers.

To get shading under some of the feathers, I used a small piece of paper slipped into one of the slits on his wing as a mask.  This is a nice way to add depth to your die cuts.
I created a misty background using two shades of DO gray ink on a 4.25 x5.5 inch panel.
My birch trees are shaded with the same grays.
To create the card, I cut half an inch off the side of the panel so is is now 3.75 x 5.5 inches and added a thin strip of gold washi tape.  On an A2 card base I glued a .75 inch strip of plaid paper.
After adhering the panel to the card base, I glued the birch tress and greenery.
I added some gold thread, then popped the cardinal off the card using foam dots.

Dies:
http://www.scrappingcottage.com/cottagecutzchristmascardinal.aspx
http://www.scrappingcottage.com/cottagecutzbirchtreeselites.aspx

Thanks for joining me today.  I hope you have a fun and creative weekend!