Friday, August 16, 2019

Never Too Old

Happy Friday Cottage Cutz fans!  It's Jeanne today sharing a very easy birthday card.  This card uses two dies from the new birthday release that are are both gender and age neutral.  These dies can be used for ANYONE!

It also features a sentiment that is great for anyone who likes to have a good time.
I started by picking two coordinating designer papers in bright colors.  I cut an A2 card base from  Rich Razzleberry, a panel 5.5 x 4.25 inches from the polka dots, a panel 5.5 x 1.625 inches from the chevron pattern and a strip 5.5 x .375 inches from the Razzleberry.
I used white card stock for my die cuts and colored them in a combination of Copic markers and Stampin Blends to match the colors in the designer paper.
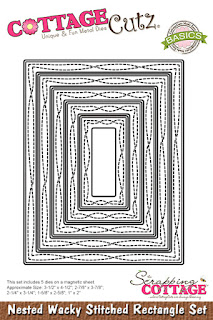
I stamped the sentiment in black on a piece of Pumpkin Pie card stock and use the second smallest of the Nested Wacky Stitched Rectangle dies to cut it out.
After I adhered all my panels together, I glued the sentiment panel in the upper right.
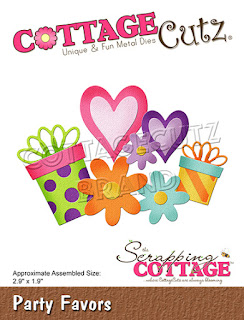
Then I could place my cake and presents.
I'm trying to increase my stash of ready to go birthday cards so I'm not making them at the last minute.  These dies are perfect for that!

Dies used:
http://www.scrappingcottage.com/cottagecutzpartycake.aspx
http://www.scrappingcottage.com/cottagecutzpartyfavors.aspx
http://www.scrappingcottage.com/cottagecutznestedwackystitchedrectangleset.aspx


Thanks for stopping by today.  I hope you have a fun and creative weekend.


Thursday, August 15, 2019

Strawberry Cupcake

Hello Scrapping Cottage Friends

I am on a cupcake roll!  This is another cupcake from the birthday release.  I am in love with all of them.  I put a group shot of the 3 cupcake cards I have made at the bottom of this post.  I think they would make an adorable gift set.

Designer Steps:
 1.  Cut all of the pieces out of white card stock using the Birthday Cupcake w/Strawberry
2.  Color all of the pieces with your favorite markers.  Then glue the pieces together
 3.  Use an A2 white card base cut a piece of dark red card stock just slightly smaller then the card front.  Cut a piece of strawberry DP 4 x 5 1/4.  Glue the strawberry paper to the dark red card stock.  Cut a piece of green polka dot DP 1 1/2 x 5 1/4.  Layer it onto dark red card stock
 4.  Glue the green polka dot strip to the bottom section of the strawberry DP and add the ribbon
 5.  Using the Cross Stitch Circle die the 3rd from the largest cut a white circle.  Place dimension tape on the back of the cupcake and add it to the circle
 6.  Put dimension tape on the back of the circle and pop it to the card as show below
7.  Take the whole panel and glue it to the white card base.  Add some glossy dots and your card is complete

CottageCutz Products

Here are the three cupcake card!  I love the cheery bright happy colors!
Hope you have a wonderful day! And thanks so much for stopping by!
Blessings
Pam


Wednesday, August 14, 2019

Happy Birthday

Hello!  This is Sukie and I have another fun birthday card to share today.  This festive card was created with the new Cottage Cutz Birthday dies.
I selected the 2 patterned papers for my card base and then used the polka dots to pick out the colors for the die cuts on my card.
The Party Hats were cut out of the different colors of card stock.  I also cut out the sentiment from the Happy Birthday Swirly Cake die cut and trimmed off the cake.  The rectangles are from the Stitched rounded Rectangle Set.
Once I put together my card base, I added the strip of polka dotted paper along the left edge.  The four rectangles were placed in the four corners of the striped card stock.
I continued to build my card by adding each of the Party Hats at the center of each of the rectangles.
Once I had all of the Party Hats adhered to my card, I placed the sentiment at the focal point of my card.
Here are the dies used on my card, available in the shop:

Tuesday, August 13, 2019

Let’s Celebrate With a Cake

Hi, Janja is here with you.
Today I have two simple birthday cards with a cake for you. Let's see how they look in different color combinations.


- CottageCutz dies: Mad Hatter Cake, Nested Stitched Scallop Rectangle Set, Rectangle Set, Build An Easter Egg (bow), Stitched Wide Rectangle Frame Set
- card base: 4.48 x 5.66" (11,4 x 14,4 cm), folded
- colored cardstock
- colored ink pads
- self-adhesive foam pads, glue
- white craft foam

First, cut out all the pieces for the cake from colored cardstock. Assemble and paste them together.


Prepare the card base and cut two rectangles out of beige and kraft cardstock - 4.21 x 5.47" (10,7 x 13,9 cm).
Cut out the red ribbon with the largest die from the Stitched Wide Rectangle Frame set.
Use the largest die from both basic sets for the frame.


Apply glue to the back of the frame and paste it to the rectangle. Create an extra dimension with craft foam.


Now spray the background with white paint. Use a brush.


Once all the elements are ready, assemble the card.


Have a nice day.
Janja


Sunday, August 11, 2019

Mouse With A Cupcake

Hi!

It's Anja here. I have another card for you today. Again with a little different opening. This time I used a cute mouse lightening a candle. 


For this card I used:
- Cottage Cutz dies (Mouse With Cupcake, Pierced Circle Set, Circle Set, Nested Stitched Scallop Circle Set),
- Distress Inks (Spun Sugar, Antique Linen, Worn Lipstick, Mustard Seed, Spiced Marmalade, Brushed Corduroy, Vintage Photo, Black Soot),
- white card stock for die cuts,
- patterned paper for die cuts,
- black pen,
-white pen,
- liquid drops (yellow),
- hole puncher,
- split pin,
- paper glue.

First I cut and colored the mause and the cupcake. I used liquid drops for the icing.


Next I cut three pairs of circles. I colored the middle circles around the edges.


Then I glued the circle together and made a hole on top to insert a split pin.


And then I just glued the mouse and the cupcake on top and my card was done.


Have a nice Sunday and see you again next week.

Anja Z.


Cottage Cutz dies I used for this card: