Wednesday, November 14, 2018

Have Yourself a Cozy Little Christmas

Hello!  This is Sukie sharing a project for my guest designer post.  I have a fun project idea to add a personalized touch to those holiday gifts.
I started my project by cutting out the pieces from the Ugly But Cute Sweater die set.  I cut the tag with white card stock from the Nested Stitched Scallop Rectangle Set.
I dressed up my tags by adding a colored reinforcement punched with the We R Memory Keepers Hole Reinforcer Punch.  The cheery sentiment is from the Scrappy Moms (retired) "A Holiday to Remember" stamp set.  The tags were topped off with some Frosted Cranberry Trendy Twine.
The die cut sweaters were put together with bright, colorful card stock.  I ended up creating three different sweaters combining the elements from this die set, the possibilities are endless.  The pop of colors is perfect against the basic white tag.
These tags will be perfect for adorning holiday gifts.  The handcrafted touch will be great for personalizing those packages.
Here are the dies I used on my tags available over at Cottage Cutz:


Monday, November 12, 2018

Wooden Ornaments

Hi!  Lois here with my Monday post.  Be sure to check the CottageCutz store because the Autumn Release is still on sale for a limited time at 25% off.   While you're there, be sure to check out all the new Christmas dies too.

My card for today went together relatively quickly.  I used one of the new CottageCutz Christmas dies, Wooden Ornaments with some pine patterned paper, and the card sort of put itself together.   


To start my card, I cut the die pieces from scraps that I had on my scrap pile -- the three ornaments from some tan cardstock and the accessories pieces from a scrap of white.


I sponged some Vintage Photo distress ink onto the ornaments and colored the accessory pieces with Copic markers, then constructed the three ornaments.


I cut the cardstock as follows:

Cream - 5 1/2" x 8 1/2", scored at 4 1/4"
Red - 5 1/4" x 4"
Patterned paper - 5 1/8" x 3 7/8"


I then cut the Christmas sentiment from scraps of both red and white cardstock and constructed my card base, forming a sort of shadow behind the sentiment.


Using the pine sprigs for placement reference, I added the ornaments -- cutting a small section out of the hangers to make it appear that the loops went behind the sprigs.  The loops are glued down flat, but the ornaments are popped up on foam dots.   As I said before, the card went together relatively quickly.  I love that!


CottageCutz dies used on this card are:

http://www.scrappingcottage.com/cottagecutzwoodenornaments.aspx


http://www.scrappingcottage.com/cottagecutzexpressionsmerrychristmas.aspx


Sunday, November 11, 2018

A Harvest of Blessings

Hi!

This is 
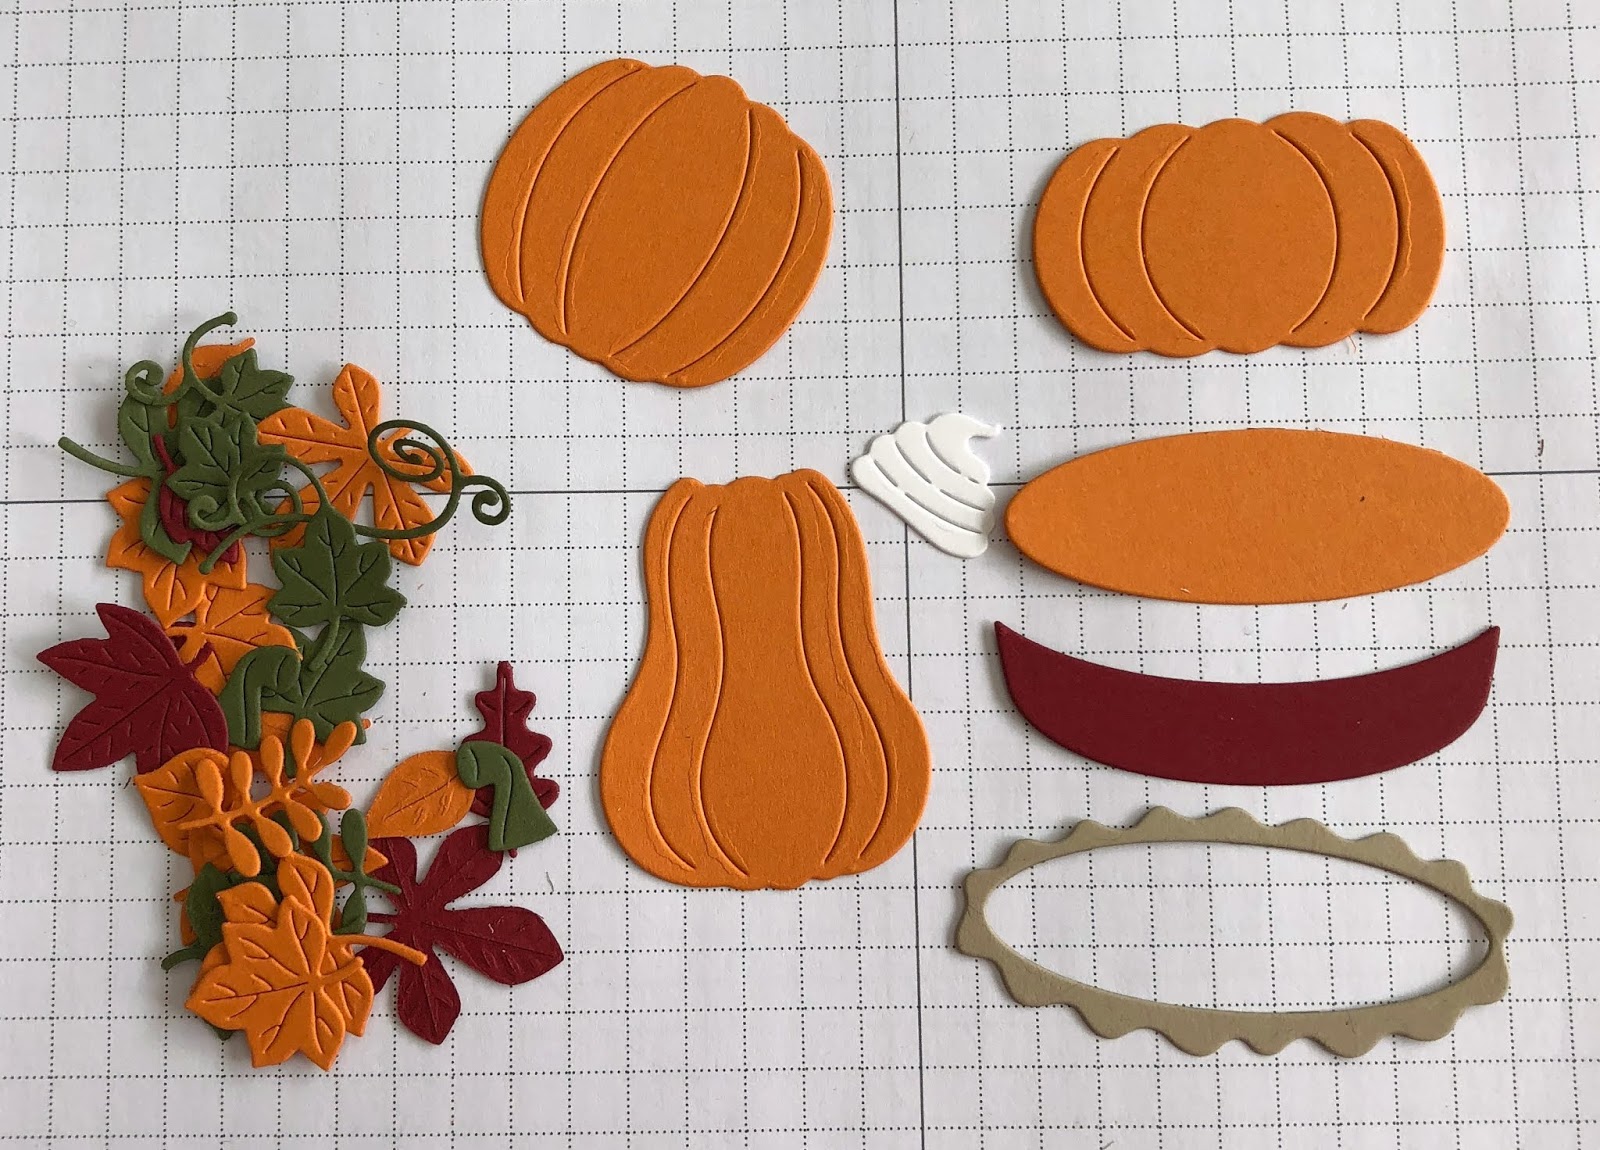
Anja again. I have a Autumn cad for you today. Autumn is my favourite season for inspiration for coloring. I really love all the colors  around us in Autumn. And this last Autumn release was one of my favourite. So many beautiful dies to use and to craft with. And today I used two more for this card.


For this project I used:
- Cottage Cutz dies (Pumpkins & Vines, Basket of Vegetables),
- Distress Inks (Spiced Marmalade, Mustard Seed, Wild Honey, Crushed Olive, Barn Door, Vintage Photo, Forest Moss, Twisted Citron, Seedless Preserves, Mowed Lawn, Peeled Paint, Aged Mahogany, Walnut Stain),
- white card stock for die cuts and background  (14,1x14,1 cm),
- craft paper for background (14,5x14,5 cm),
- white card base (15x15 cm),
- sentiment stamp,
- Versafine Onyx black ink,
- acrylic block,
- paper glue.

First I colored the pumpkins.


Then I colored the vegetables. I used Distress Inks.


Then I made the background.


I stamped the sentiment on top.


Then I cut another piece of paper for the background to add a bit of dimension.


When I had everything cut and colored I glued and arranged everything together and adhere it to the card base.

And this is my finished card.


Hope you have a nice Sunday. I'm going on a short trip to have some fun after a very busy working week.

Enjoy and come back again next week.

Anja Z.


Cottage Cutz dies I used:


Saturday, November 10, 2018

Peace, Love & Joy Greetings


Hello Scrapping Cottage friends! Thanks for taking the time to stop and visit with us today. It's Mary Marsh here bringing you the Saturday edition of the Blog. 

We have a new release of dies over at the online store. Our Autumn 2018 dies are here with 10 new designs. They are currently 25% off for a limited time. So, if you still need to make some Thanksgiving cards head over to the store and pick up some of these amazing dies. And, if you need some card ideas for the dies look back on the blog because the DT has posted some beautiful cards for inspiration. 
 
My card this week is featuring the Love, Peace & Joy die. I was looking to create a Christmas card that would be easy to make multiples of. I accomplished that and am going to make at least 10 more of these for my own Christmas cards. I like to make a lot of different designs with my Christmas cards. Let's get started with some details on How I created this card.

Step 1: I started my card this week using the sketch #722 on Splitcoaststampers. I thought it was a great layout for the idea I had in mind to showcase these dies.
I used white corrugated paper for panels 3 & 4. What I did though was cut a single piece of cardstock and then used ribbon to divide the panels.
 
white card base: 5 1/2" x 4 1/4"
red layering panel: 5 3/8" x 4 1/8"
white corrugated image panel:  3" x 5 3/8"
Step 2: I cut the Peace, Love & Joy phrases in red cardstock and also the corresponding images for each phrase.
 
Now that my elements are prepared, I am ready to start card assembly. I attached the corrugated panel to the red layering panel with double sided tape. I used 3/8" red grosgrain ribbon to divide the panels.
Attached the word phrases with Ranger multi matte medium. I like this adhesive because it dries clear and is a strong hold. The images are secured with dimensional adhesive.
The sketch calls for the sentiment to be added to the right corner. So I looked through my Christmas stamps and found this one. It filled up the bottom of the card for a nice balance. I used my MISTI for help in placement.
Step 3:  To finish up my card, I attached the image panel to the white cardstock base and then added a few white sequins.  I thought they finished off the card nicely.
Well, that's it for me for this post. I hope I have given you an idea for a Christmas card using these super cute dies.
See you next Saturday!
 
die I used to create card:
http://www.scrappingcottage.com/cottagecutzlovepeaceandjoy.aspx


Friday, November 09, 2018

Pumpkins Everywhere

Happy Friday everyone!  It's Jeanne today and I have a fall card that I entered into the October 25 Fusion challenge.  It is a combination theme/sketch challenge.  When I saw the challenge I knew that these dies would be perfect!
The challenge:
To start, I die cut the pumpkins, pile of leaves and the pie from the Pumpkin & Vines and Pumpkin Pie & Latte dies using various colors of card stock - Cherry Cobbler, Mossy Meadow, Pumpkin Pie, Crumb Cake and white.  I ended up die cutting more leaves than I needed but have saved those for another project.
I then used a sponge dauber to add depth to the edges and colors to the leaves.  I ended up changing my pie plate color to Lost Lagoon after I picked out my patterned paper.  I decided the blue gave it more of a pop.
I made an A2 card base from Crumb Cake and cut the circle from one of the patterned papers using the middle die from the Double Stitched Circle die set.  I used the coordinating paper and cut a rectangle 2 x 4 inches.
My pie became the oval in the sketch.
Finally I adhered everything together and added a few sequins.
This card came together very quickly thanks to the sketch.  I'll be making several of these as Thanksgiving cards.

The new Autumn 2018 dies are on sale for a limited time at the online store.  Be sure to drop by check them all out!

http://www.scrappingcottage.com/cottagecutzpumpkinpieandlatte.aspx
http://www.scrappingcottage.com/cottagecutzpumpkinsandvines.aspx
http://www.scrappingcottage.com/cottagecutzdouble-stitchedcirclesetbasics.aspx

 Thanks for stopping by - have a fun and creative weekend!