Thursday, November 08, 2018

Dakota's Christmas

Good Morning Friends!

It is Pam creating with you on the blog today!

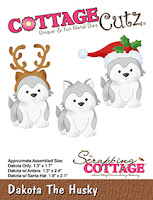
I just wanted to let you know that we have some of our dies on sale for 70% off!!  Plus the new release Autumn is on sale for 25% off.  Get your Christmas shopping done early!!  My card today features Dakota the Husky which is only available in the online store.  And he is so adorable!!
Design Steps:
 1.  Cut all the pieces out of white card stock using the Dakota The Husky
2.  Color the Husky with your favorite markers and then assemble
 3.  Use small black gems for the dogs eyes
4.  Using the Expressions Let it Snow die cut the words out in red card stock
5.  Use the second from the largest Stitched Scalloped Square die and cut it out of red.  Also cut out a square from DP at 3 1/2 x 3 1/2
 6.  Use an A2 white card base cut a slightly smaller piece of red card stock then a piece of grey snowflake DP 4 x 5 1/4
 7.  Glue the red and grey DP to the front of the white card front
 8.  Glue the green holly DP to the front as shown then add the red scalloped square.  Glue the Let it Snow just below to the squares.  Pop dot the dogs to the red square
9.  Add the little snowflakes and your card is complete

CottageCutz Products


As always we really appreciate you stopping by today!  Don't forget the fantastic sales in your store!
Blessings
Pam


Wednesday, November 07, 2018

Fall Pumpkins

Hello, this is Sukie sharing a card for my guest designer post today.  I adore Cottage Cutz dies and the Autumn release is one of my favorites with so many inspiring products!
I found the perfect fall themed papers in my stash from the Recollections Harvest Delight 6x6 paper pack. I wanted to break up the background pattern so I cut a couple of strips of paper from the same paper pack in the solid colors. All of the pieces were adhered with Glue Dots Adhesive Gluetape to the kraft card base.
Next I cut out the pumpkins and leaves from colored card stock using the Pumpkins & Vines dies. The pumpkins were inked on the edges for added dimension.  I cut out the oval using the Stitched Oval Set and also inked it on the edges.  The whimsical "fall" sentiment is from the Fall Phrases die set.
I adhered the oval to the base of my card which is a standard A2 size card (4.25 x5.5) and layered it with the set of pumpkins.  The pumpkins were overlapped a bit so they would fit perfectly on my card.
To finish off my card, the leaves were anchored around the pumpkins along with the sentiment.  The rustic look of this card is definitely the look I was trying to achieve.
The dies I used for my card are available over at Cottage Cutz:


Monday, November 05, 2018

Cookies and Cocoa

Hi, Lois here with my regular Monday post.  Before I start with my card, I invite you to visit the CottageCutz store, in which you can find many of our dies on sale -- up to 70% on some.

And now my card.   Who doesn't love cookies and cocoa?  That's exactly what I've got for you today!  My card was made with several new Christmas dies from CottageCutz as well as an old one.


To start my card I cut the cookie images from some cream-colored cardstock using CottageCutz Homemade Cookies 1 and 2.


Using some Ranger Distress ink (Tea Dye and Vintage Photo) I colored the cookies and topped them with the icing pieces, which I did not color -- except for the two hearts. After they were all constructed, they looked just like gingerbread cookies!


To make the plate on which to serve the cookies, I cut two ovals (one in cream and one in green) using the 2nd largest Nested Stitched Scallop Oval . . .


. . . cutting the center out of the green oval and adhering it to the outside of the cream one.


I then placed the cookies onto the plate, gluing some of them down flat and popping some up with foam adhesive circles.


I cut the cup, cocoa, marshmallow and holly from the CottageCutz Sweet Christmas die . . .


. . . sponging the "cocoa" with Tea Dye distress ink and coloring the holly/berries with Copic markers.


I then cut my cardstock as follows:

Cream - 5 1/2" x 8 1/2", scored at 4 1/4"
Red - 5 1/4" x 4"
Plaid patterned paper - 5 1/8" x 3 7/8"


It was then just a matter of constructing the card base, adding the cookie plate and cup of cocoa.  I then stamped an appropriate sentiment and punched it out, attaching it at the top -- and my card was complete.


CottageCutz dies used on my card are:

http://www.scrappingcottage.com/cottagecutzhandmadecookies1.aspx

http://www.scrappingcottage.com/cottagecutzhandmadecookies2.aspx

http://www.scrappingcottage.com/cottagecutzsweetchristmas.aspx

http://www.scrappingcottage.com/cottagecutznestedscallopovalset.aspx

Sunday, November 04, 2018

Husky and The Tree


Hi!

It's Anja here. Today I have a card with the new Dakota the Husky design. Such a cute die, only available in The Scrapping Cottage store. And I decided to combine it with the Christmas tree.


For this card I used:
- Cottage Cutz dies (Dakota The Husky, Handmade Twig Tree, Happy Holidays Greeting),
- Distress Inks (Pumice Stone, Black Soot, Pine Needles, Fired Brick, Spun Sugar, Vintage Photo, Walnut Stain, Tea Dye, Old Paper),
- white card base (15x15 cm),
- white card stock for die cuts and background (12,5x12,5 cm),
- patterned paper for the sentiment and background (14x14 cm),
- white and brown foam,
- black pen,
- paper glue.

First I cut and colored the lovely husky. I used black pen for the eyes and make up applicator for the chicks.


Then I cut and colored all the pieces for the tree.


I also used colored foam to cut the husky and the base of the tree and then later the greeting. I used the foam to add some dimension. I glued the colored husky and the tree to the foam.


Then I cut the paper for the background. I used white and patterned paper. Then I colored the edges with Distress Ink.


I cut the sentiment from the patterned paper. I again used Distress Ink around the edges. Then I glued the sentiment on the cut foam.


In the end I just glued everything on the card base and my card was finished.


You can find this lovely Dakota the Husky die in the store. Check it out.

I'm wishing you a lovely Sunday and see you again next week.

Anja Z.


Cottage Cutz dies I used:

http://www.scrappingcottage.com/cottagecutzdakotathehuskyexclusive.aspx

http://www.scrappingcottage.com/search.aspx?find=twig+tree

http://www.scrappingcottage.com/cottagecutzhappyholidaysgreetingelites.aspx