Sunday, May 13, 2018

Happy Mother's Day

Hi!

It's Anja with you on this Sunday. It's Mother's Day today and I made another Mother's day card for this occasion. I used beautiful new dies from Mother's day release. The orchid die is so great and it offers so many different possibilities to decorate your cards.


For this card I used:

- Cottage Cutz dies (Happy Mother's Day Phrase, Orchids),
- Zig Markers (Numbers: 043, 046, 050, 051, 060, 062, 065, 260),
- craft card base (10,5x15 cm),
- white watercolor paper for background (10x14,5 cm),
- watercolor paper for die cuts,
- Gansai Tambi watercolors (Numbers: 90, 36),
- rose gold embossing powder,
- Versamark embossing ink,
- heat gun,
- scissors,
- paper glue,
- foam surface for embossing,
- embossing tools,
- water spritzer,
- watercolor brush,
- brush.

First I die cut the sentiment and tapped it in embossing ink.


I used rose gold embossing powder and heated it with the heat gun.


Then I die cut the orchids. I use Bristol paper when I color with watercolor markers.


Before I glued the orchid together I used embossing tools to add a little dimension to the flower.

Then I started with the background. I cut 10x14,5 cm watercolor paper. I used Gansai Tambi colors and put it n my glass surface, using a brush. I stretched the color withe the water spritzer.


I tapper the paper on the surface. I did it repeatedly. When I was satisfied with the pattern, I dry heated it. 


I did the same with the other, gold color. Here I also made a bunch of color drops at the end. I again dried it with the heat gun.


When the paper was dry, I used the scissors for the edges.


I did the same with the front of the card base.


When I had everything prepared, I glued the cad together. And this is the result.


Have a nice Sunday, celebrating with your moms. I'll see you again in a week.


Take care,
Anja Z.


Cottage Cutz dies I used:


Saturday, May 12, 2018

Mom - enjoy your day!

Hello Scrapping Cottage friends! Thanks for taking the time to stop and visit with us today. It's Mary Marsh here bringing you the Wednesday edition of the Blog. Before I get started with my card for today, I wanted to wish all you Mom's out there a very happy Mother's Day.

Also, want to let you know that there is a big sale going on at the online store. You can save up to 70% on dies. Lots to choose from so make your way over there to look around. You just might find something that you can add to your collection.

For today's card, I am featuring the Stitched Birdhouse and Mom w/Heart dies. I needed one last Mother's Day card and this one will be hand delivered. So let's get started with some details on how I created my project.

Step 1: I started my card by choosing my layout. I saw this one on Splitcoaststampers on Wednesday and knew it would work well for my card idea. I love using tilted panels on a card. I think it's such a fun idea.
In case you missed it, Jeanne used this same sketch on her card yesterday. Check it out here.  Just by changing the paper and dies on a layout, you can get a  different look but still tell that the same sketch was used.
Step 2:  Once the layout was decided on, I chose my card colors. I found this patterned paper in my stash that had a lot of colors that I like. I thought all the other elements on the die could be cut in the corresponding cardstocks and give me a feminine looking card.
For the card base I used navy and the angled panes olive and white.
The birdhouse is cut with a navy patterned paper and a melon mambo roof. The bird in hello honey cardstock, flower pot in melon mambo and the trim in mint macaron. The pole is in soft suede and the bow in mint macaron. The Mom phrase is in navy.
Step 3: Before I started card assembly, I wanted to stamp an additional sentiment. Sometimes along with the die cut sentiment, I like to add a stamped sentiment to complement the die cut phrase. I don't always have one that will work but this one was a good fit.
It's a 1-line stamp and  there really wasn't room for it on one line. So I pulled out my MISTI and masked the stamp to work it onto 2 lines.
 
Step 4: Time for card assembly. For the #4 layer of the sketch I used melon mambo ribbon.  And for the #5 element I used the bow that is part of the birdhouse. I moved this element to the left side so it would be part of the birdhouse. You can always tweek the sketch to fit your card. As long as it basically looks like the sketch given you are good. 
To complete this card, I added my Mom phrase and some melon mambo enamel dots. My last Mother's Day card completed - right under the wire (lol)!! Never seems to be enough hours in the day to get everything I want to do accomplished.
Well,  I hope I have provided some inspiration for a way to use this Birdhouse die. Even with the sentiment I used, this could easily be a birthday card for Mom.
 
That's it for me for this post. I will see you again next Saturday.
 
dies I used to create card:
http://www.scrappingcottage.com/cottagecutzstitchedbirdhouse.aspx

http://www.scrappingcottage.com/cottagecutzmomwheart.aspx


Friday, May 11, 2018

Lazy Daisy

Happy Friday!  It's Jeanne today with a fun card for spring or summer.  This card uses the Stitched Tulip and Daisies die from the new Mother's Day release.  This release features some beautiful dies that can be used for much more than Mother's Day!
For the layout of this card I used the sketch challenge on Splitcoast Stampers this week.
I love sketch challenges - they save a lot of time in the craft room!
I started with an A2 card base in Night of Navy, one panel of patterned paper 4 1/4 x 5 1/2 inches, and two panels 3 1/2 x 4/3/4 inches.
I cut three flowers from white card stock, and the leaves and stems from Pear Pizzazz.  I used the Stitched alphabet to cut the word "Hi" and used the centers of the letters A, P and R for the dots.
I used a sponge dauber and Daffodil Delight ink to color the center of the flowers.

I glued the panels down according to the sketch and tied a piece of 12 inch gingham ribbon around the panels.
I added the flowers and sentiment then glued the panel to the card base.  My last step was to adhere a small daisy to the ribbon using a foam dot.

Dies used:
http://www.scrappingcottage.com/cottagecutzstitchedtulipanddaisies.aspx
http://www.scrappingcottage.com/cottagecutzstitchedalphabet.aspx


Thanks for stopping by today   I hope you have a great weekend and a Happy Mother's Day!


Thursday, May 10, 2018

Little Birdie!

Good Morning Scrapping Cottage Friends!

I am using one of our new release dies from the Mother's Day collection.  I hope you take the opportunity to stop by our store.  The new dies can be used for all kinds of occasions!

Design Steps:
1.  Use an A2 white card base.  Cut a piece of white card stock just slightly smaller then the base and run it through a dotted embossing folder.  Glue to the front of the card

2.  Cut a piece of yellow card stock 3 3/4 x 5 and glue to the front of the card.  Cut a 3 1/2 x 4 3/4 piece of chevron DP and glue to the yellow card stock

3.  Use the Oval Doily Frame die and cut out a white oval and a cloud DP oval.  Use the inside of the cloud piece to place inside of the white oval border
3.  Use the Stitched Birdhouse dies and cut all the pieces of the die in white.  Also use the Spring Meadow die and cut out the grass in white.  Use your markers and color all of the pieces.
4.  Assemble the birdhouse on the oval cloud paper and then glue to the front of the card inside of the white oval frame.  Add your sentiment and your card is complete

Cottage Cutzs Products


I hope you take the time to get crafty today!  It is really good for the soul!!
Blessings
Pam

Wednesday, May 09, 2018

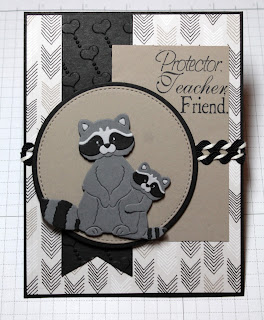
Mama Raccoon & Baby (New Dies)

Hello Scrapping Cottage friends! Thanks for taking the time to stop and visit with us today. It's Mary Marsh here bringing you the Wednesday edition of the Blog. Before I get started with my card for today, I wanted to give you a heads-up on a new release of dies and a sale. The dies are versatile and can be used for cards other than Mother's Day. 

 The new release of Mother's Day dies with 22 different designs is still on sale right now at 25% off. The Design Team has begun showing samples using these dies. Check out the previous days Blog posts to see those samples. There are also a couple of group posts with even more samples.

Now let's move onto my card for today. This one I created with the Mama Raccoon & Baby die that is part of the Mother's Day release. I am using it for a Mother's Day card but again this die could be used for a variety of occasion. How about to welcome a new baby or as a thank you from a new Mom or even for baby shower invitations just to mention a few ideas.

Step 1: Since I knew what die I would be showcasing today, I knew I wanted a layout where the raccoons would be the star. I found this sketch online and decided to go with it for this card.

Step 2: Once the layout was decided upon, I just needed to select my card colors. I found this designer paper that had the name of "go wild". It is a series of different animal prints and patterns. This arrow pattern seemed to work well for a raccoon.
 
So my card colors were chosen with taupe, and black. Not your typical Mother's Day colors but the raccoon and sentiment tie it all together.
The flag panel is cut at the size from the sketch and I used a heart embossing folder for texture.
 
Black card Base: 4 1/4" x 5 1/2"
Patterned Paper Panel: 4 1/8" x 5 3/8"
Taupe Circle: 3rd largest stitched circle die
Black circle: 4th largest circle die
Step 2: Cut my mama & baby raccoon. I followed the colors on the packaging and also used the photo to assemble them. CottageCutz always has a color photo on each die package and this makes die cut assembly quite easy. I used a medium, light gray and black for the animals 
Step 3: Before I started my card assembly, I wanted to stamp the sentiment. The sentiment I am using reads -"thank you for being my protector, my teacher and my friend. I only wanted to use the words - protector, teacher, friend. So I pulled out my MISTI and masked off the other words and stamped what I needed.
 
I wasn't sure at first what to do for the middle thin panel, Then I remembered that I had some twine in my stash. I have had this for so many years and I almost got rid of it and now I am glad that I didn't. It's self adhesive so it was no issue getting it to stick.
 
The panels are all secured with double sided tape. This is my primary adhesive. On the image panel, I used mounting tape because I wanted it lifted off of the background somewhat. After this was done I scattered a few sequins just to enhance the panels a bit. Taupe is not a go to color choice for me. I usually shy away from the neutral colors. But I really like how this card turned out.
Well that's it for me for this post. I hope I have given you another idea for these new fun dies. See you again on Saturday.
 
dies I used to create card:
http://www.scrappingcottage.com/cottagecutzmamaraccoonandbaby.aspx
 
http://www.scrappingcottage.com/cottagecutzcirclesetbasics.aspx

http://www.scrappingcottage.com/cottagecutzstitchedcirclesetbasics.aspx