Friday, March 23, 2018

With "Mush" Love

Happy Friday!  It's Jeanne today with a card for spring.  I love the new stitched dies.  And I fell deeply in love with the Stitched Mushrooms and the snail from the Stitched Garden Friends set as soon as I saw them.
I started by choosing the patterned paper so I could get my colors - Smoky Slate, Pool Party and Calypso Coral.  I cut the side fold A2 card base from the grey, a Pool Party Panel 4 1/8 x 5 3/8 inches and a panel from the pattern 4 x 5 1/4 inches.  I glued the patterned paper to the blue panel but did not glue them to the card base yet.
Next I die cut all the pieces from white, Smoky Slate, Pool Party and Calypso Coral. I used two mushrooms from Stitched Mushrooms, the snail from Stitched Garden Friends and the second largest circle from Nested Scalloped Circles. You may notice that a couple of pieces are missing from this photo.  That's because I sometimes "design-on-the-fly"; that is, I make decisions and change the design as I work.
I used a stamping platform to stamp my sentiment.  (I purchased a set of mushroom themed sentiments because a very good friend is a morel mushroom hunter - who knew such people existed?)  I placed everything in the platform, arranged my elements with sentiment on the circle, then carefully moved the elements and set a magnet in place.  I knew that the sentiment would now be in the correct place.
When the sentiment had been stamped I glued the mushrooms in place and added the snail with foam dots.  I then started to arrange it on the card with a piece of ribbon cut slightly longer than 5 1/2 inches.
However, I felt the main image didn't "pop" enough.  Here is my "design-on-the-fly"; I decided to add another element under the white scalloped circle.  I found the next size up scallop circle was too large but the second largest circle from the Double Stitched Circles worked perfectly!  Since my ribbon is coral, I made the circle blue.  I folded the ribbon behind my panel and glued it, then adhered the panel to the card front using foam tape to add dimension.
I glued the scalloped circle to the blue circle and adhered it with foam dots to the front of the card.  My second "design-on-the-fly" element is this cute button.  I was going to use a real button even though the color wasn't a perfect match, when I noticed that I had also cut a button (normally for the flower center) from the Stitched Garden Friends set when I cut my snail shell.  It worked perfectly!  Just the right color and size!

Dies used:
http://www.scrappingcottage.com/cottagecutzstitchedmushrooms.aspx
http://www.scrappingcottage.com/cottagecutzstitchedgardenfriends.aspx
http://www.scrappingcottage.com/cottagecutznestedscallopcircleset.aspx
http://www.scrappingcottage.com/cottagecutzdouble-stitchedcirclesetbasics.aspx
Thanks for stopping by today!  I hope you enjoyed my card.  Have a creative weekend!

Thursday, March 22, 2018

Easter Bunny

Hello Scrapping Cottage Buddies!

It is Pam from Stamper at Heart Blog Spot creating with you today! And before I get started I wanted to give you a heads up about the sales we are have at our store.  We have a Collection of new release dies called Rise and Shine that are currently 25% off and they are just so much fun!  To see some card samples from the design team click here and here!

Now on with today's card!  I am on my last Easter card for my friends and family in fact most of the cards are just about to go in the mail at the end of the week.  This is my last one and I just love how this little guy turned out in his overalls with the little buttons!


Designer Steps:
 1.  Start with an A2 white card base and cut a 4 x 5 1/4 piece of blue card stock.  Run the blue card stock through a cloud embossing folder
 2. Cut out the greeting using the Happy Easter Phrase die and white card stock.  Glue the phrase to the upper part of the blue embossed panel
 3. Cut out the white fence using the Victorian Fence die.  Then glue it just below the greeting
 4.  Next cut out a strip of green card stock 4 x 1 1/4 and 3 grass strips using the Spring Grass die
 5.  Layer the grass onto the bottom part of the card as shown
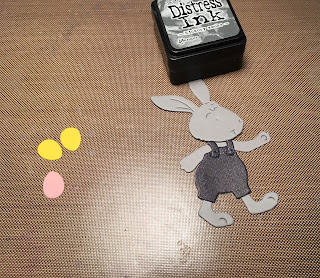
 6.  Using gray card stock and the Mr. Peter Rabbit die cut out the body.  Next use the same die and cut out the overalls in a denim DP.  Also using the same die and cut out the Easter eggs using yellow, orange, and pink card stock
7.  Shade the bunny with a gray ink then glue on the overalls add the black pearl eye and tiny buttons.  Glue the eggs into the grass and one in the bunny's hand and your card is complete.

Cottage Cutz Products


I hope that you are finishing your Easter cards too and that this little card has given you some inspiration!  As always thanks for stopping by!
Blessings
Pam


Wednesday, March 21, 2018

Quick and Easy Easter Treat Containers


Hey Everyone, Sherry here with CPR - Craft Pray Repeat and I'm here with another project using some of my new favorite dies. I have really enjoyed this Spring and Easter Release and hope that you have enjoyed the many projects that you've seen on the CottageCutz YouTube channel and blog. Click Photo below to watch the video showing how fun this project is to make and how it would be a great project for schools, church groups, scouts and of course, to share at your office with co-workers.


Remember that the Rise and Shine Collection is still on sale at the store.
Click HERE to go directly to that page 
to start looking at the amazing dies that were released.


Remember to practice your CPR - Craft Pray Repeat.
Thanks for visiting me today and happy crafting.
God Bless,
Sherry

Tuesday, March 20, 2018

Coloring Easter eggs

Hi, Janja here!

Coloring Easter eggs is a ritual in the spring. There are so many fun ways to decorate Easter eggs. Let's see how Bunny did it.


Supplies:
- CottageCutz dies: Egg Painting Bunny, Spring MeadowStitched Alphabet, Miss Petunia Bunny, Just Hatched Chick, Pillow Box Plus, Stitched Oval Set
- white card base: 5.3 x 5.3" (13,5 x 13,5 cm), folded
- white cardstock
- silver cardstock
- Distress inks: Spiced Marmalade, Festive Berries, Aged Mahogany, Broken China, Mowed Lawn, Tea Dye
- Distress Oxide ink Vintage Photo
- Memento inks: Tangelo, Lady Bug
- glue, double-sided adhesive tape, self-adhesive pads, fun foam

Cut out all the pieces we need. Mine are colored with Distress inks.


Cut the same large white frame as the card base. Stamp some stains on it.


Make two holes in the frame, and insert a string. Attach letters on the string.


Fix the frame to the card base with a self-adhesive foam tape or use a fun foam.


Complete the card.


And for the youngest, something sweet. Pillow boxes with chocolate eggs.


I would like to remind you that the new Rise & Shine release is still available for 25 % less. 

Thank you for coming over. Have a nice day.