Saturday, December 16, 2017

We Three Kings

Hello Scrapping Cottage friends! Thanks for taking the time to stop and visit today. It's Mary Marsh here bringing you the Saturday edition of the Blog.

Well, it's 9 days until Christmas and I have just a few more Christmas cards to finish. I plan on getting them out in the mail this weekend. I have several that will be traveling across the country but I am sure they will make it on time. Nothing like the last minute rush (LOL)!!!

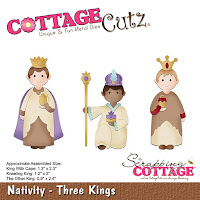
Today for your viewing pleasure, I created a card using the Nativity - Three Kings die. I had this idea to use this Three King's die and a background of sheet music. Well fortunately for me, Pam my DT sister, directed me to where I could get these vintage printables for free. And, my card came to life. So let's get started with some details on how I created this card.

Step 1: My first step was die cutting the 3 Kings. I wanted them to have colorful outfits so I used bright colors for their Kingly attire.
I colored two of the faces with Copic E00 (skin white) and E02 (fruit Pink) for some shading. For the 3rd King I sponged a medium brown ink on white cardstock and then die cut from there.
The die pieces were adhered with Ranger Multi Medium Matte. I like this adhesive when using die cuts because it dries clear.
Step 2: The vintage song sheet can be sized however large you need it. I used my photo editing software to size it to 4 x 6 and then printed on parchment paper. Then I cut it down to 3 7/8" x 5 1/8". If you are interested here is the Pinterest link for this song printable. I used gold foil as my layering panel and the card base is a berry shade. It's the same color I used for the Kings garments.

Berry Card Base: 4 1/4" x 5 1/2"
Gold Foil Layer: 4 1/8" x 5 3/8"
Song Panel: 3 7/8" x 5 1/8"
Step 3: Time for card assembly and I used double sided tape to attach the panels.
 The Kings were attached with dimensional adhesive. I wanted them raised up from the panel for depth.
Once they were on the panel I decided the Bethlehem Star would look good. I wanted something small as an embellishment. So I used the Three Kings Peace ornament and cut just the star. I wanted more depth here as well so I cut 2 more and layered them.
That complete my card for this week. It's a simpler one, but I like how it turned out. We celebrate the 3 Kings day on January 6. If you haven't finished your Christmas cards yet, this would be one you could re-create and send out for the New Year. And the die is on sale right now for 25% off.

See you next Saturday!!

Dies I used to create card:
http://www.scrappingcottage.com/cottagecutznativity-threekings.aspx

http://www.scrappingcottage.com/cottagecutzthreekingspeaceornamentelites.aspx


Friday, December 15, 2017

Gingerbread Gift Card Holder

Happy Friday!  It's Jeanne posting today after taking a week off for a business trip.  We're getting down to the wire for Christmas and if you're like me, your go-to gift (especially for teenagers) is a gift card!

The Fancy Pocket Plus die makes the perfect gift card holder.  It comes with accessory dies or you can decorate it for any occasion using other dies.  Here I used the Gingerbread Man Cupcake die.
I cut all of the cupcake pieces from various colors of card stock.
I used Crumb Cake ink and a sponge dauber to shade the edges of  the gingerbread man and icing.
I cut the pocket from a coordinating color and used a hole punch in the top so that I could make a tag type holder.
Next I assembled the cupcake and used foam tape n the back so it would sit up off of the pocket.
After assembling everything I added Nuovo drops for the sprinkles on the frosting.

I love this pocket because it makes gift card holders so easy!  I made this into a tag but you can easily use it to add to a card.
http://www.scrappingcottage.com/cottagecutzfancypocketplus.aspx

http://www.scrappingcottage.com/cottagecutzgingerbreadmancupcake.aspx

Have a fun and creative weekend!


Thursday, December 14, 2017

Sick Pup!

Good Morning Scrapping Cottage Friends!

It is Pam creating with you today!  I hate to say it but flu and cold season is upon us!  And Cottage Cutz is a step ahead of it with a new release with tons of adorable Get Well dies!  Check out this card I made for a friend!

Design Steps:

1.  Cut out all of the pieces in a cream color and then cut out the dogs body in brown using the Nurse Puppy die

 2.  Assemble the piece shading and coloring as you assemble

 3.  Using 3 different patterns and colors of DP cut out 3 different size circles.  Use the Nested Wacky Stitched Circle Set
4.  Use an A2 white card base and cut a slightly smaller piece of pink. Next cut a piece of green checked designer paper 4 x 5 1/4 glue the checked paper to the pink.  Add the circles popping up the largest circle then added all the die cut pieces as shown.  Cut the sentiment in pink using the Ouch with Tooth and add it to the top left corner


Hope your check out all of the Get Well Dies! They are so much fun and would make a great gift for any crafter!

Blessings
Pam

Wednesday, December 13, 2017

Nurse Puppy - Piecing Tutorial & Card


Hi! It’s Janet back again with a video project to share with you. If you have visited here lately, you know we’ve been showing off the newest Get Well die release that Scrapping Cottage issued for Black Friday. Today, my project showcases the adorable little dog in the Nurse Puppy die set.

As the case with many CottageCutz dies, you are getting a lot packed into one die. Nurse Puppy includes the precious little puppy plus seven additional accessories related to the medical field. That's right, SEVEN! The pieces could be used separately or combined to celebrate many different events. Since there is so much in this set, my video today concentrates on how to piece together the puppy and all her accessories. Even if you don’t have this die, seeing how it comes together will help you pick up some tips that will come in handy with similarly detailed sets.
   
Click on the video thumbnail below to see how I put this little cutie and all her accessories together.


If this card base design seems familiar it is because our very own Design Team member Lois Bak posted the instructions for it here a little over a year ago on a project titled Center-Step Mushrooms. Lois' card base designs frequently include fancy folds and I am always looking for good ideas for unique folds. This card base is one of many that I have stored away in my archives. I thought the center step design would work great to feature all eight pieces in this die set and I wasn’t disappointed. This base can be used for any kind of card you'd like to make. If you’d like to revisit her post on the blog click on the link. She includes all the measurements, instructions and construction photos for the card base and the mushrooms she artfully placed on it: CENTER-STEP MUSHROOMS

I’ve also recorded a video tutorial of the center step card construction on my channel. Click on this link to visit that: CENTER-STEP CONSTRUCTION TUTORIAL

Thanks for joining me today here at the Scrapping Cottage. I won’t be back until after Christmas so I want to take this time to wish all of you the very merriest and happiest Christmas ever! I’ll be back on the 27th to show you a New Year’s project. 2018 here we come!

Hugs,

Janet

Dies used in this project:


Tuesday, December 12, 2017

Cup of Comfort Ornament Tag

Do you enjoy a little cup of comfort?  You know the kind that is filled with delicious, warm cocoa, coffee or tea.  I created these sweet Cup of Comfort Ornament/Tags using the Nested Stitched Doily Set and the Cocoa & Sweet Treat Dies.
I used watercolors to color in the images.  To add deeper color to areas of the die, I add a base coat of the watercolor then let dry.  Next add a second coat in the areas to you would like a deeper more intense color, letting dry between coats.
Assemble the images, add some red/white twine, lace pieces, embellishments and glitter glue to add shimmer.  Add a hanging tag with the red/white twine.
I hope you enjoyed a little Christmas inspiration.
 Wishing a  creative day, dear friends.


Monday, December 11, 2017

Nativity Easel Card

Hi, Lois here with another fun project.  Even though Christmas is just a few weeks away, I'm still making Christmas cards.  As you probably are aware, I like to make fun-fold cards.  A particularly easy one is an easel card, and I have just that for you today.


I wanted to use navy as the card base, but I don't have any heavyweight navy cardstock; so I used heavyweight white as the base and just used the navy as a mat layer behind this really pretty marbleized pattern paper.  I cut two pieces of white -- 4 1/4" x 8 1/2" and 4 1/4" x 4 1/4"; two pieces of navy - 4" x 4"; and two pieces of patterned paper 3 7/8" x 3 7/8".


I scored the larger white piece on the long edge at 2 1/8" and 4 1/4" . . .


. . . and folded on the score lines.


I then layered the two square panels -- one with white/navy/patterned paper and the other with just the navy/patterned paper.


It's important to use a strong adhesive to hold this panel onto the easel, so I placed three strips of Scor-Tape on the final small section of the easel . . .


. . . and adhered the square front panel.  The other square panel is adhered to the inside.


I then cut my die-cuts from navy, silver and a scrap of red.  You'll notice that I cut several layers of the sentiment.  As the sentiment is going to act as the "bumper" for my easel, it needed to be thick.  The navy cardstock is quite thin (65#), and I actually have five layers there -- two of the Merry Christmas sentiments are double thickness.


Using a fine-tip bottle of liquid glue, I adhered the Nativity scene, bells and bows to the front of the card.  As you can see, I cut down the "hangers" for the bells.


After gluing all the layers of Merry Christmas together, I glued the sentiment to the inside.  Just an FYI, the die I used for this sentiment actually says "We Wish You a Merry Christmas," but I cut out just the "Merry Christmas" portion.


Here again is my completed card.


CottageCutz dies used on my card are:


http://www.scrappingcottage.com/cottagecutzwewishyouamerrychristmaselites.aspx


http://www.scrappingcottage.com/cottagecutzmistletoeandbells.aspx