Thursday, November 23, 2017

Oh No Kitty!

Hello Scrapping Cottage Friends and Happy Thanksgiving!

It is Pam crafting with you today!

A HUGE BLACK FRIDAY SALE IS GOING ON NOW!!! THIS SALE FEATURES OUR LATEST RELEASE DIES FOR THE ULTIMATE GET WELL CARD! HERE IS A PEEK of all the new release dies! Also make sure you check out our entire store there are many items on sale!! HERE IS THE LINK TO THE STORE!

Now on to my card for today!

Design Steps:
1.  Using the new release Oh No Kitty Die cut out all of the pieces on white card stock


 2.  Use your markers to color all of the pieces and glue them together.  What a cute Kitty!!

 3.  Use an A2 white card base cut a piece of black card stock slightly smaller then the base at
5 1/4 x 4

4.   Cut a DP 5 x 3 3/4 then glue it to the black card stock and before adhering it to the front of the card add the ribbon


5.  Using the Cottage Cutz Nested Stitched Scallop Rectangle cut 2 in black card stock.  Glue to card as shown with the sentiment at the top and the Kitty popped up just below it.  This card will make anyone who receives it feel better and bring a smile to their face!


Cottage Cutz Products


MAKE SURE YOU CHECK OUT THE FANTASTIC SALE!


Blessings


Pam

Wednesday, November 22, 2017

Cherished Memories Art Journal

Hello die lovers!  Sheila here, sharing on of my newest art journal pages using the Sparrow on the Post die cut.
I first die cut the white card stock then stamped the image using Stazon ink.
Stazon in doesn't run when using watercolors. 
Next, I used watercolors to color in the image.  Letting it dry.
Then, I found a wonderful vintage image to pair the sparrow with, adding twill, kraft e-flute and vintage lace.
Many wonderful memories bird watching with my family.
Do you bird watch?

Product used:

Just a reminder that there is a big Black Friday sale going on now in the online store with savings up to 80% off on dies. And, there is a new "Get Well" release that also has savings of up to 60% off. Drop by the store to see all the online deals.

Tuesday, November 21, 2017

Christmas cupcakes

Hi, Janja here!

Preparations for the most beautiful holiday of the year are getting closer. You have probably started looking for ideas and decorations that will adorn your home.
My choice today are the cupcakes on the card and the ornaments.


Supplies:
- CottageCutz dies: Santa Bear In Pot, Gingerbread Man Cupcake, Santa Cupcake, Snowman In Cocoa, Merry Christmas Santa, Nested Ornaments - Ball, Stitched Circle Set, Nested Stitched Scallop Circle Set, Circle Set
- white card base: 4.25 x 5.5" (10,7 x 13,9 cm), folded
- patterned paper: 4 x 5.2" (10 x 13,2 cm)
- white and colored cardstock
- glue, double-sided adhesive tape, self-adhesive pads
- metallic gold string
- Distress ink pads: Festive Berries, Aged Mahogany, Twisted Citron, Mowed Lawn, Antique Linen, Vintage Photo, Walnut Stain

To begin with, die cut all the elements of the Santa bear from colored cardstocks. Before we assemble them into a whole, color them additionally with different distress ink pads, to obtain depth.


Cut three circles that match each other in size.


Cut and fold white cardstock in half, to get the card base. Cover the front of white card base with patterned paper. Attach Santa bear with self-adhesive pads on top, and the sentiment Merry Christmas to the lower part.


Assembly the card.


Even for ornaments, use the same assembly procedure. First cut out individual motives, and then the basics, where we will fix them.


We can combine different dies with each other. Like a snowman that I took from the cup, and put it in a cupcake.


Finally, I invite you to watch a video that shows all the new
"Get Well" dies. 


Thanks for stopping by. 
Enjoy the beautiful moments that are in front of you.


Monday, November 20, 2017

Thank You, Doctor!

Hi, Lois here with my pre-Thanksgiving post.  Along with Thanksgiving comes Black Friday.  The Scrapping Cottage/CottageCutz is celebrating Black Friday with a new release of 12 Get Well-related dies.  They will be available at special pricing for the bundle.  The one I used for my card today is called Medical Bag.  It's not actually a "get-well" card, but rather a thank-you card you might send your doctor for a job well done.


To start my card I cut a piece of heavyweight white cardstock 5 1/2" x 8 1/2" and scored it at 4 1/4".  In addition, I cut a piece of red cardstock 5 1/4" x 4 1/8" and a piece of black and white plaid patterned paper 4" x 5 1/8".


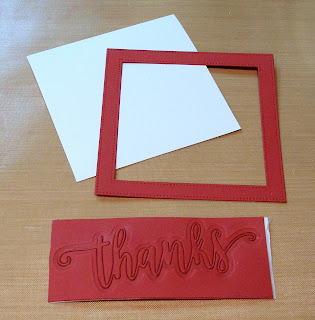
The reason I left only 1/8" difference in the layers on my card is because I wanted to cut a frame with the square wide-frame die, and I needed larger than normal base layers.  I also cut a piece of white cardstock slightly smaller than the frame and the "thanks" sentiment die.


I then  added strips of foam tape behind the frame.

Now I was ready to cut the pieces from the Medical Bag die.  I've embraced a "tool" that Janet introduced us to in one of her videos -- a fun foam sheet wrapped with Press 'n Seal.  This is marvelous to keep all those little die-cut pieces from getting lost.  Thanks, Janet!!!


I sponged a little bit of darker blue on the caduceus and constructed the doctor's bag and stethoscope.  As I was putting the stethoscope together, I realized that the largest circle should have been gray, not black.  So I cut another circle from the gray cardstock.  I then stamped the sentiment onto the white panel inside my frame.


All that was left now was to complete my card.  I glued the "thanks" at the top of the card and the completed frame below it . . . and I was done.


Be sure to check out the CottageCutz website on Black Friday.  Here's a video showing all the dies in the Get Well release.

https://www.youtube.com/watch?v=Ziph4f2FWyE&feature=youtu.be


CottageCutz dies used on this card are:


http://www.scrappingcottage.com/cottagecutzpiercedwidesquareframesetbasics.aspx

http://www.scrappingcottage.com/cottagecutzexpressionsplusthanksphrase.aspx