Friday, September 22, 2017

Chickadees for Fall

Happy autumn everyone!  It's Jeanne sharing today and I am so happy fall is here -it's my favorite season.  To celebrate I made a card with an autumn feel.
These chickadees are part of the new release and come with both stamp and die.  To make the card, I first colored the birds with Copic markers and cut them out using the coordinating die.  Next I cut an A2 sized panel out of the gingham paper along with a 1 1/2 x 5 1/2 inch strip of dark red card stock.  I used the largest Nested Wacky Stitched Rectangle die to cut the white panel.
Then I stamped my sentiment in dark brown on the stitched panel.  I love how this sentiment goes with the songbirds!
I used several shades of green and two shades of brown to cut the foliage from the Pine Spray die.
Next, I adhered the panels down, offsetting the stitched panel so that I would have room on the left for the large sprays.  I love asymmetry in design and think this works well here.
I used several of the foliage leaves that I cut but not all.  After I had decided on placement, I glued them in place and used foam dots to adhere the birds.

http://www.scrappingcottage.com/cottagecutznestedwackystitchedrectangleset.aspx

Thanks for stopping by and I hope you have a great weekend!


Thursday, September 21, 2017

Spooky Cake!

Hello Scrapping Cottage Friends!

It is Pam from Stamper at Heart Blog Spot creating with you today! The first day of fall is tomorrow my very favorite season!  I just love the warm fall colors and cheering on my favorite football team! And of course Halloween is always fun. It is a great excuse to play dress up even at my age! Hee Hee!!

Cottage Cutz has some wonderful new Halloween dies so please check them out!  They are now available at our online store.

Design Steps:


1.  Start with an A2 white card base, cut a 5 1/4 x 4 1/8 piece of black and a orange polka dot piece
5 1/8 x 4.  Glue the black to the white card base and the orange polka dot to the black

 2.  Use orange, gray, purple, black, dark brown, white, yellow and green and cut out all of the die pieces with the Spooky Cake die and Halloween Pedestal die
3.  Add some Distress Ink to the pieces for some depth
4.  Assemble all of the pieces
5.  Pop to the front of the card and add Boo with a label maker

Cottage Cutz Products

Thanks for stopping by and Happy Fall Y'all!

Blessings
Pam

Tuesday, September 19, 2017

Happy Halloween Hanger

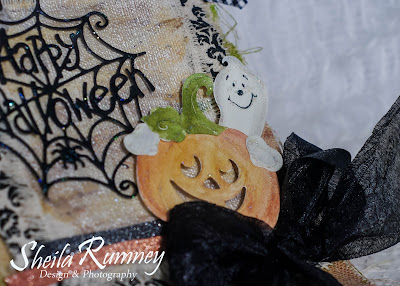
Hello creative peeps!  Sheila here to share a mixed media Happy Halloween Hanger.
I used while watercolor paper to die cut the Happy Ghost Cottage Cutz.  
I used different shades of yellow and orange watercolors to start layering color on the dies.
I continued to add layers for watercolor color in the pumpkin, stem and ghosts.  Once dried, I assembled the Happy Ghost die gluing together then adding glitter glue.
Then, I die cut black cardstock with the Happy Halloween Web.  Then adding glitter glue to add a little sparkle.

For the canvas pennant hanger, I used spritzed on glimmer mist in coordinating colors. Then I used high impact paints, in coordinate colors, to add dimension and shimmer to the canvas.  Next I layered the canvas pieces on top of the pennant hanger.  
(Created with Cottage Cutz dies, Canvas Corp Brands, Tattered Angels products and Prima Marketing Watercolors.)

Then, I added ribbons, lace, vintage button and washi tape to complete.

I hope you enjoyed a little Halloween inspiration!  Remember to go to the online store on Wednesday, Sept 20th for ordering.

Die cuts used:

CC-381 Happy Ghost
CCE-493 Happy Halloween Web

Monday, September 18, 2017

Nativity Bridge Card

Hi, Lois here with some brand-new CottageCutz Christmas dies. It's always fun to learn a new technique.  My card today actually has two techniques that I just learned -- a fun-fold and a background.  CottageCutz has a whole bunch of new Christmas dies, which will be available on their website on September 20th.  I used two of them on my card -- Away in a Manger and We Wish You a Merry Christmas.


The background technique I recently learned is called Galaxy Background, which looks like it would be much more difficult than it actually is.  To create the background you sponge various colors of Distress ink onto white cardstock.  The colors I used, in order, are: 1) Mermaid Lagoon; 2) Peacock Feathers; 3) Chipped Sapphire; 4) Seedless Preserves; and 5) Black Soot.  During the process you'll wonder how this will possibly look good; but, be patient, it comes together at the end.  As you can see, each of the colors is sponged sparingly so as not to overtake the previous layer.  When you get to the Black Soot, however, you lightly cover the entire card.  After sponging is completed, put a little bit of white acrylic paint on an acrylic block and dilute it slightly with water, mixing it together with a small paint brush.  Then flick the paint brush against the side of your finger to splash the paint onto the entire area.  Here is a photo of the six steps involved.  You can see how the colors build upon each other.


Now you can start your card.  Cut a piece of heavy weight white cardstock 4 1/4" x 8"  and score at 1 1/4", 2 1/2", 5 1/2", and 6 3/4".


My background piece was originally a white piece of cardstock 4" x 6 3/4".  Cut the sky pieces as follows:  a 1" strip, a second 1" strip, a 2 3/4" strip, and another 1" strip, leaving one final 1" strip.


Fold the card base as shown in the photo -- very similar to a double gate-fold card.


Adhere the sky pieces to each section of the card base.


Cut the sentiment and Nativity border.  I used glitter paper for each element -- pale blue for the sentiment and silver for the border.


Glue the sentiment onto the center section of the card, with the star extending just slightly off the top.  When adhering the Nativity border, just apply glue to the ends of the die cut.  Lay the card flat, with just the left side folded on the score lines.  Adhere the left side first, and then span the center and adhere the right side.


As you can see, the card will lie flat for mailing; but, when you fold both sides up, it will stand with the Nativity border "bridging" between the two end panels.  You can see in the following photos the 3-D look of this card.


Here again is the card from the front.


I hope you give these fun techniques a try.  I'm really hooked on that Galaxy Background!  

CottageCutz dies used on my card are:


Sunday, September 17, 2017

Hello Twins

Hi!

It's Anja here. Because I'm still waiting for my Halloween dies to arrive, I made a different themed card today. I bought some new skin toned Zig markers a few weeks ago and I gave them a try today. I figures Baby Doll dies are perfect for that. And that is why I made a baby card, this time to welcome twin baby boys.


For my card I used:
- Cottage Cutz dies (Baby Dolls, Hello Phrase),
- Zig markers (Blush, Tea Rose),
- Distress Oxides (Vintage Photo, Walnut Stain, Peeled Paint, Broken China),
- white card base (21x10 cm),
- white watercolor paper for die cuts and background (20,6x9,6 cm),
- alphabet stamp,
- VersaFine Onyx black ink pad,
- black pen,
- watercolor brush,
- baby wipes,
- stamping platform.

First I die cut all two baby boys figures from watercolor paper. I colored them with Zig markers and watercolor brush.


 Hair and diapers are colored with Distress Oxides. I glued all body parts together.


Then I made the background. I used baby wipes and Distress Oxides to color the edges. I colored the phrase hello the same way.


I used stamping platform to stamp the word "twins". I used black ink.


And then I just glued everything together. It would be fun to make a girl card too :)


Have fun and enjoy your Sunday.
Anja Z.

Cottage Cutz dies I used: