Thursday, April 20, 2017

Welcome Baby!


Good Morning Dear Scrapping Cottage Friends!

I am happy to show you another one of the new baby dies that was just released.  I have had two great nephews born in the last 6 months and they came down to visit from Ohio.  They were both just so adorable.  So needless to say I am in the baby mood!  Today I am showing you a card using Sweet Baby Lamb.


Here are my design steps for this sweet baby card!

1.  Use an A2 white card base cut a piece of cloud designer paper using the second largest Pierced Rectangle die then glue to the center of the card front
2.  Cut a white fence using the Victorian Fence die, cut green grass using the Spring Grass die and cut a pink frame using the Pierced Wide Rectangle Frame Set.  Glue the fence and the grass to the bottom of the sky.  Then add dimension tape to the frame and mount it

3.  Cut and assemble all the little critters and accessories from the Sweet Baby Lamb die set


4.  Use the second to the smallest Cross Stitch Circle dies and cut a white circle.  Stamp the sentiment and add a button with some pink and white bakers twine


Here are the Cottage Cutz Products I used to create this card!


These new baby dies are so sweet!  I hope you will make a new mom very happy by making her a card to celebrate having her new little one!

Blessings
Pam


Wednesday, April 19, 2017

Congratulations Card - Baby Monkey


I used several techniques on this monkey to maximize his cuteness. First I shaded him using brown and black chalks before putting him together. I raised up his paws with foam tape and rounded his tummy before placing a strip of foam tape down his middle to help retain the baby tummy roundness. He demanded some googly eyes and I happily complied! Then his mouth was traced with a black fine-lined marker so his personality could really shine. I also rounded the balloons and attached them with foam tape to the strings. The balloons are part of this monkey set and I know I'll use them for many other projects. It's always nice when a die is versatile.


For the interior of the card, I nested three stitched ovals, tucked clouds into them and stamped a message in the middle of the top oval. This left plenty of room to write a message to the lucky new parents. The clouds used in this card and the sun came from the Clouds & Sun die set.


Thanks for spending some time with us at the Scrapping Cottage! Don't forget to check out the new release and I'll be back again on the 30th with another new project video.


Tuesday, April 18, 2017

~ Follow Your Dreams (new dies) ~


Hello Scrapping Cottage friends! Thanks for taking the time to stop and visit today. It's Mary Marsh here bringing you the Tuesday edition of the Blog.

We just had the cutest release of baby dies. There are 42 different designs. So perfect for creating cards to welcome the new baby or even as baby shower invitations.
Today for your viewing pleasure, I am showcasing the new Choo Choo Train dies. But, I am showing another way to use this die that isn't centered around a baby card.

So without further delay, let's get started on how I created my card.

Teal Card Base: 5 5/8" x 4 3/8"
Black Layer Panel: 5 1/2" x 4 1/4"
Image Panel: 5 3/8" x 4 1/8"

Step 1: I started my card this week by die cutting my train pieces. I used the colors from the Splitcoaststampers color challenge #631. The colors are red, kraft, teal and black. I also used a neutral of light and dark gray.
teal, black, red, kraft

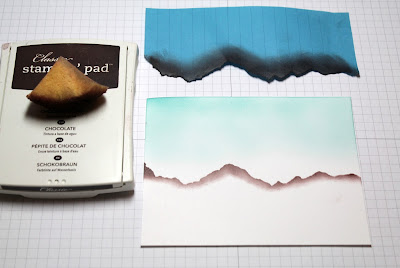
Step 2: I decided to create an outdoor scene for my train. I started it by sponging the teal ink on the top part of my white cardstock.

I wanted some mountains in this scene so I took a post it note (it's blue) and tore it into a mountain range shape. Placed it on my cardstock to cover the card top and sponged in chocolate ink.
 
For the final step to the background, I sponged more teal ink and then crumb cake and tea dye distress. I was happy with how the background turned out.
Step 3: I usually stamp my sentiment as one of my last things to complete my card. But, since I had a couple of layers on this one I stamped at this point in the process. I used Tuxedo Black ink and my MISTI for placement.
Step 4: I placed my train cars, couplings and track on the completed background scene.
 
Step 5: I layered the black cardstock to the image panel and then to my teal card base. And, that completed this card. Here is a close-up of the card. I wanted to show the detail in the train cars -right down to the couplings that connect the train together. You can click any of the photos to make them larger. 
 
I hope I have given you an idea for a different way to use this die. Sometimes by just thinking out of the box a bit, you can get a creative idea to use a die in a unique way. Well, that's it for me for this post. See you on Saturday.
 
 
Dies I used to create card:

http://www.scrappingcottage.com/cottagecutzchoochootrain.aspx


Monday, April 17, 2017

Nest with eggs

Hi, Janja here!

Each spring, most of the migratory birds return from wintering in their rearing area. We will see most of the nests just in this and the following two months.
And so for today I prepared nest with eggs on thank you card.


Supplies:
- CottageCutz dies: Nest With Eggs, Songbirds, Spring Greenery, Thank You
- white card base: 5.3 x 5.3" (13,5 x 13,5 cm)
- patterned paper: 4.72 x 4.72" (12 x 12 cm)
- white and colored cardstock
- corner punch

From white and colored cardstock cut out with dies a nest with eggs and greenery. Coat eggs with glossy accents to get the shine. On some green twigs apply pearl dots. Also prepare birds cutouts and add "Thank you". Cut them out twice.


While the eggs and dots are drying, prepare a card base and the background from patterned paper. Cut off one corner with corner punch.


Assemble the card.


Thank you for coming over. Have a nice day. 


Sunday, April 16, 2017

Easter Eggs Card

Hi!

It's Anja here. I hope you're having a nice Easter Sunday.
I have an Easter card for you today. I used the beautiful Fancy Spring Eggs die which is one of my favourite Easter eggs dies.

I used:
- Cottage Cutz dies (Fancy Spring Eggs, Spring Foliage Border, Bib Mini),
- white card base (15 x 15 cm),
- craft paper (14,5 x 14,5 cm),
- 2 white paper strips (6 x 15 cm and 5,5 x 15 cm),
- Distress inks (Barn Door, Vintage Photo, Shabby Shutters, Peeled Paint),
- paper glue,
- adhesive foam pads,
- round corner punch,
- yellow and white marker


First I die cut three embellished eggs from white card stock and three egg bases from craft paper. I colored the embellished eggs with Barn Door and Vintage Photo Distress ink to make them look like Easter eggs colored in onion peelings. I used the same Distress Inks to color the edges of the bigger white paper strip. 


Then I die cut and then colored two pieces of border. I used Shabby Shutters and Peeled Paint distress ink.


I rounded the corners or white card base and craft paper square. I put some Distress inks on the edges of the craft paper. I used the same colors as for the eggs.


Then I glued all the pieces together. I used adhesive foam pads for the white strip. 


I cut a few small flowers and colored them round the edges with Barn Door Distress ink. I gave them a little shape and adhere them to the green border. Finally I used white marker to put a little more interest to the greenery and yellow marker for flower stamens.


And just a reminder. There is a new release of beautiful baby dies and it is available on the Scrapping Cottage site. Don't forget to check it out and get 25 % discount.

Have a nice Sunday.
Anja Z. 

Cottage Cutz dies I used: