Friday, April 07, 2017

SWEET BABY CARDS


Hello dear friends !!!!

It's Anita here with another post with beautiful CottageCutz products. Did you see the beautiful baby theme dies that have been launched recently. They will surely win your heart... So cute they are!!!!

I have not yet started working with them , but then I am showing some old dies that are so beautiful that I love creating baby theme projects with them.

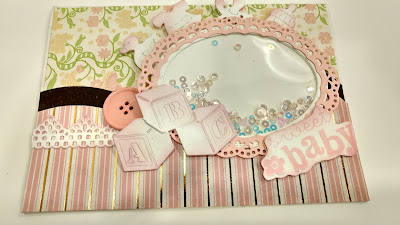
Here I have made a boy and girl shaker card using CottageCutz dies.

you can check all the baby themed dies here.


To make these cards, cut a card base 7" x 5". 
Adhere matching baby themed pattern papers. 
Cut 2 ovals from the stitched oval die. 
Cut 6 frames using stitched oval die. Adhere the three frames together one, for each card.
Adhere the large oval on the card base. Add sequins and add the transparent sheet cut to oval size. 
Adhere the frames forming a shaker card. Die cut all the baby themed pieces and distress accordingly pink and blue for the cards. Adhere on the card as shown. 
Add sentiment.

It is so much fun and easy to create these beautiful cards with CottageCutz dies.
List of Dies Used.


Do visit the CottageCutz blog and the store for amazing products and inspiration. Thanks for spending time here. Have a nice day.


Thursday, April 06, 2017

Spring Bunnies!

Good Morning to All of Our Scrapping Cottage Friends!

It is Pam with an Easter card to share with you today.  I have created a card using inlays from the die called Spring Bunny Egg.


1.  Begin by cutting the Spring Bunny Egg die and removing all the pieces. Be careful to put them in a place where the piece will not get lost.  I actually place them in a small box until I am ready for them

2.  Trace the egg to make a back so that you can glue down the inlaid small pieces after you are finished coloring them set aside

3.  Mask the top half of the egg using green ink sponge the bottom half of the egg.

 4.   Then mask the bottom of the egg using blue ink sponge the top part of the egg

5.   Gather all the inside pieces and begin coloring them with your copic markers or any coloring tools you may enjoy using

6.  After you are finished coloring glue the back to the egg and then start adding the colored inlay pieces
7.  Next using the largest Double Stitched Rectangle die center a piece 5 1/4 x 4 inch piece of yellow checked paper to make a frame

8.   Using the second largest Double Stitched Rectangle die cut 5 1/4 x 4 inch piece of yellow card stock
9.   Glue the yellow card stock directly under the checked paper
10.  Using the Grass Border die cut a strip of grass and glue it behind the frame on the yellow card stock

 11.  Glue the entire frame to the front of an A2 card
 12.  Center your Spring Bunny Egg in the frame under the grass
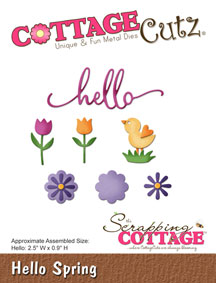
 13.  Cut two more bunnies using the Spring Bunny Egg and color them plus cut 3 orange flowers using the Hello Spring die
 14.  Add the bunnies and flowers as shown and for a final touch add a small bow to the top left of the frame
Cottage Cutz Products used:


I hope you enjoyed this Spring tutorial and that you will give it a try!!

Thanks for stopping by today! I am always so glad you did!!

Blessings
Pam


Wednesday, April 05, 2017

CottageCutz Woodlands & Woodland Animals


Hello, everyone!  So glad you stopped by the Scrapping Cottage blog!  This is Bev Polen from Guneaux Designs, and I am a guest designer for today!  The project I have created for you features the wonderful stamps and dies from the CottageCutz Woodlands Set, CottageCutz Woodland Animals Set, and the dies from the Rustic Sign & Trees.  I had so much fun creating this card, and I hope you enjoy it.


I love the gorgeous fox images and dies from the CottageCutz Woodland Animal Set; therefore, I had to add three foxes to my card.  The little raccoon is so adorable that I planed to add two but there was not room on the card.  If you have not purchased the set yet, I promise you will have so much fun creating with it and the CottageCutz Woodlands Set.

To create the card, I stamped, colored (with copics), and cut out the images I would use for the project.


After die cutting the elements, I decided I wanted to fussy cut around them, which I did.  Then I created a Step Ladder Center Cut Card with white card stock, and sponged on it a sky, sun, and grass.  It was then time to load up the card with the critters.  What fun!!

If you would enjoy making a similar card, select the elements you want to showcase and color and die cut them.  Then create the Step Ladder Center Cut Card by following these instructions:

  • Cut a 7" x 10" piece of heavy card stock.
  • With the 7″ side at the top of a cutting tool (henceforth, trimmer), move the card stock to the left to the 1-5/8″ mark.


  • Move the cutting blade of your trimmer down to the 1″ mark and lower the cutting arm.  


  • Cut the paper from the 1" mark to the 8-1/2" mark.
  • Turn the paper over (not around or the cut lines will not match), move it to the 1-5/8" mark on the trimmer, move the cutting blade down to the 1" mark, and lower the cutting arm. 


  • Cut the card stock from the 1" mark to the 8-1/2" mark.
  • Remove card stock from the trimmer, and it will look like the following.  (Note: There is 1" from the top of the 7" side of the card stock to the first cut line, and 1-1/2" from the cut line to the bottom.)  
  • Place the card stock onto a scoring tool with the 10" side at the top.  Ensure the 7" side that is to the left on the scoring tool is the one that has the cut lines 1" from the side.  Score at the 1", 2" and 3" marks from the first cut line to the second cut line.  Score at the 5" mark from the top to the bottom of the card stock. Score at the 7-1/2" mark from the first cut line to the second.


  • Now fold the card stock according to the following:  a) 1" score line is a mountain fold, b) 2" score line is a valley fold, c) 3" score line is a mountain fold, d) 5" score line is a mountain fold on the two sides and a valley fold in the center, and e) 7-1/2" score line is a mountain fold. 


  • Decorate the card to your liking.  If desired and to support the elements placed on the back step (mountain fold), cut a 3-11/16" x 4-7/8" piece of card stock and attach it to the back step on which you can add your primary feature.  I added this piece to my card. 

COTTAGECUTZ STAMPS AND DIES USED ON THIS  PROJECT:


I hope you will try this card fold and use the CottageCutz dies found at the Scrapping Cottage to showcase.  Come back tomorrow for more beautiful crafting projects!