Monday, June 26, 2017

Birthday Balloons

Hi, Lois here with my Monday card.  We all need birthday cards, and I have a relatively simple one for you today -- using two different CottageCutz sets, Happy Birthday Phrase and Balloons, Variety.


To start my card, I cut a piece of heavyweight cardstock 10" x 6 1/2", scoring it at 5".  I also cut two pieces of purple cardstock, 4 3/4" x 6 1/4" and 3" x 4 1/4"; as well as two pieces of patterned paper, one 4 1/2" x 6" and the other 2 7/8" x 4 1/8".


I then cut the images in various colors from the two dies . . .


. . . and sponged some distress ink on them to give them a bit of dimension.  I added a highlight on each balloon with a white gel pen.


Then I constructed my card base . . . 


 . . . and added the various die cuts.


Easy peasy!

CottageCutz dies used on my card:


http://www.scrappingcottage.com/cottagecutzhappybirthdayphrase4x4pre-order.aspx


http://www.scrappingcottage.com/cottagecutzballoonsvariety.aspx


Sunday, June 25, 2017

Make Great Memories

It's Anja here. I had a few days off this week and went to a music festival. I met some awesome new friends and made great memories. And today's simple card is inspired by my latest experience.


I used:
- Cottage Cutz dies (Phrase Memories, Phrase Smile, Mr. Snuggles, Film Strip, Pierced Circle Set),
- Distress Inks (Black Soot, Pumice Stone, Barn Door),
- white card base (15x10,5 cm),
- grey, black, red and white card stock for the die cuts,
- black&white patterned paper (14,4x9,9 cm),
- black and white pen,
- alphabet stamps,
- Versafine ink pad (Onyx Black),
- paper glue.

First I die cut all the pieces. I used colored paper this time and just shaded it around the edges.


I assembled the card and glued together all the pieces.


Then I added the rest of the sentiment inside the card, using alphabet stamps.


And this is my finished card. 


Saturday, June 24, 2017

Sweet Birthday Wishes

Hello Scrapping Cottage friends! Thanks for taking the time to stop and visit today. It's Mary Marsh here bringing you the Saturday edition of the Blog.

Hope you are continuing to enjoy all the different cards from the DT using the new Expressions Plus word dies. The team has shown some really creative ways to use these word dies with your existing collection of dies. With 35 different word phrases, there is so much you can do with them in your own card making.

I have been showing you over the past several weeks how to combine word die phrases with a stamped sentiment. Check out my cards here, here, here and here.  I am continuing with this series today as well.

What I do is look at the word phrase and then think of other dies I have that would be identified by the phrase. Today, for instance, I thought of what could be identified as sweet and work for a birthday card. Lots of food items came to mind ice cream, frozen treats (popsicles), cupcakes to name a few.

For your viewing pleasure I am using the Sweet Phrase and Ice Cream Cone dies to create a cute summertime birthday card.

So let's get started with some details  on how I created my card.

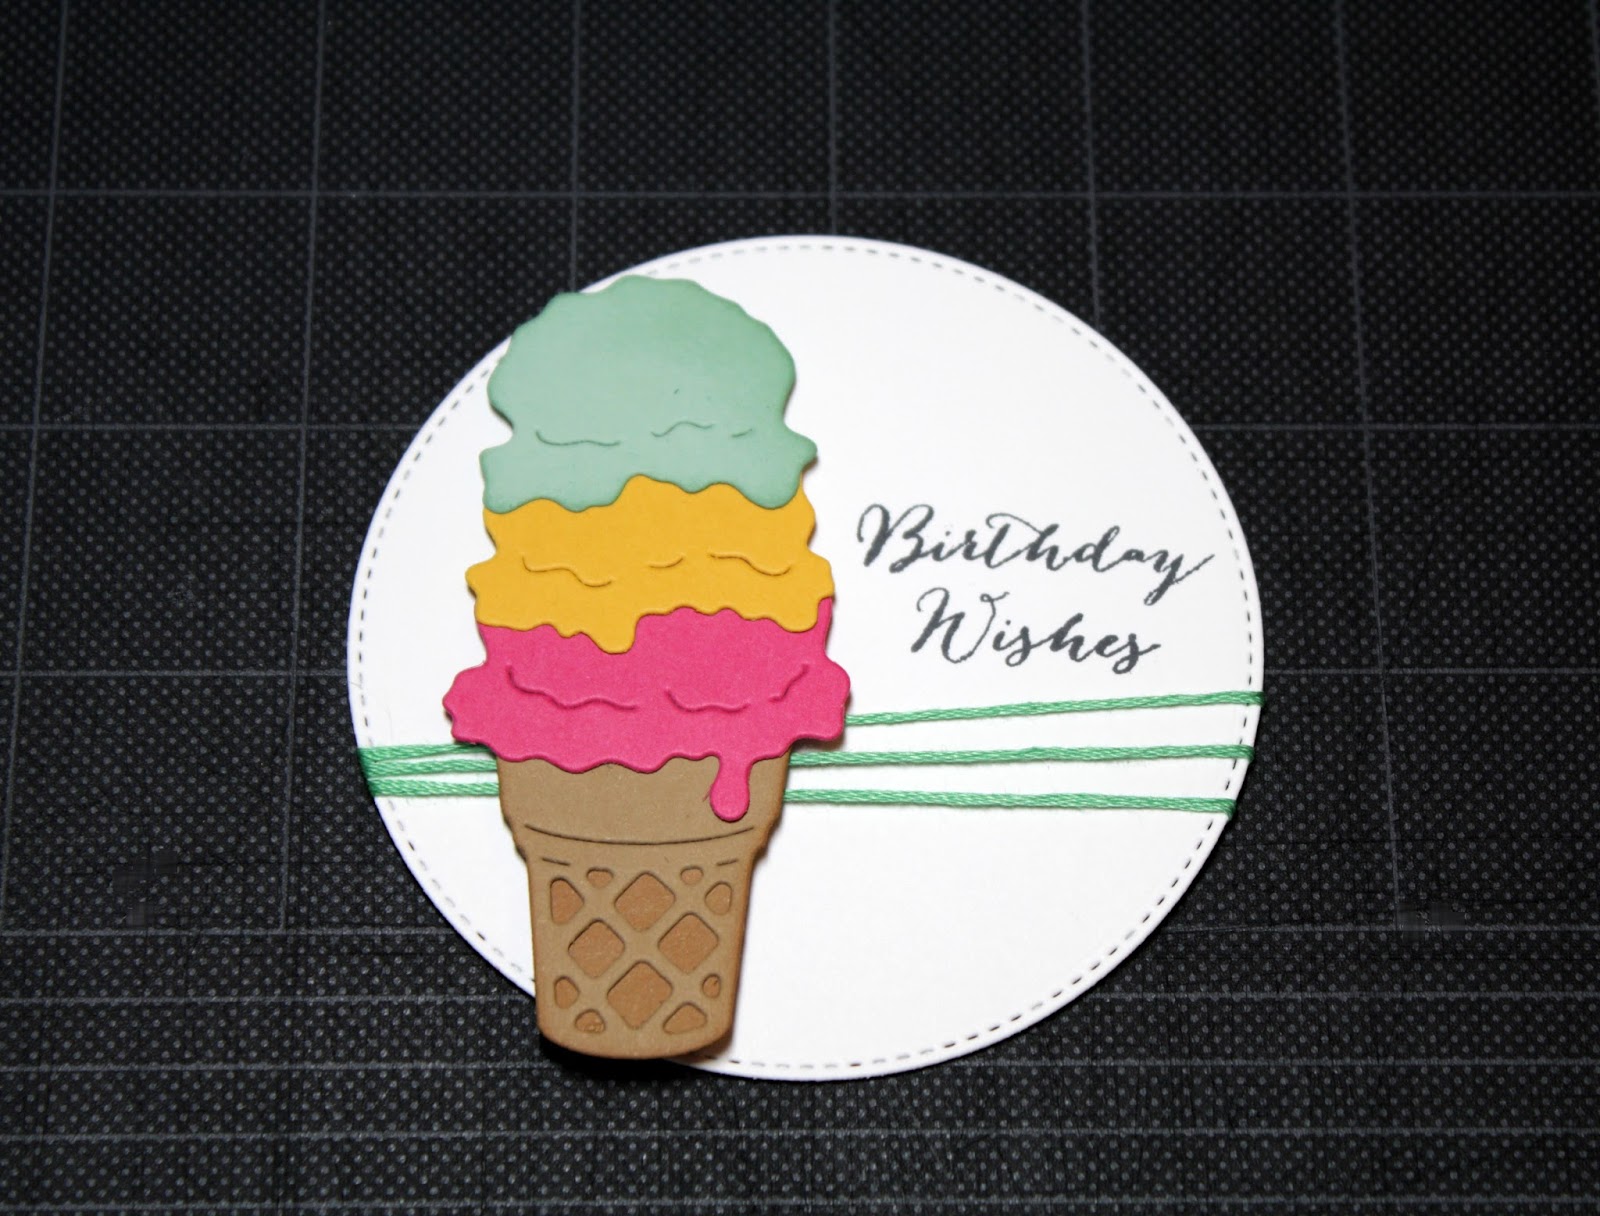
Step 1: I looked through my patterned paper for a bright and fun design for my card background. I found this bright pink striped paper and thought it would work well. It reminded me of an old fashioned ice cream parlor.

white card base: 4 1/4" x 5 1/2"
bright pink layer: 3 7/8" x 5 1/8"
striped paper: 3 5/8" x 5 1/8"
Step 2: Cut the ice cream scoops using bright pink, mint green and curry cardstocks. I sponged the mint green scoop with the same shade ink for a little depth.  The cone is cut in a medium brown cardstock and I sponged the underneath layer with tea dye ink. Again this is for depth.
Step 3: I used the stitched circles die (2nd largest) to cut a backdrop for my ice cream cone and also to stamp the sentiment. My sentiment is just a bit too long for my circle. So by masking, with painters tape, and using my MISTI, I was able to turn it into a 2 line sentiment.


Step 4: With all my elements cut and stamping done, I am ready to start assembly of my card. I decided to add some twine to the circle for interest. I found some floss in my stash that is a mint color. Adhered the ice cream cone with dimensional adhesive.
Step 5:  I cut my Sweet Phrase in mint cardstock. The font is so pretty on all these new word dies. Love how it flows. It's a perfect fit for my ice cream cone.
Step 6: I finished off my card by adding some mint and pink enamel dots. I thought it finished off my card nicely. And, that my friends is my card for this week. I hope I have provided you with some inspiration on another way to use these new Expressions Plus word dies.
Dies I used to create card:
http://www.scrappingcottage.com/cottagecutzexpressionsplussweetphrase.aspx
 
http://www.scrappingcottage.com/cottagecutzicecreamcone4x4pre-order.aspx
http://www.scrappingcottage.com/cottagecutzstitchedcirclesetbasics.aspx


Thursday, June 22, 2017

Camping Journey!

Good Morning Scrapping Cottage Friends

It is Pam sharing with you today! I must say I am not much of a camper because I am so afraid of creepy crawly critters! But I do love the beauty of God's Creation!  There are so many wonderful camping grounds maybe I will get brave enought to give it a try someday!


Design Steps:

1.  I started by cutting out all of the pieces using the Cottage Cutz Campground die. The card stock colors I used are green, dark green, kraft, yellow, orange, dark brown, and rust.

 2.  I then inked the pieces to give dimension and interest.  The inks are by Tim Holtz.
 3.  Cut out a free hand hill and ink.  Then cut out the Expression Plus Word Journey both cuts on Kraft card stock.  Last cut out grass on dark green card stock using the Cottage Cutz Spring Grass die
 4.  Use an A2 Kraft card base and a piece of designer paper for the background glue the DP to the card
 5. Glue the hill down, the grass, the trees, journey, moon, stars, and fire in that order

6. Last glue down the tent and your card is complete!

I just love how this card turned out! It sure looks like a cozy camp site! Hope you give these fun dies a try they are perfect for cards or scrapbooking!

Cottage Cutz Products


Blessings
Pam

Wednesday, June 21, 2017

Let's Go Fishing! Double-Fold Card


Hello Scrapping Cottage friends! It's Janet from SugarShine Designs with a masculine card for you today. This card is called a double-fold card and is also known as a Joy card fold. By complete coincidence, Lois posted this same card fold on Monday except she turned it so that the card opened up vertically. My card opens up horizontally but is otherwise very similar. This is a nice fold because it starts out a normal A2 size but once opened expands to three panels and 10.25" wide.


I used many different die sets to create this project but if you don't have all of them, just substitute with different dies. This same idea can work on a number of different themes. Just start by thinking about what you want to use for the closure and then go from there.

In my case, I started with the tree from the Grass, Trees & Vines set and built the rest around the outdoors theme. I also used all the dies from the stamp and die set called Woodlands. The detail in these stamps and dies are awesome. You can color these any number of ways but I chose to use my PrismaColor pencils. I colored the dies from the Fishing Gear set with distressed ink. 

For complete instructions and dimensions, please visit the CottageCutz YouTube Channel by clicking on the video image below. As always, ask any questions you have and give me a thumbs up if you enjoy the video. If you haven't already, please subscribe so that you won't miss any future CottageCutz videos. We are very close to 500 subscribers! Thank you for supporting the channel. We appreciate every one of our CottageCutz fans across all of our social media platforms.

 Click here for video

Dies Used in This Card:


Thanks for spending some time today with me and the Scrapping Cottage. See you again soon!

- Janet
SugarShine Designs