Tuesday, November 15, 2016

Christmas ornaments with winter faces

Hi, Janja here!

Today I share with you another holiday card. I joined CottageCutz Christmas ornaments dies and Peachy Keen winter faces stamps.


For the card we need:
- white scalloped edge card base: 5.3 x 5.3" (13,5 x 13,5 cm), folded
- patterned paper: 5 x 5" (12,7 x 12,7 cm)
- golden paper
- embossing folder
- Distress ink: Tumbled Glass, Broken China, Tattered Rose, Rusty Hinge
- Memento ink: Dandelion, London Fog

Trim patterned paper in appropriate size. With the 2nd bulb ornament die cut out two ornaments and two golden tops of ornaments. Cut out golden bows with the holiday mason jar die.


Also cut two ornaments from a golden paper, slightly smaller than the size of holes in the patterned paper. First cut half ornament, slightly move the die and then cut out the other half.
Use only negatives. Glue them to the back side of patterned paper.
Stamp "Believe in the magic" and with an embossing folder create snow background.


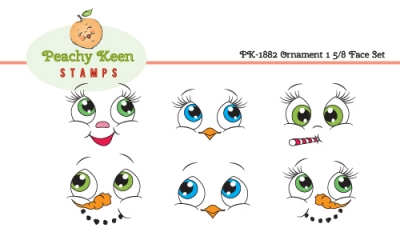
On watercolor paper draw the edges of ornaments with a pencil and stamp cute faces. Use Peachy Keen face stamps 1 5/8th inch sets: ornament and candy cane.


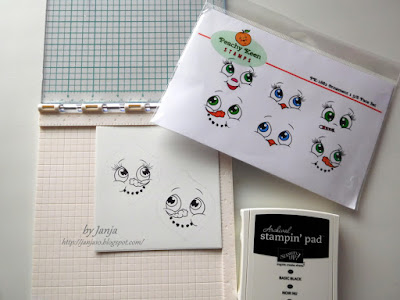
Paint faces. I used Distress and Memento inks.
After completion of painting, erase pencil silhouette and attach watercolor paper to the back of patterned paper.


Add golden pieces and the card is completed.


Use remained ornaments for tags. We can decorate gifts under the Christmas tree with them.


 Thank you for coming over and have a great day.


Monday, November 14, 2016

Center-Step Mushrooms

Hi, Lois here today.  If you have followed my blog at all, you know that I love making fun-fold cards. One of my favorite fun-folds is a center-step card, one of which I have for you today.  I'm using more of the In the Forest 2016 release from CottageCutz dies.


Supplies for this card are:

Green cardstock cut 10 1/2" x 5 1/4"
Chocolate cardstock cut 3 1/2" x 4" and 3/4" x 5"
Cream cardstock cut 3 3/8" x 3 7/8" and 5/8" x 4 7/8"
Scraps of green, red, gray, and brown cardstock
Distress ink - Bundled Sage, Tea Dye, Walnut Stain, Fired Brick, Weathered Wood
Sponge applicators
Polka-dot patterned paper

To create the card base, lay the green card base into a paper trimmer longways at 3/4".  Cut a slit from the 1" mark to the 6 1/4" mark.  Move the card base to the other side and repeat.  Score outside the slits at the 1", 2" and 6 1/4" mark.  Score between the slits at the 5 1/4" mark.


Fold at the score lines with a mountain fold at the 1" mark, valley fold at the 2" mark, mountain fold at the 5 1/4" mark, and mountain fold at the 6 1/4" mark, creating the stepped base of the card.


Cut the various small pieces using the dies, using adhesive sheets behind the delicate greenery and sentiment for ease of attaching to the card.  I did not need the cattails on the grass pieces, so I trimmed them off.


Sponge the lower edge of the cream panels with green ink.   Layer the cream panels to the chocolate panels and adhere to the card base.  Color the die cut pieces with distress ink as you desire and adhere the large mushroom, one of the small mushrooms, snails, and greenery to the cream panel as shown on the photo.  Adhere the grass pieces, other two mushroom, mouse and hedgehog to the small cream strip, as shown.  Place the sentiment in the upper right-hand corner.

Cut two strips of patterned paper 1/2" x 4" and adhere to the side panels as shown.  You can place a piece of cream cardstock on the inside if you wish.

Completed card.


Dies used on this card are:


Sunday, November 13, 2016

Merry Christmas

Hello everyone!

It's Donna here again with CottageCutz  and Peachy Keen Stamps to celebrate their new release of face stamps that work well with the CottageCutz Christmas ornament dies. TWO NEW SIZES of Face Stamps have been added to their release, 1 5/8" and 1 7/8" to fit the super fun ornaments by CottageCutz. Please stop over at Peachy Keen Stamps because Kathy is offering some promotional pricing on her new stamps sets that will go perfectly with the CottageCutz dies.

Here is my card using the Peachy Keen stamp sets Ornament 1 1/8" Face Set.  I am using the Cottagecutz Nested Ornaments: Star.  I am using the smallest star of the set.


Here is how I put my card together:
  1. The card is an A2 card 4 1/4 x 5 1/2,
  2. The black layer is 4 x 5,
  3. The next layer is 3 7/8 x 4 7/8, I embossed the branches and added some wink of stella to give it some dimension,
  4. The star ornament is die cut from the smallest die in the Nested Ornaments: Star set, 
  5. I colored the  face with copics. I used YG13 for the eyes, YR68 for the nose, and R29 for the mouth.  The cheeks I used R00,  
  6.  finished my card off by adding the sentiment by CottageCutz "Merry Christmas".

Closer look at the star ornament, I added some clear wink o stella around the edges.

 Closer look at the Merry Christmas sentiment.

Dies used:


Saturday, November 12, 2016

Northern Lights Background Technique

(click photo to view larger)
Hello Scrapping Cottage friends! Thanks for taking the time to stop and visit today. It's Mary Marsh here bringing you the Saturday edition of the Blog. Another weekend is upon us and that brings us closer to Christmas. Today I noticed out in Blogland that someone mentioned it being 6 weeks to Christmas. Yikes! Time to get busy and get all my cards finished.

Today, I am using a couple of the dies from the Christmas Part 1 & 2 releases. It's the horse w/ sleigh and the deer and forest border dies. I also tried a technique that I hadn't done before called the Northern Lights technique. I really liked how the background turned out and it's so easy to do. Let's get started with the details of my card.

Purple Card Base: 5 1/2" x 4 1/4"
Cucumber Green Layer: 5 1/4" x 4"
Image Panel: 5 1/8" x 3 7/8"

Step 1: Started by selecting the 5 colors I wanted to use for my background sponging. There is a lot of sponging with this technique and each time you try it the card will turn out just a bit different.
Step 2: I decided to start with the yellow ink first. I made a couple of paths of color using a stamping sponge. The yellow really added some brightness to this background. 
 
Step 3:  I laid down my 2nd ink color using the medium blue ink. Just kind of followed the path of the yellow ink.
Step 4:  Added my 3rd ink color with the rich purple shade. This is really a vibrant ink color and the reason I chose it for my card. With each addition of ink I used a different sponge.
Step 5: On this step I added the medium green ink and again I used a clean stamping sponge. I layered it in all the remaining white areas of my card.
Step 6:  On this final inking step I added the navy blue ink. This is how it turns into a sky. Using my stamping sponge I went in between the 2 colors to break up the line and to kind of mute the colors. You can make your sky as dark as you want it.
 
If it gets too dark you can go back in and add some more of the other colors to brighten it up. I actually turned this base to make my card a landscape design. So I did go back in and add more of the navy after I took this photo. You can see in my finished photo that I did darken it up a bit.
Step 7: I cut my images in black to make them like a silhouette against the northern lights night time sky. The snow bank is a silver cardstock topped with chunky glitter for a glistening snow. My sentiment is stamped in Versamark ink and then I used a black embossing powder to make it bold and stand out.  
 
Step 8:  I am now ready to assemble my card. After it was put together, I decided to add some stars in the same colors I used for my ink. I cut the single stars from the Merry Christmas Ribbon die and scattered them across the sky.
If you want to look at a larger view of any of the pictures, just click on it and it will open up larger.
 
 Well, that's it for me for this week. I hope my card has inspired you to give this technique a try. So until next time........inky hugs!
 
http://www.scrappingcottage.com/cottagecutzhorsewsleighelites.aspx
 
http://www.scrappingcottage.com/cottagecutzdeerandforestborder.aspx
http://www.scrappingcottage.com/cottagecutzmerrychristmasribbonelites.aspx


Friday, November 11, 2016

PENGUIN IN THE SNOW


Hello to all !!!

This is Anita here !!!! Hope all are set for Black Friday !!!! Its going to be a crazy day in the winter chill. So how about some music to relax you. Candy Cane Penguin is here with some cool music.

Check out my card here. It is a very simple yet fun card. There are many die cuts that have been trimmed to create a scene. I will explain as I move along.
Let us see the pictures here.


The finished card measures 5.5 inches x 5.5 inches
Add the effect of clouds with Tumbled Glass Distress ink.
Trim the frame of the CottageCutz Birds on Lamp post die and colour it with Copic markers.
Cut the CottageCutz Candy Cane Penguin die and colour with copic markers.
  

Adhere all the parts of the Penguin die cut

Add the effect of snow using clear adhesive and distress clear rock candy glitter.

 Add a thank you sentiment.


Here are the pictures of the dies used.


I wish you happy days ahead. See you till then.

Tuesday, November 08, 2016

Mushrooms in the forest

Hi, Janja here!

Mushroom hunting is not just an entertainment. When picking mushrooms and observing nature in different seasons we are also faced with a variety of forest animals and plants.
New release of CottageCutz dies - In the forest, is already available.


For the card we need:
- white scalloped card base: 5.3 x 5.3" (13,5 x 13,5 cm), folded
- brown cardstock: 4.9 x 4.9" (12,5 x 12,5 cm)
- patterned paper: 4.7 x 4.7" (12 x 12 cm)
- white and color cardstock
- Distress ink: Festive Berries, Aged Mahogany, Mowed Lawn, Peeled Paint, Tea Dye, Brushed Corduroy, Vintage Photo, Walnut Stain

First prepare the card base and background. With the die mushrooms and greenery cut out all pieces in different colors of cardstock and shadow them with Distress inks. Add dots with white pen on hats of mushrooms.


With the die hollow tree with forest friends cut out hollow tree and mushrooms. Prepare two hollow trees. One from a brown cardstock, and the other from fun foam. Glue both pieces together.


Shadow hollow tree with Distress inks and draw a few darker lines with a brush. Coat it with varnish.
Begin by assembling. Use self-adhesive foam pads and glue.


Thank you for coming over and have a great day.

List of dies used: