Sunday, March 27, 2016

The card for the Newborn baby

Hi, Yuliya here!)
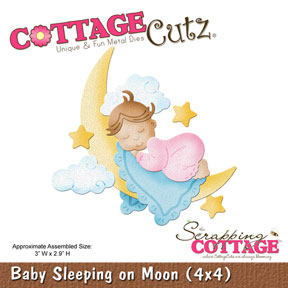
Today I want to share with you little tutorial how to make a sweet  Newborn baby card. I use Baby Sleeping on Moon

Let's start! 
For the card, I prepared a template in the form of a cloud. I use the chipboard. The size of the card can be adjusted by your preferences. My card have a size 6,4" * 4,4"
 Cut out
 Once you have created a template in the shape of an cloud you will need to trace around it 2 times on your choice of patterned paper.
 The base cards of  cardstock. 
I cut it out 3 times (1x from cardstock and 2x from patterned paper).
Note! The details of the selected paper is smaller than the parts from cardstock
 Glue the details (blue and pink) to the cardstock
 Let it dry
Great! Our card is ready for the next step
Prepare some die-cuts
I use the glue ZIG memory system
How about  flowers?
All parts were glued to each other and decorated. Add some volume with the help of glue tape
So cute, isn't it?)
Details. You can also add some little enamel dots.
I hope you enjoyed this card


Other Supplies: cardstock,  scissors, Sizzix machine,  pencil, glue ZIG memory system and glue UHU creativ, flowers, enamel dots

Friday, March 25, 2016

Friends are like Lighthouses

Hi, Vladka here!

I'm thrilled with new Nautical release, it is full of beautiful dies. And for me it is always a challenge to use dies for occasions for which are not intended to be. So, I used Lighthouse and Clouds die to create special card for a friend. And it can be a birthday card too. Are you interested how you can create it? Let´s start!


Basics:

White card base: 4 1/4 x 6 inches (cut 4 1/4 x 12 inches, fold in half)
Additional piece of white cardstock for printing the sentiment 
Some white, dark blue and red cardstock scraps to cut out the die cuts 

Other Supplies:

CottageCutz Dies: Listed Below
Distress Ink: Weathered Wood, Aged Mahogany, Tumbled Glass
Other: Scissors, Paper trimmer, Sizzix machine, Scor-buddy, Water, Sheet of Acetate


1. With WordArt in Word, design the sentiment and print it with your printer on white cardstock. Trim it in size 3 3/4 x 5 1/2 inches. I used Rochester Font.
2. Time to do some smooshing again. Add some Tumbled Glass Distress Ink on acrylic block and spritzed some water on it. Then take a piece of plastic acetate and gentle pressed it against the block to pick up some of the ink. Now, press the plastic to the right side of paper to transfer the ink. This will give you a splotchy look.
3. With Lighthouse and Clouds die cut all die pieces out with white, dark blue and red cardstock. Distress edges of white pieces with Weathered Wood distress ink. Glue lighthouse pieces together as shown on the card.
4. With Message in the Bottle die, cut out with white cardstock the piece which represent sand. Color it with Weathered Wood distress ink which will give you the look of rock. Glue it under the lighthouse.

Now all you need to do is to glue lighthouse, together with clouds and seagulls, on the piece of paper with sentiment. Apply adhesive on the back side of this additional piece of paper and add it on the card base. Card is finished.


Have fun creating!

Tuesday, March 22, 2016

Easter candy basket

Hi, Janja here!
Countdown to Easter. With home-made candy basket in the shape of a heart, we can decorate Easter table and make children happy with chocolate eggs.


For the basket, I prepared a template in the form of a heart. I cut it out 4 times (2x from cardstock and 2x from patterned paper). All parts were glued to each other and decorated.
The width of the basket can be adjusted by your preferences with changing the width of the side tabs.


The handle of the basket is 11" (28 cm) long and 0.60" (1.5 cm) wide.


At the center of the basket, I added two cut-out hearts. I used a dies from the basic sets: heart (the largest die) and stitched heart (the 3th die from the center). 


All the flowers are cut with the new CottageCutz die 3D flower #5. The bloom is so rich that you can create different size with cutouts.
For the largest bloom I used all the cutouts. For two I removed the lower leaves and for three smaller ones I used only the middle of the bloom. They are all shaded with Distress ink: Worn Lipstick and Victorian Velvet.
For the twigs and leaves I used floral spray die. They are shadowed with Distress ink: Moved Lawn.
The bow is attached on the handle of the basket.


List of dies used: 


Thanks for visiting.

Janja

Monday, March 21, 2016

Happy Easter

Hello everyone,

It Donna here to share with you an Easter card.  Easter is early this month....can you believe it is this Sunday!  My card I am using the beautiful ornate "Happy Easter Egg" by CottageCutz.

I have made an Easter Egg shaker card....oh what fun!!!


 Closer look at the shaker part of the card.....

Here is how I put my card together.....

The card is an A2 card (4 1/4 x 5 1/2)

The first layer on my card measure 4 x 5 1/4

I cut the rectange frame using two dies from the CottageCutz Retangle Set. I applied double stick tape around the back and attached it to the base of the card.


 For the shaker part of the card, I used the template from the piece of paper from the die that I cut out the Easter Egg.  I traced the inside of the egg so I could cut a solid egg for the back of the shaker.  I used my fuse to make the shaker part of the card, so I used the template to fuse the plastic piece to hold the sequins.


After cutting all my pieces and putting my sequins in the plastic egg, I added a little glue to the solid egg and put the plastic piece and the ornate egg that I cut.  I added a bow to give the card a little character and that is it!  


Thanks for stopping by, please come back again soon!


Friday, March 18, 2016

Vintage card with Wreath, Butterfly and Bow

Hi! Vladka here. Today I have vintage card with wreath for you. You know how I like to combine old and new dies and I will show you how you can create this one.  Let's start!


Basics:
Card base: 4 1/4 x 6 inches (cut 4 1/4 x 12 inches, fold in half)
Additional piece of kraft cardstock: 3 3/4 x 5 1/2 inches
Some white and red cardstock scraps to cut out the die cuts 

Other Supplies:
CottageCutz dies: listed below
Cardstock: kraft cardstock
Distress Ink: Brushed Corduroy, Gathered Twigs, Aged Mahogany, Peeled Paint

Other:  text stamp (optionally), scissors, paper trimmer, Sizzix machine, scor-buddy, brush, white watercolor tube paint or you can use acrylic paint instead, piece of sponge, pencil or any other tool with round handle.


Let's prepare everything first:

1. With the Floral Spray die and Laurel Wreath cut greenery out with some white (I actually used light gray one) cardstock. Color greenery with green ink.
2. With the Expressions Thank youLisbeth Butterfly and Build a Bow die cut out the Butterfly, Thank you expression and pieces to create the bigger Bow. Distress all the edges with Aged Mahogany distress ink.
3. With Build a Grapevine wreath die cut out two wreaths and color them with brown ink.
4. Stamp text on additional piece of kraft cardstock - this step is optional.
5. Use a sponge to gently color the edges of all die cut pieces and edges of additional piece of kraft cardstock with white watercolor paint straight from the bottle. You can also use white acrylic paint. Let them to dry.
6. Before glue bow together, curve bow edges with pencil or any other tool with round handle as shown on the photo.


7. After bow is finished, put pencil also through the both loops which will give them beautiful round look (as shown on the photo).


Preparations are now finished. Let's make the card!

Apply adhesive on the back side of additional piece of cardstock and add it on the card base. On the front of the card, glue both wreaths, all the greenery, butterfly, bow and the sentiment as shown on the photo. Card is finished.


Have fun creating!