Friday, May 27, 2016

Branch, Bird and Heart


Hi, is Vladka and today is time for CAS card.


Basics:
White card base: 4 1/4 x 6 inches (cut 4 1/4 x 12 inches, fold in half)
Additional piece of white cardstock (3 3/4 x 5 1/2 inches)
Additional piece of white watercolor paper

Other Supplies:
CottageCutz Dies: Listed Below
Distres markers: Tumbled Glass, Mermaid Lagoon, Peeled Paint, Brushed Corduroy, Gathered Twigs
Other: paint brush, water, acrylic block, paper trimmer, Sizzix machine, Scor-buddy, scissors


Let's prepare background first.

1. Apply some Tumbled Glass and Mermaid Lagoon ink directly to the acrylic block. Use thick brush and apply just water on the left middle part of the watercolor piece of paper. Now apply also some Tumbled Glass with the brush on the same place as water. Repeat this also with Mermaid Lagoon ink.
Let it dry or speed the dry process with a heat gun. Background is prepared.


2. With Tree Tag Topper die, cut the tree out from white or kraft cardstock and with the scissors cut off the circle around the tree:


3. Color the Leaves and branches with Peeled Paint, Brushed Corduroy and Gathered Twigs distress inks. Use post-it notes to mask branches when coloring the leaves and the opposite.


4. Now turn the die cut so, that you get branch instead of the tree and glue it on the watercolor paper. With the biggest stitched rectangle die cut the rectangle out of whatercolor paper with a branch.


5. With Whimsical Deer and Bird die cut the bird out with white cardstock and colored his beak yellow. Glue it on the branch.

6. Cut the smallest heart from red cardstock, using die from Heart Set and glue it on the card. With the ruler draw a line from the bird to the heart.

7. Stamp desired sentiment  and card is finished.

I hope you like my card and that will inspire you to try this. You can use watercolor paint set instead of distress inks, if you wish.


Have fun and thank you!

Before I go, I just want to remind you on our second CottageCutz challenge with theme Hello Spring. Link button can be found here!

Wednesday, May 25, 2016

~April Showers bring May Flowers~


Hello Scrapping Cottage friends! Thanks for taking the time to stop and visit today. It's Mary Marsh here bringing you the Wednesday edition of the Blog. 

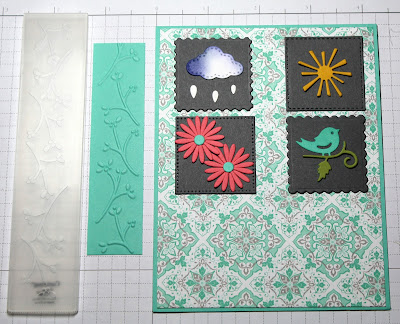
Today for your viewing pleasure, I am featuring a new die set from the May release. This one is the Spring Stamps die. It's an 8 piece die set with just the cutest images for your card making. Joanne has made it so easy to make a really cute card with this new set.  In fact, I think this die set almost makes the card for you (lol)!!!

So lets get started with how I put this card together. How I started my design process this week was with my papers and colors. I came across this patterned paper in my stash the other day and decided I was going to use it sooner than later.
Card Base: 4 1/4" x 5 1/2"
Patterned Paper Layer: 4 1/8" x 5 3/8"

 Then I decided on my layout and found this sketch on line. It's a good one to use all 4 of the squares from this new Spring Stamps set. Sketches are such a good way to get your card design going.
 
 
I thought the die cut squares would look good in a darker shade as a backdrop for the images. I chose a dark gray and cut 4 of them. Each square die in this set has a different edge and is a 1 1/2" square. There is a scallop, a postage stamp edge, a pierced square and a stitched square. I used all 4 patterns.


Cut the images next and adhered them to the squares. The bird image is cut in blue and then I pieced the green cardstock for the branch and leaf. On the cloud image I sponged some purple and dark blue to represent a rain cloud. I arranged them according to my sentiment the rain and sun brings the flowers and birds in spring.


I cut a 1" x 4 1/8" panel of the Caribbean blue cardstock and used an embossing folder for background texture. Attached right below the squares.


My sentiment is computer generated in Word 2016. It reads "April sun and showers bring May flowers". I used word art to put in a circular fashion. I won't give instructions here but if you want to know how I did this just leave a comment and I will get back to you. Cut with the stitched circles die using the 4th largest die.


My butterfly is cut from another new die, the Fancy Pocket Plus. I will have a sample using the complete die in the coming weeks. Scattered a few centers that were left from the flowers I cut to complete my card.
 
Well, friends that's it for me for this week. A reminder that you still have 6 days to get your card completed for our 2nd challenge. This one is spring themed. Get more info here. These new dies would be perfect for the challenge.

So until next time.......inky hugs!

http://www.scrappingcottage.com/search.aspx?find=spring+stamps
http://www.scrappingcottage.com/search.aspx?find=fancy+pocket+plus
http://www.scrappingcottage.com/cottagecutzstitchedcirclesetbasics.aspx


Tuesday, May 24, 2016

In a gilded frame

Hi, Janja here!

CottageCutz frame dies are so useful that they belong in my go-to collection. The card for today's post is also spiced up with a frame covered with a thin layer of golden flakes. On the frame I put a leafy foliage with flowers.


For the card we need:
  • brown card base: 4.53 x 5.70" (11,5 x 14,5 cm), folded
  • corrugated cardboard: 4.3 x 5.5" (10,8 x 14 cm)
  • brown cardstock: 3.9 x 4.9" (10 x 12,5 cm)
  • white cardstock
  • Distress inks: Milled Lavender, Spun Sugar, Victorian Velvet, Aged Mahogany and Moved Lawn
  • Memento inks: Cantaloupe, Pear Tart
  • golden flakes
From white cardstock cut flowers and leaves with 3D flower #1 and leafy foliage dies. Cutouts of flowers and leaves are then shaded and shaped. For flowers use only the smallest die cuts.


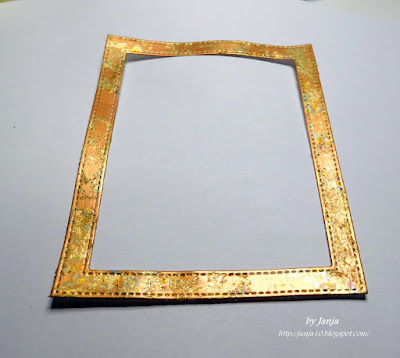
With the largest die from the stitched wide rectangle frame set, cut out the frame and brush it with a copper metal paste.


When the frame is dry, apply the adhesive with a sponge on few places. Sprinkle it with golden flakes. With fingers press them gently for perfect bonding. We remove the surplus flakes with a sponge.


The frame is very shin, although I have not been able to catch its glow on photos. 


Put it on the brown cardstock, mark the inner part of the frame and cut it out. Corrugated cardboard is part of an old package. 


Assemble the card.


And don't forget on our May challenge - Hello spring. You still have time to share your projects with us till the end of the month.  

Dies, which I used at work:


Have a nice day.

Janja

Sunday, May 22, 2016

Thanks Card with 3-D Flowers

Hello Scrapping Cottage Friends!
Yuliya here. Today I share with you my new card I will be sharing how to make this card using the CottageCutz 3 D Flower dies!

Supplies:
Other: White Cardstock for Cardbase,  Scissors, Paper trimmer, Sizzix machine, distress Ink
Please follow the step by step pictures on making of the card
1.  Prepare cardstock for base and prepare the details for our card. Additional piece of white cardstock or watercolor paper.
Add some volume with the help of chipboard.
2. With CottageCutz Cross-Stitched Circle Set (Basics) cut the frame out with patterned paper
3. Cut out many pieces from  CottageCutz 3D Flower 1 die on 160 gsm white cardstock (Canson). You can color it with paint brush, distress inks and water, like I did it here. Spray the water on it and let it dry. I used 2 colors Distress ink - Span Sugar and Candied Apple
4. Cut out many pieces from  CottageCutz Leafy Foliage (4x6). With Mowed lawn paint Distress Ink color all the leaves. I used bruch to do this.

5. I like this 3 D Flower!! Add the Expression Hello from the CottageCutz Expressions Thanks


I hope you have shared your entries for the Spring themed challenge at the CottageCutz blog. If not, then do take part to win fabulous prizes.
Have fun and thank you!)