Sunday, January 25, 2015

Telescope folding Valentine Card


Hello everyone, today I wanted to share a super fun card I made for Valentines day. This is a Telescope Fold Card. These are easy and fun to make.


Here is the Card Completely Closed Up!

For the Card- I just picked 3 different base sized circles. Most of them are spellbinders dies, except the top one, it is a CottageCutz "Be Mine" Die, and then I layered a pink spellbinder circle under the red layer on this one. For all the others, I layered each one how I wanted it to look before connecting them all together. The key is to decorate them before connecting them, and to make sure any of your die cut pieces are glued down good, so they don't get in the way when opening this card.

CottageCutz Dies- I just had to pull out these older Valentines CottageCutz dies, as I love making Valentines cards. So for this card I used CottageCutz "Be Mine", "Tweet Love", "Mr. Love Bug", "Sweet Flourish", "Fancy Cattails&Butterflies",Expressions "Valentines Day", all are CottageCutz Dies from The Scrapping Cottage.

Partially Opened card in the photo above

Embellishments- I kept it pretty simple for embellishing this card, as you want to have it close easy with no embellishments in the way. So I only embellished the top layer with some half backed pearls. I was sure to glue them on with glue, so they don't fall off easy. I also added some glitter to the "Mr. Love Bug" Die cut. This gives it a fun look and a little extra Bling for my card.

Supplies Used:
CottageCutz Dies
Spellbinders Dies
Half Backed Pearls
Viva Pearl Pen
American Crafts Card Stock
American Crafts True Love Paper
American Crafts Glitter
Copics for Coloring
Dusting with Distressed Inks
Brads

My card fully Open!
Thank you for looking and I always love hearing from you all! So let me know what you think of my Telescope Card!
Hugs to all,
Cheryl


Friday, January 23, 2015

Thank you card

Hello Everyone!!!

  Today I am sharing with you my new THANK YOU card I created with beautiful  

 For this card I used beautiful "Forest Deer Scene" die from Winter Collection of dies. Very simple card.
 
  
 First, I created the background using different colors of ink.Then, I cut scene out and glued to background of card. After all, I added deer scene background to base brown card and decorate with white pen and pearls. Added sentiment in the corner of deer card.

 For this project I used:


Wednesday, January 21, 2015

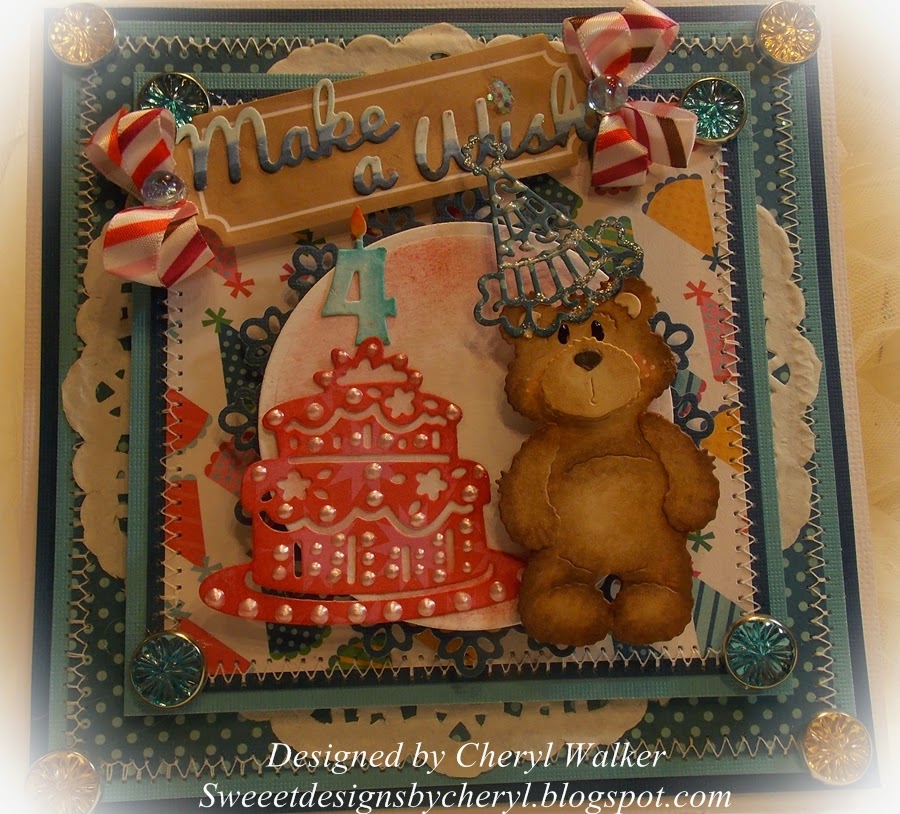
Mr. Snuggles "Make a Wish" Card

Hello everyone! Cheryl here today, and Hope you all are doing well, and enjoying the New Year! :)
Today I wanted to share a Birthday Card I made for the Scrapping Cottage using the darling CottageCutz dies.

For my CottageCutz Mr. Snuggles, he was cut with white card stock, and then colored with 4 different Copic's in E shades. Next I added some blush to his cheeks, and some white gel dots. For his eyes I used Viva Pearl Pen in black. His nose is popped up using a pop dot.

Design Paper- is from American Crafts and is the Pebbles Birthday Wishes paper stack. Love the designs on this dp, perfect for the CottageCutz Birthday Release. CottageCutz Party Hat is cut using the same design paper. I also used another design from this same paper stack for the cake.

Layers- on this card there are 4 layers, that includes the doily on the background layer. I used the CottageCutz Magnolia Doily for the top circle layer. This is for my main images.

Embellishments- I used some brads that I had picked up at the AC warehouse sale last year. I ended up using the Yellow and Blue ones. I also used a Viva Pearl Pen in white to do all the Pearls on the cake and hat. Next I did use glitter glue on the hat as well. Ribbon is extra that I picked up for an awesome deal at the same warehouse sale.

CottageCutz Dies Used: these photo's are all linked to the Scrapping Cottage Store for easy finding.


Supplies Used:
CottageCutz Dies
American Crafts/Pebbles design paper
American Crafts /Ribbon/Brads
Viva Pearl Pen
Doily
Copics
Sewing

Thank you for looking and have a lovely day!
Hugs to all,
Cheryl

Monday, January 19, 2015

CottageCutz Altered Valentine Glassine Bag

Hi friends and crafters.  Today I want to share with your this Altered Valentine Glassine Bag made with the beautiful CottageCutz dies from the Valentine collection.  Don't you just love all the different size hearts that coordinate beautifully together and the sweet cupid die.  The dies used are the Filigree Cupid, Flourish Love Heart, Sweet Floral Heart, and Sweet Heart.
The roses were rolled with left over designer text paper and pink and white cardstock.  The edges of the paper were sewn for added design and texture.  Let's not forget the pretty paper doilies used as well.  It's the finishing touch for a vintage feel,
Hope you have enjoy your visit today and got a little inspiration for your next Valentine project for your the sweetheart or special person in your life. Until next time, happy crafting! See you soon! Here are the dies used.


Sunday, January 18, 2015

Bear's Surprise

Hi, all! Vladka here with you today!
I know that bears can be very dangerous animals in the nature, but on the other side they seem so cute and friendly in fairy tales. I like this motive, because I have a feeling I can snuggle in bear's hug as a little child and that will give me comfort. 
And you have to admit that this Birthday Party Bear is really cute. He jumped out of the envelope as a surprise and has a birthday gift and balloon in his hand. To get fairy looks, I colored the envelope with green Distress Ink and added a grass and little flowers. It is such fun to play with different CottageCutz dies.
I wish you all great Sunday!

Saturday, January 17, 2015

CottageCutz "Snowman Winter Scene"

Hello everyone, and Happy Saturday to you all!
Today I'm sharing this Darling CottageCutz Snowman Winter Scene Card. Isn't he just too sweet?! 

For my CottageCutz snowman- I cut him out in white card stock, and then added some viva pearl pen dots, a little glitter glue, and then dusted in a blue ink around the edges. Next I framed him with a border punch, and then added some punched branches in white. Love the look it gives.

 Design paper- I kept it all the same blue with white polka dot, as it reminds me of winter and snow. Love snow in the winter, however not for several months.....LOL

Layers -There are 3 layers on this card. 1st is the background layer, and then the border layer, and lastly the image layer.I did add sewing with a pattern that looks kinda close to snowflakes, on the background layer and the border layer, cute huh?

Embellish-Lastly I added white half backed pears to each side of my card for some extra embellishing.

 I really enjoyed designing this card. I have added a list of supplies used below.
Supplies Used:
CottageCutz /Snowman Winter Scene CCE-193
Martha Stewart Punches
Viva Pearl Pen/Distressed ink with dusting
Pearls in white
AC Design Paper
Sewing

Thank you for looking and have a lovely day!
Hugs to all,
Cheryl

Wednesday, January 14, 2015

CottageCutz Little Angel

Hello everyone, and Happy Wednesday to all!
Today's card is done with the CottageCutz Sweet Little Angel die. She is super cute, and was super fun to color. I also used one of my favorite CottageCutz Frame dies called "Oval Doily & Frame" Die.
So for my Angel I used white card stock to cut her out with, and then colored her with copic markers. Next I added some glitter glue to her wings, and some Viva Pearl Pen dots to her dress, I set her aside to dry, and then punched out some green branches.  The dp I used is Crate Paper Pretty Party, and also used cream card stock for layering. My card was super simple to make!
CottageCutz Dies Used:


Thank you for stopping by and have a wonderful day!
hugs to all,
Cheryl

Tuesday, January 13, 2015

Thank you card

Hello Everyone from Olena!!!

  Today I am sharing with you my new Thank you card I created with beautiful  

For this card I used "Thank you sentiment" and "Fancy Floral Lace Border" dies.


 For this project I used: