Thursday, April 28, 2011

XoXo

Good morning! Happy Thursday! :) For today's project, I used the adorable Cottage Cutz giraffe to make an I miss you card.


Isn't he, excuse me, she, sweet! Her friend, bluebird, is from the bunny with umbrella die, from the spring/Easter release. The little birdie is the perfect companion to any of the Cottage Cutz animals. I have a confession...the scalloped circle behind the giraffe is actually the piece I was planning to throw away. I was going to use the inside circle instead, but this looks so cute I changed my mind and used it instead! LOL


For my message, I used the label and XOXO stamp from the Love release.


Thanks for visiting the blog today. Come back again soon for upcoming projects featuring new releases!


Wednesday, April 27, 2011

Floral Tea

 Floral Tea. . .just a hint of floral added to Starbucks Awake tea. This weeks card is made with the Cottage Cutz Teacup Mouse die. I used a wide border punch to create a lattice and added a few flowers from the teacup die. I used pink card stock for the teacup because it showed the flowers off the best. The flowers were done in pale blues, teals and shades of pink.
 The mouse looks so cute hanging over the edge of the teacup. I added a little teabag dangling in his hand. Most of the coloring is done in ink pads with a sponge, but the teabag looked better in three shades of Copic markers. They seemed to give a better tea stained effect.
 To show you a little of how I colored the card stock. . the three leaves above are in stages (it may be hard to see). I lightly color the side of the first leaf in Copic Leaf Green, than sponge (highlight) the bottom part of the leaf in Memento Bamboo Ink. This gives you several shades of color tones, depending on where and what colors overlapped. Lastly on the third leaf I added the gold shimmer from a Sakura Pen in a few random area's. Each leaf looks slightly different. The other note here is that I colored the leaves while they were not punched out. If you pick the paper off the die machine gently after cutting, the design pieces will stay in tact. This allows me to work the color to where I want it.  . . because the large part of the paper is holding my leaves. I do not have to worry about holding that tiny leaf (in my case with fat fingers) or over coloring the leaves after they have been glued down. I have greater control over where the color is and also the direction of the color.
 I also did a matching teabag tie on. The base paper is 2" x 5 3/4", with score lines at 2 1/2", 3" and 5 1/2". Cut a 1 3/8" square window on one side and clip the top two corners. The Cottage Cutz Mouse die head fits perfect on the corner of the window. . . .with his little hand hanging over. Make a mini hole protector with a 1/8" and 1/4" hole punch. Add a string to the top of the teabag (I used the heavy twisted thread that comes like embroidery floss, but teenagers use it to make friendship bracelets. It comes in a mixed bag of colors, has a nice rope texture). Slip a starbucks teabag into the pouch. They come in really nice silk net bags.
Tie your creation to the side of each teacup at your next event. Add one to a breakfast tray next time you are helping someone under the weather. Make a few and throw in a basket next to the pot at the office.    Go on . . .make someone feel special today!

Sorry for the delay. Had a bit of electronic mishap this morning. I think my pictures may have posted to a inter office memo at the White House. Opps.

Thanks Barry


Tuesday, April 26, 2011

Engagement Roses

I was excited to finally use my Rose stem die back from the Valentine's Day release. When my daughter got engaged last August she got a dozen red roses that night and I knew this die would go perfectly on a layout. I cut the rose out twice and assembled the first one just like it was shown and the second one I wanted a rosebud so I trimmed of the leaves on one side and didn't make the rose as full. I also used a little ink around the edges of my pieces for a little depth.


The Design Team is anxiously waiting for our next shipment of dies so stay tuned for some fun birthday projects coming your way as well as some Peachy Keen projects.

See ya next week, Kay


Monday, April 25, 2011

Spring Has Sprung

The weather was gorgeous yesterday, Easter Sunday!  I do believe Spring has finally arrived, although today is grey and misty.  The weather sure has been up and down all over.  Today's card features the Garden Pot Bunny, by Cottage Cutz.  I hope you will check out the store and make a wish list, cause when you see what's new and coming, if you are like me, you're going to want them all!  Thanks for having a look!  Have a wonderful day!


Hugs and smiles,
Janice

I apologize.  I didn't check Nikki's post yesterday, until now.  We used the same die, and her card is so much cuter than mine.  Lesson learned, always remember to check the blog.  I will try to make a different card and get it posted as soon as possible.


Here is another card.  I used Bird's Nest and Cat dies,  Hope you like.  Enjoy the rest of your day!

Sunday, April 24, 2011

If friends were flowers...

Hello and Happy Easter! For my card today I used the Garden Pot Bunny. I cut it only one time from white cardstock and used my ink blending tools and distress inks to color it. Super easy!
The patterned paper is from the Hello Luscious collection from Basic Grey. Ok, that's it! Have a wonderful Easter!

♥ Nikki ♥


Saturday, April 23, 2011

Easter Kitty Card

Just because it is Easter, doesn't mean you can't pull out some of your stash and find a new way to use some of your shapes. For my project today, I created an Easter card for a little 9 year old girl who loves kittens. Instead of having the kitten holding the Valentine's heart, I cut out one of the bunnies from the patterned paper and voila - Easter Kitten!
Thanks for coming by today! I hope you are having a great Saturday! See you next week!


Thursday, April 21, 2011

Happy spring

Today's project is a simple card using the ornate wreath from the Easter release.

Can you see the bunnies and tulips in the design? So clever and cute! I simply adhered the wreath to the front of a scalloped circle card and added a sentiment sticker and lots of bling and doodles. Tie a ribbon or twine around the fold, and you have a lovely spring or Easter greeting!


Thanks for looking!


Wednesday, April 20, 2011

Lambikins

Today I chose to work with the CottageCutz Little Lamb die. I started with a piece of white cardstock that was all crumpled up, then straigthened out before running it through the diecut machine. I want a little added "bumpiness" to my lamb. I cut the face out of smooth white cardstock and added some light rose ink to set it off just a hint.

There are so many fun lamb/sheep sayings out there so this die would be great for lots of different ocassions besides Easter and Spring.


Thank Ewe


Thinking of Ewe


Happy Baaa..day


Just for Ewe


just to name a few.


Wishing all of you a Happy Easter and your share of the chocolate :)


Tuesday, April 19, 2011

Easter Bonnet

In her Easter Bonnet, This weeks card just in time for Easter using the Cottage Cutz Spring Bonnet Chick die. The main thing I wanted to show you is to cut the Wing, Tail and Bow twice and cut as an additional piece of card stock. This way you can use to add dimension to the chick. I used Glossy Accents to add the stable base to glue the pieces at a slight angle.It acts like a pop dot to hold the card stock up!!!. I glued the wing down first at an angle. I cut the tail feathers as three individual feathers and glued them under the raised wing top and cut them a little short so they would look like three more tail feathers besides the flat feathers. The Bow ribbon was glued down as normal and the second bow piece was glued flat in the center with the ribbon loops with the loops popped up.

The Chick was cut with Doodlebug Sugar Coasted card stock, highlighted with a orange Copic marker. Also understand the Copic colors oddly on the glitter coated card stock . . give it a longer time to dry (and it does not really blend well) but it highlights great. . 

Happy Easter to all and to all a filled basket of goodies. . . . . Barry

Monday, April 18, 2011

Happy Monday to all of you!

Hello friends!  For today's card I used this adorable Teacup Mouse die.  I used white cardstock to cut the images, and colored them with copics.  I used a Stampin Up embossing folder for the tulip frame and a Cuttlebug embossing folder for the circle.  Rick rack and ribbon was used to finish the card.  Enjoy your week everyone!

Hugs and smile,


Janice

Sunday, April 17, 2011

Hi! For my cards today I used the new Duck w/Egg die and the Duck Accessories die. SOOOO STINKIN CUTE!!!!!!!! I paper pieced the umbrella.
I LOVE LOVE LOVE this ducky!!!!!!!!!! I made this next card and posted it on my personal blog yesterday, but I thought I'd share it here as well ;)
same dies!!!! SOOOOOOOOOO CUTE!!!!!!!!!!
Hope you likey! ;) Have a great week!!!!

Nikki


Saturday, April 16, 2011

Easter Lamb

For my post today, I have used the Cottage Cutz Little Lamb die. I pulled together some pretty Spring papers and then embellished them with this cute little lamb shape! This shape was really easy to put together and I just added a little shading to the lamb with my Copics.
Hope you have a great rest of the weekend!! See you next week!


Friday, April 15, 2011

Baby Boy Baptism

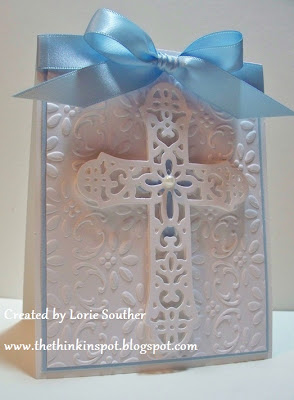
Good morning!!  Happy Friday to you!!  It's a very cool and rainy Friday here, but April showers bring May flowers, right?  I sure hope so!!  I have a very special card to share with you today.  I made this card using the new Ornate Cross from the Easter release at The Scrapping Cottage.

Even though this card is very ornate, it's on the clean and simple side, too.  I made this for my sweet baby grandson, Max, who is being baptized this Sunday.  Just a little splash of blue for my baby boy to celebrate the special day.  I cut two of the crosses and layered them by popping the top cross up with foam dots.  In the center, between the layers, I used the two small crosses included on the die, with one of them done in blue.  This gave it a little pop of blue in the center, which I thought was a nice effect.  The background is embossed with a flourish embossing folder, and a little satin ribbon finished this card off. 

Have a glorious weekend!!