Thursday, July 29, 2010

Summer is so much fun

I'm loving these adorable summer shapes. Do you have yours yet? Well, if you can't decide, maybe this will help. I've used a bunch of them on this page and I will not apologize! LOL

Starting with the title, I've used the popsicle for the "i" and the mini cooking pot from an earlier release for the "p". Other food shapes make up the remainder of the title letters.


Along the bottom of the page, for a picnic themed border, I've used the soda bottle, picnic ant which is carrying the watermelon from the ladybug die, and the ladybug which seems to have absconded with the chicken drumstick from the larger ant!


Ok, who can resist this adorable little penguin from the last release....not me! And who says penguins are only for snowy, cold, or wintery layouts?! Don't be silly! Here I've used the penguin on a summer page and it fits perfectly with the beachy theme, don't you think. :)

This little guy, er, excuse me gal, is enjoying a day at the beach in her ruffled bikini.


In addition to this new penguin shape from the Scrapping Cottage collaboration with Peachy Keen stamps, I've used the message in a bottle die. The bottle is cut from vellum, the cork is cut from cork paper, and the sand is actual sandpaper! I've added stickles for some sparkle in the sand. It is a sunny day, after all.


Wednesday, July 28, 2010

Hooray for Baseball

When I first saw this Happy Bird die I thought of "Hooray for You!" He looks like he is excited about something.

I thought it would be fun to make him yellow like a canary. I also used the CottageCutz Edger die called Flowervine. I wanted the flowers to be the same on both side so I trimmed the middle out and overlapped them make it the perfect size for my card. I also used to pearl for the centers of my flowers.

For my baseball card I used the CottagCutz Baseball mini die ( I love these things!) to create this baseball birthday card that would be great for just about any age. The stitching in the baseball has little dimples that you can color in for your stitches. I lightly inked the edges with some Tea Dye Distress ink.

Tuesday, July 27, 2010

"Under the Sun" Cottage Cutz CHA Release


Time for fun under the sun. As you can tell, we have been very busy working on new designs. Let us know your favorites by posting your comments here.

Birdfeeder, with Bitz n' Pieces


I was working a project with the Cottage Cutz Birdcage Die, when I realized the birdcage in its early stages looked like a bird feeder, so this is were the following project came from. I cut the Birdcage out twice, that way I could add dimension or prospective to the Bird feeder giving the
look of all sides, but I needed to glue the backside of the cage upside down. and slightly to the right. Now I had all eight columns. Than filled the area in the base with a scrap of paper and glued seed beads in the bird feeder for bird seed. I than cut the roof over again in silver to get roof panels and a silver spike on top. I used Glossy Accents on the silver to give a glassy surface. Added a green strip under the spike and added a green contrast on the feeder. I used the Cottage Cutz 2x2 Flourish Die and cut two pieces (snipped one side off each) and created a mirror scroll on the base of the feeder. The pole is 3/8" x 6 1/2" strip of card stock.

To add the tree branches that are inner twined in the feeder pole I cut four branches from the Cottage Cutz Bird's Nest Die. This is a great die when you need to create branches or vines on a project. I used three of the branches as is. . . weaving around the pole and cut one branch up to add branches where I thought I need a little addition. The die also has a few leaves, that I added here and there.


I had a friend drop in while I was working on the branches and they commented about having to glue all those leaves back onto the branches and I said, NO WAY. I am working backwards. So, I thought I might need to explain. . .Cut the branch out of Brown and Green, cut the brown leaves off the brown and glue the brown branch onto the green branch . Than it saves you from gluing all the leaves . **Added Note this is also great for fall, you can create a fall branch with rust and gold leaves and a few leaves that have fallen . . .

I added lots of birds feeding, The Birds were from the same Cottage Cutz Birdcage Die, I just added color to the backs of the birds with blue ink. I could have also added flowers to the branches, if I wanted more color. The total height of the completed bird feeder was almost 10" . This makes a nice sidebar to a album page. At the base add a small oval piece of paper, glue seed beads. . . . you know how much seed gets kicked out of a bird feeder!!!!


Monday, July 26, 2010

Good Morning Friends!


For today's post I have used The Cottage Cutz Hummingbird die. I love birds and this hummingbird die is a beauty!

I have been enjoying Lorie's technique of using white cardstock and then coloring the images. I colored my die cuts with copics and used a white gel pen for highlights. I hope you like it. Have a great week! I will be back next Monday with a new project.

Saturday, July 24, 2010

Cheeseburger

Hi. It's Nikki again, and here's my card for today. I used the new Hamburger die, and I just think it is adorable! I cut it out of white cardstock. I then colored the pieces with my prismacolor pencils and blended and shaded with odorless mineral spirits. I applied glossy accents to the debossed sesame seeds to make them appear shiny and more realistic. I think it worked really well!
It is kind of hard to see them in the photo, but I promise it looks cool in real life! ☺ I hope you like my card for today! ☺ Have a great day, and I'll see you back here next Sunday. Oh, in case you entered some of my giveaways, check My Blog today to see if you're a lucky winner!

♥ Nikki ♥

Thursday, July 22, 2010

Gone Fishin'

Hello and happy Friday!  Goodness it's hard to believe that another week has come and gone, and the weekend is once again upon us.  I have a scrapbook layout to share with you today.  My goal in becoming a part of The Scrapping Cottage Design Team was to try and do more scrapbook pages, and so far, I've managed to get in two, which it two more than I've done for the rest of the year, so I'm chalking this up to one great success, so far!!  I created this page with some fabulous fishing paper that I picked up at my LSS, but there's nothing on the back of this paper that tells me who manufactured it, so I have no idea whom to give credit to, but at any rate, it's great paper, and just perfect for these adorable little goldfish which were cut with the Frannie Fish die from The Scrapping Cottage.  I pulled the colors from the paper's background to accent the photo frames.  The Stars Edger die added wonderful interest along one side of the page, and the wide striped grosgrain ribbon was calling my name to be put to use on this layout.  The title was cut with my Cricut using the Simply Sweet Cricut cartridge, and the letters were layered on  1 1/4" and 1 3/8" punched circles.  The little Frannie fishes were cut with colored card stock, but I did use my Copic markers to add some shading and highlighting here and there.  Once the color was finished, I gave them a good dose of Dazzling Diamonds glitter for a little bling.

 
 Here's a little closer look at the details.  I thought the page pebbles made good bubbles, and I placed those randomly around the page.


That about does it for this layout.  Now all I have to do is add some pictures, and I'll have one more of those elusive scrapbook pages finished.  It has been a busy crafting week for me, but those are the very best kind in my book.  We've had a lot of excitement surrounding the release of the new die/stamp sets.  Joanne and Kathy have given us the best of both worlds, and has it ever been fun playing with these new dies and stamps!!  Please take time to stop by my blog, because there you'll find two opportunities to win some free dies.  Hope to see you there!

Wishing you a wonderful weekend filled with happy stamping!


Sweet!!

Oh goodness, I'm loving these adorable little face stamp and die sets. I went a little crazy playing with them as you can see. LOL!! These are just the most fun to work with and the possibilities are limitless. Take a look.

I've added stickles -- who doesn't love stickles?! -- for a little sparkle...


and used the lily pads and cattails from boat and dock die for the grass.


I used these adorable penguins on the inside of this card for the "together" sentiment conveyed on the front.


The peach is one of my favorites from this whole release. I love the size and the face is too cute.

The polka dotted leaves add a sweet touch to the whimsical facial expression.

Here is the little bluebird singing his heart out! What a sweet little birdie he is.

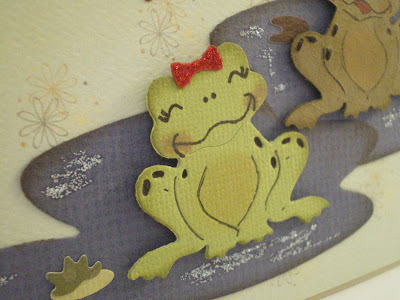
And the frogs! I love the frogs!! In addition, I used the boat and dock die again this time using the cattails along with the lily pads for the froggie's home on the pond.

The bow tie from the penguin die fits Mrs. Frog perfectly....
and stickles add shine to Mr. Frog's crown.

Thanks for stopping by today. I hope you'll be inspired to make your own creations with these sweet stamp and die sets!


Wednesday, July 21, 2010

COOLIN' Down on a TOADALLY Awesome Day!

I apologize for the late post today, I've had multiple computer issues this morning but we're up and going again...finally!
I've had the opportunity to play with some of the darling CottageCutz dies w/Peachy Keen faces.
For my first card I used the new Penguin doll and used the scarf from the Doll Accessories #2 die.
I sat down at my computer and typed up some fun sentiments to use with my new dies and thought You're so COOL! would be a great way to thank someone and be able to use the penguin die all year round. I also used the Rick Rack Edger which is a must have in my book!

For my next card I used Barry's tip and made a faux embossed background by cutting out multiple frogs and inking the edges slightly and adhering them to the same colored cardstock for an embossed look. This Happy Lil Frog die is so cool because the spots are actually debossed like little dimples which make it so easy to color in.
For my last idea I used the mini Soft Serve Cone to make a simple little coupon for a free ice cream which would make a great addition to tuck inside a card or give to a child or student who did something extra special.

Whatever the occasion you'll find something that fits with the wonderful assortment of CottageCutz dies here at the Scrapping Cottage!


Tuesday, July 20, 2010

Hoo! Loves You Baby

Hoo Loves you ! (Baby) Was made with the New Cottage Cutz Stylized Owl Die. The whole color palette really started from the new paper from BoBunny, One side was the most vivid purple, and the other side the stylized suns in really bright colors. So I decided that the new owl would look great in those vivid colors. I embossed the background in leaves and branches, added hard core torn edges . . .mounded on the vivid purple side of the card stock. Than cut the owl out of the other vivid colors. To add some embellishments, I criss-cross some gold cord with bright color beads and added a few hearts (heart die was from the Cottage Cutz valentine cupcake die). I cut the hearts and punched a hole in the top edge to crete a bead to be threaded on the cord. . . . . I really did not add the Baby part to the card, I was not sure how many would remember the saying. . was I dating myself ????. . . and thought I better leave well enough alone.

Monday, July 19, 2010

The Blog Hop is Finally Here!!!


Good morning everyone! Well today is the day! The Peachy Keen Design Team will be showcasing the new Cottage Cutz dies with Peachy Keen faces. Let the HOP begin! Have fun!

Sunday, July 18, 2010

Peachy Keen and Cottage Cutz - Last sneak peek!!

Ok, everyone, this is it. We've saved the best for last of these 14 incredible new die sets by The Scrapping Cottage featuring designs by Kathy Jakopovich, founder and designer for Peachy Keen Stamps. Each die set (except the Happy Bird package) will come with two to three Peachy Keen Face stamps to coordinate with your shapes!

The dies will be available for pre-order tomorrow on both Peachy Keen Stamps and The Scrapping Cottage. Single sets will be discounted 15%, or 25% off the entire collection for one week only! Pre-sale ends July 26th. Orders begin shipping the second week in August.

Join the Peachy Keen Stamps Design Team tomorrow, July 19th @ 9 a.m. CST for a special BLOG HOP featuring projects using every single one of these dies - you get to see them in action before you buy them! Thanks for stopping by, hope to see you back here tomorrow!


Thanks for your service

Hello! My sailor will be home soon from deployment, so I wanted to make him a card. I used the Rick Rack Edger die to create my flag. I just pieced them together and trimmed off the outer edges to make it straight.
For the stars on the bottom border of my card, I used the Stars Edger die. I just used the "inside" pieces and not the actual border bit. Thanks so much for stopping by today! I hope you will be back tomorrow to see the AWESOME pairing of Cottage Cutz dies with Peachy Keen Stamps! You are going to be absolutely blown away!!!! Have a wonderful day!

Nikki

Saturday, July 17, 2010

Sneak Peek #2

We've got our die cutting machines revved up and ready to go! Our designers are working on some super fun projects to showcase these beautiful new dies and stamps! Are you ready for your second peek? You might recognize our fun peach from our Faceless Fruit set, we think she is just PERFECT! Don't forget, tomorrow is our last SNEAK PEEK before the BIG HOP on Monday, July 19th. Our designers are going to have some "peachy" prizes for you and Peachy Keen Stamps will also have AN AWESOME prize lined up for you! You won't want to miss it!

Friday, July 16, 2010

Exciting News!

Exciting News!

The Scrapping Cottage and Peachy Keen Stamps have teamed up to bring you amazingly crisp die sets featuring some of Kathy Jakopovich’s most whimsical and fun {and we like FUN} designs! And guess what? You’ll even receive coordinating Peachy Keen faces with your Cottage Cutz ® die shapes! Whaaaat!? This is so much fun; The Scrapping Cottage and Peachy Keen Stamps have never offered a bundle like this before, and it will be pre-sold exclusively on The Scrapping Cottage and Peachy Keen Stamps’ websites starting Monday, July 19th.

Which sets, you ask? Well, we’re gonna show you. But only a few right now. We’ll show you a few more tomorrow, and then the last bunch on Sunday. Are you ready to see the first sneak peek? Here you go!


Don’t miss our {BLOG HOP} featuring samples from ALL the new packages

Monday, July 19th


These die and stamp packages will be available with a {special PRE-ORDER PRICE} beginning Monday, July 19th on

The Scrapping Cottage

Peachy Keen Stamps

Happy Days and Blue Jays

Good morning!!  I certainly hope it's a happy day for you.  Happy days and Blue Jays are what I'm celebrating today.  This is a card I made with the Blue Jay die from The Scrapping Cottage.  During the winter months here in Missouri, we thoroughly enjoy feeding the birds, and it gives us a lot of enjoyment to watch them.  Beautiful Blue Jay's frequent our feeders on a regular basis, and when I received this particular die, it immediately reminded me of our lovely winter visitors.   I'm so impressed with the amazing  detail of each die cut piece.  As usual, I started with plain white Georgia Pacific card stock, for my die cut.  I assembled the pieces by gluing them together, then I started coloring with my Copic markers.   I always start with the lightest color, and build layers of color from there. 
The second picture below shows you a little closer look at the  coloring, and a tip I'd like to share with you is that after all of my coloring is finished, I like to go over the piece and add tiny details with a pure black Micron pen size 01.  You can see below some of the lines that I added with my pen, and it really helps give the finished project an authentic look.  I played along with the 2 Sketches 4 You Challenge (Kazan's sketch) with this card layout.  I just love sketch challenges, because by having the sketch already prepared, I can focus my time and energy on coloring the image and choosing great paper and embellishments.  It just seems to make my card making life so much simpler.
I hope you've enjoyed my offering for today.  Feel free to stop by my blog, The ThINKin' Spot  for more of my adventures in card making.   Have a wonderful weekend, filled with happy stamping and scrapping!