Saturday, June 23, 2018

Graduation Card

Hello Scrapping Cottage friends! Thanks for taking the time to stop and visit with us today. It's Mary Marsh here bringing you the Saturday edition of the Blog.

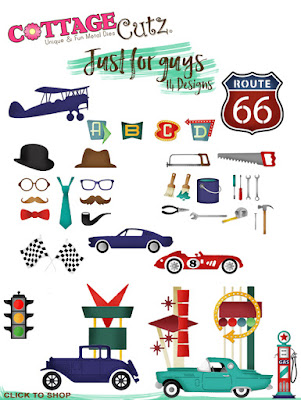
We have a brand new release of Just For Guys dies in the online store, and they are currently 25% off.  There are 14 new designs and they are ideal for masculine cards, guy stuff or car buffs. They all have a retro and classic look. The design team has been showing samples using the new dies. So if you haven't seen them, take a look back on the Blog for some creative ideas for your masculine cards. 

 For my card today, I am featuring the new Traffic Light die. I needed a graduation card, and I thought this die would make something a little different.  Let's get started with some details on how I created my project. 
Step 1: I chose my card colors based on the school colors. It's a blue -gray theme. My blue cardstock is called lost lagoon and I used patterned paper to match. I used the largest Stitched Scallop die to cut my rectangle panel.
Card Base: 4 1/4" x 5 1/2"
Patterned Paper Layer: 4 1/8" x 5 3/8"
Stitched Scalloped Layer: 3 1/2" x 4 1/2"
Step 2: Cut out the traffic light pieces. I like to use colored cardstock when I cut my dies. It's easier for me to do it that way. But you can certainly use white cardstock then the color medium of your choice. Either way works great.
I cut the 2018 from gray cardstock and I used the Stitched Numbers die. This card is going to a girl so the scalloped panel and the stitched numbers give it a bit more femininity.
Step 3: Time to start a bit of the card assembly. I attached the PP layer to the card base with double sided tape. 
Started the assembly of the image panel. First, I had to stamp my "go" word on the greenlight. I didn't have a stamp with just that word. But, I found one with the word "got".
By masking off the "t" and the rest of the sentiment I had what I wanted. Sometimes we just have to get a little resourceful with what we have to work with.  
Attached to panel then I stamped my sentiment in the bottom right corner. Used the Stamp-a-ma-jig for help with keeping it straight.
I applied Ranger multi matte medium to the numbers. Placed them on an angle just for added interest.
Step 4: To finish off my card, I used mounting tape and attached image panel to base.  I thought it needed something else to complete it so I added a few gray enamel dots. It was just a little bling but not too much to overwhelm the other elements of my card.
Well that's it for me for this post. I hope I have given you another idea for a way to use these new dies. See you next Saturday!!

dies I used to create card:
http://www.scrappingcottage.com/cottagecutztrafficlight.aspx

http://www.scrappingcottage.com/cottagecutzstitchednumbers.aspx


http://www.scrappingcottage.com/cottagecutznestedstitchedscalloprectangleset.aspx


Friday, June 22, 2018

Road Trip

Happy Friday everyone!  It's Jeanne today and my cards uses some great dies from the new "Just for Guys" release.  (Although these really aren't just for guys - this would make a great card for anyone going on a road trip!)
The card features the letters from the Retro Alphabet set.  I cut them all out of white cardstock to begin.
Some of the backgrounds were similar but the nice  thing about this set is that you can mix and match the backgrounds for the letters!
I colored the backgrounds and letters using Copic markers to match the colors in the patterned paper I was planning to use.
Next I cut the background pieces from the Route 66 Road Signs set using vanilla cardstock.  I left these uncolored.
I cut a panel slightly smaller than 4/14 x 5 1/2 inches.
I adhered all my elements to the panel with some hanging off.  I used scissors to trim these and then glued the panel to a top fold A2 card base.
I love the retro look of these dies.  Great for men (or women)!

We have a number of sales going on in the store today, including the new release which is Just for Guys!!! It has 14 wonderful dies for the awesome men in our lives! It's on sale for 25% off!  The other sale we have going on is our ANNIVERSARY SALE WITH UP TO 50% off most of the dies in the store!  So please check out the online sales!

Dies used today:
http://www.scrappingcottage.com/cottagecutzretroalphabet.aspx

http://www.scrappingcottage.com/cottagecutzroute66roadsigns.aspx


Thanks for stopping by today.  Have a creative weekend!

Thursday, June 21, 2018

Route 66!

Hello Cottage Cutz Fans!

It is Pam sharing with you today on the blog!

We have a number of sales going on in the store today!  Including the new release which is Just for Guys!!! It has 14 wonderful dies for the awesome men in our lives! Can you believe they are on sale for 25% off!  So please check out the online sales!


The other sale we have going on is our ANNIVERSARY SALE WITH UP TO 50% off most of the dies in the store!

Now onto the project for today!  I used some fun designer paper and our new Route 66 Road Sign die!
Designer Steps:
 1.  Cut all of the pieces out of white card stock using the Route 66 Road Sign die
 2.  Color the pieces using your markers
 3.  Cut a white Double Stitched Rectangle and pop the Route 66 sign on top of it.  Cut to 1/4 x 5 1/4 inch red strips
4. Use an A2 white card base cut a slightly smaller piece of red card stock and then a piece of DP 5 1/4 x 4.  Glue all of the piece to the front of the white card base

 5.  Add the red strips and the Route 66 panel


6.  Color the additional road signs with your markers. Stamp the arrow with Roadtrip
Cottage Cutz Products


Thanks so much for stopping by and the sales end soon so don't miss out on these fabulous discounts!
Blessings
Pam