Monday, December 04, 2023

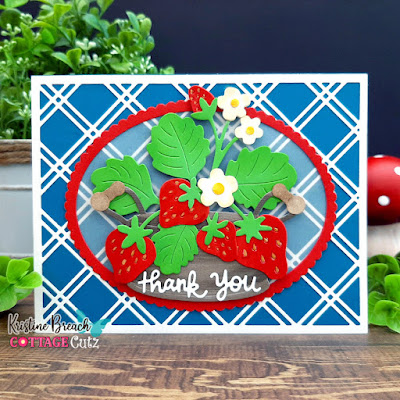
Strawberries in Tub

Welcome CottageCutz friends!

Kris here with a sweet card that is very easy to recreate using our Black Friday Release.  The individual dies are 30% off!!  


Dies I used:

Design Steps:


I die cut and colored my elements as shown above. I added some gold accents to the seeds on my strawberries.

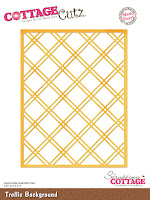
My card base is cut from Pretty Peacock at 4-1/4" x 11" and scored at 5-1/2".  I then glued my Trellis background onto card front. 

I die cut the largest Scalloped Oval from Poppy Parade and from vellum.  I then die cut the largest Stitched Oval inside of the red oval to make a frame and glued it on top of the vellum oval, then onto card front, as shown.


I added my strawberries in the tub to the middle of my oval with foam dots, then added the "thank you" sentiment to tub.


For the inside, I die cut the largest Stitched Rectangle from white and the large strawberry from the Sentiment, Thank You Berry Much die.


I taped the white panel to the inside center and offset the strawberry as shown.


Here's the front again.


Don't forget to check out our YouTube channel for lots more tutorials and giveaways!

Happy Crafting friends!

~Kristine

Sunday, December 03, 2023

Christmas French Horn

 Hello Friends 

Our new Christmas Release is available at a wonderful 30% off.  This collection has over 40 different dies.   It has everything you will need for your holiday paper crafting. Make sure to stop by the online store and check out all the fantastic new designs!

Today, I am using the Holiday French Horn.  This horn is a large die so it is a perfect size for a quick last minute card or a multiple set of A2 Christmas cards.


Design Steps:

1.  Using the Holiday French Horn die cut out the following colors of card stock: gold, red, light green and dark green
2.  Card base is an A2 kraft card stock, piece of gold card stock 4 1/8 x 5 3/8, piece of music DP 4 x 5 1/4
3.  Glue the gold to the kraft base and then glue down the music DP
4.  I tacked down the top of the horn and then stuffed in the holly, berries and additional single leaves. I then finished glueing down the horn if it needed it.   Add your little corner holly and berry
5.  For the sentiment on the inside I stamped in VersaMark Merry Christmas to You and embossed it in gold on kraft card stock then die cut.  For the front I stamped in VersaMark May Your Days Be Merry and Bright and embossed in gold on cream card stock then die cut
6.  I added my sentiment to the front as shown below.  And I added my sentiment inside plus a few added decorations as shown above


We have more inspiration on our YouTube Channel check it out HERE

Thanks so much for stopping by!  And I will see you next Thursday.

Blessings and Take Care


Saturday, December 02, 2023

Hello Sunshine - Thinking of You

Hello Blogger Friends! Thanks for taking the time to stop and visit on this first Saturday of December!

It's new release time!!! We have our annual Black Friday release available now in the online store. There are 19 different designs and they can be used for all seasons.

The dies are broken into 2 different bundles and they are currently on sale for 30% off the individual  dies. 

Today we are featuring another card from Marla. She used the Garden Bicycle,  Hello Sunshine and the Garden Flowers dies from the Bundle #1 collection and created a thinking of you card. 

She achieved a great ombre look with the Hello Sunshine phrase by using spun sugar, worn lipstick, scattered straw and fossilized amber distress inks. 

The addition of the patterned paper helped to ground the bicycle. The background arch reminds me of one you would have in your garden to train flowers to grow up it. 

Marla did a video reviewing the dies from the Bundle #1.  She also gives more info on this card we are showing today. Check that out here. There is also a giveaway.


Friday, December 01, 2023

Hello Sunshine Bay Window Card

Welcome CottageCutz friends!

Kris here to share this Friday edition of the blog.  It's the 1st day of December and there's actually snow flurries out my window as I type this up.  My card however is in stark contrast with a Spring/Summer theme featuring our brand new BLACK FRIDAY RELEASE!!  There are 2 bundles of this release that are both on sale at 60% off!!  Or you can get the individual dies for 30% off.   See the whole release HERE.  

TODAY is the last day of the Black Friday BLOWOUT SALE!!  Save up to 85% ☺


When I saw the window die in this release I decided to make a BAY WINDOW card and I think it turned out so cute!  I used the following dies:

Garden Window
Hanging Plants
Garden Butterflies & Bee
Garden Flowers
Sentiment, Hello Sunshine
Stitched Sun, Clouds & Umbrella (cloud)
Grass Slimline

(inside of card)

Design Steps:


I cut my side-folding card base 5-1/2" x 11" and scored at 5-1/2", 6-3/4" and 9-3/4"


Front of Card:

- I cut a piece of pink patterned paper 5-1/4" x 3" 

-  (2) pieces of plaid paper 5-1/4" x 1"

Inside of Card:

- I cut a piece of blue cloud patterned paper 5-1/4" x 3-7/8"

- a piece of pink patterned paper 5-1/4" x 1-1/4"

- a strip of polka-dot paper 5-1/4" x 1/4"

- a piece of green pattern paper 3-7/8" x 2" - die cut the top with Grass slimline


Front of Card:

- I glued the pink piece to the middle of my card front.  

- I die cut the window as shown above.  *Keep the window that is cut out for the inside. 


Inside of Card:

- I added strips of Scor Tape around the window opening 

-  adhered a piece of 3" x 4" window sheet.  


For the front of card:

- I die cut (2)  windows from white cardstock and glued them on top of each other.  

- I added 1/8" Scor Tape to back and adhered to acetate on the front of card.  

- I adhered the (2) plaid strips to side panels.


For the inside:

- I adhered the pink/white window that I had left over to the window sheet 

- I cut (2) pieces of yellow beehive paper to cover the taped acetate parts above and below the window (size will depend on your exact placement of your window).  

*NOTE:  I initially adhered the yellow paper above & below the window, but later decided to cover the lower piece up with the same green as my grass so my sentiment would stand out.  


- I adhered the blue piece inside ... about 1/8" to the right of my middle score line

- I adhered my grass on top.  

- I added strips of 1/8" foam strips to the back of my pink layer and placed centered between the blue/green layer and the right edge of card.  

- I glued my 1/4" polka-dot strip to the center of pink layer. 


I die cut the decorative elements from white cardstock and I colored with Copic markers then adhered to front and inside of card as pictured below.  


Here it is standing up with the front panel tucked behind the popped up side panel.


Check out this WHOLE amazing release 


Thanks so much for looking!  I hope you are inspired to get crafty with your favorite CottageCutz dies!  

~Kris