Hello CottageCutz friends! Thanks for taking the time to stop and visit with us today. It's Mary Marsh here bringing you the Wednesday edition of the Blog.
It's new release time!!! We have our Christmas 2023 release in the online store that has 40 designs. It's an old-fashioned Christmas theme. You can pick up the individual dies at 30% off for a limited time.
We also have a new Fall 2023 release in the online store with 15 designs. You can also pick up these individual dies at 30% off for a limited time.
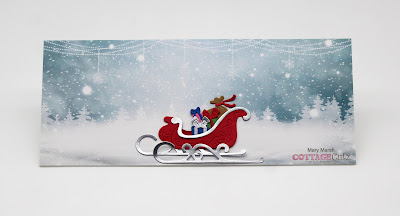
Today for your viewing pleasure, I am featuring the new Vintage Sleigh die to create an outdoor scene in the slimline design.
We also have a new Fall 2023 release in the online store with 15 designs. You can also pick up these individual dies at 30% off for a limited time.
Today for your viewing pleasure, I am featuring the new Vintage Sleigh die to create an outdoor scene in the slimline design.
Even though it is a vintage sleigh design you can use it for a card with a more modern appeal. So, let's get started with some details of how I created this one.
Design Steps:
When I saw this Vintage Sleigh die, I thought it would show well on a slimline format. So, I looked through my designer paper for a background that would work for my idea.
When I came across this pack of slimline card fronts (from Divinity Designs), I knew this pattern would be perfect for my outdoor scene. I liked the snowy landscape and the subtle white pine trees in the background.
The designer paper is 3 3/4" x 8 3/4". I decided to keep that size and cut my white cardstock the same size. This will fit in a #10 business size envelope and it's flat for mailing.
Next, I cut my sleigh in the usual red color and used a metallic silver for the runners and trim. I cut the presents in different colors of cardstock. I kept Santa's bag in a brown shade. I cut some of the pine trees from the Santa & Reindeer die for added embellishments. And for a sentiment I used the Tis the Season die from the Christmas 2022 collection. It's a larger sentiment but for a slimline design it works well to fill in the top part of my card. And I cut it in red cardstock for a bolder appeal.
Now that my card elements are prepared I am ready to start assembly. I attached the designer paper to the card base with double sided tape and the sleigh with the same adhesive.
Next, I attached the trees with clear drying glue.
To finish off my card I attached the sentiment with clear drying glue.
That's my sample for this week. See you next Saturday!
Reminder: Marla has a new video and a giveaway on the CottageCutz YouTube channel. Click here.


