Wednesday, September 13, 2023

A Change in Direction


Hello, my crafty friends and happy Wednesday.  I'm here today with another CottageCutz YouTube video.  I don't know about you, but I always like to get more mileage out of my dies.  I enjoy making cards using slimline dies, but I know not everyone is comfortable with this sized card.  Today, I am sharing a die you may have overlooked for this reason.  It's called the "Mountains and Trees Slimline". As you can see by my card, this die is designed to create a beautiful outdoor scene and can be used with A2 sized cards as well.  I call these double bonus dies.

I hope you will head over to our YouTube Channel to see the entire card making process.  If you entered to win the "Leafy Branch 1" die from my last video, I will be announcing the winner, so you don't want to miss out.  
Until next time..... Marla


Tuesday, September 12, 2023

Boo Card With Halloween Die Cuts

Happy Tuesday crafty friends,

I hope your day is off to a great start! Today I am sharing a cute little Halloween themed card featuring some fun Cottage Cutz dies. Take a look....
It is a top folding A4 card. I started with a white cardstock base. To that, I added some fun green with micro dots patterned paper. 


I started by cutting all my pieces out in plain white cardstock. I then set about to coloring my various pieces with my markers. It is one of my favorite things to do.


I added some of the fun spider webs to the bottom of the card and then used my stitched alphabet die to cut out the letters for BOO and used some foam tape to adhere them and give them a little lift. 


This shows me adding some glitter to the cute little spiders. I also added some glitter to the bow on the tree vase.


Here's a closer look at the cute little witchy ghost on the whacky stitched square mat. I used some foam tape to give her a little lift. 

Here is one last look at my completed card. I hope it inspires you to try different, non-traditional Halloween colors.


Dies I used


I hope you are inspired by my fun little card! Be sure to head over to the Cottage Cutz YouTube channel for some more great inspo!

Don't forget to head over to Cottage Cutz and take advantage of their latest promotions. Until the next time, have a wonderfully crafty day.


Monday, September 11, 2023

Ginger Friends Tunnel Card

Hello friends!

Kris here to share some Monday inspiration with you!  I made a Christmas-themed tunnel card using some of my favorite dies from the Christmas 2022 Part 2 Release Ginger Friends and Cookies & Cocoa and more.


DESIGN STEPS:

1.  Cut and score a red A2 side-folding card base.

2.  Cut (2) pieces of patterned paper (green on my card) at 5-1/4" x 4".  Glue each piece inside your card very close to the center score line w/out going over it.

3.  Cut a piece of patterned paper (red chevron on my card) at 5-1/4" x 8-1/4".  Score the 8-1/4" side at 2-1/16", 4-1/8", and 6-3/16".  Fold as follows:  valley fold, mountain fold, valley fold. 


4.  Cut the largest pierced oval die from the middle of red patterned piece.


5. Open card flat and lay the oval piece over the green, lining up the edges so there's equal red border all around.  While holding it in place, fold back one outter section and apply glue then lay it back down.  Repeat with other outter panel.  Do not glue the middle portion.


6.  Use the extender technique to lengthen the Icicle Border die so it covers the width of the inside of card as shown below.  Glue to top of the red patterned paper --- make sure it stays below the top edge of red card base.


7.  To make our focal image pop up in middle, cut a piece of cardstock at 4" x 3/4" and score at 1", 2" and 3".  Cut another piece at 3" x 3/4" and score at 1/2", 1", 2" and 2-1/2" and fold as shown below (the one shown on top is the 3" x 3/4")


8.  With the 3" piece, apply glue to the backside of each outside panel as shown.


9.  Adhere to the 4" piece so that the 2 glued tabs are bumped up to the middle score line as shown.


10.  I forgot to take a good pic of how to insert it, but you'll want to add glue to the outter 1 tabs of the 4" piece and butt them up against the middle score line of your card base as shown below.  


11.  Die cut, color, and assemble the Ginger Friends, Cookies & Cocoa, and the 3rd largest Scalloped Oval.


12.  Glue the Ginger Friends to each side panel and adhere oval to the mechanism in center of card.  Done!


Thanks for taking a peek today!  I hope you are inspired to get crafty with your favorite CottageCutz dies!

~Kristine


Sunday, September 10, 2023

Harvest Basket


Hello CottageCutz friends! Thanks for taking the time to stop and visit with us today. It's Mary Marsh here bringing you the Sunday edition of the Blog.

Our Folk Art release is still available in the online store at 35% off individual dies. There are 19 new designs that are so perfect for cardmaking, journaling, and scrapbooking.

In fact, all of the releases from 2023 through Halloween of 2022 are currently on sale. Check them out here if you want to pick up any that you may have missed and still want. 

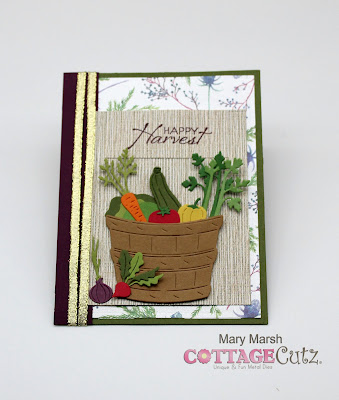
Today for your viewing pleasure, I am featuring an older die from our 2018 fall release- Basket of Vegetables,  and I created a card to send at Thanksgiving to celebrate the autumn harvest. So lets get started with some details of how I put it all together. 

Design Steps:

I started off my card this week with the layout. I used an older sketch from Splitcoaststampers Sketch #717 for my card. I thought the layout would show off this basket of vegetables die well.

I wanted to use designer paper that had more of a fall theme to it. I had this pattern in my collection and I liked the flower images. I paired it with a moss green and a shimmery white cardstock. 
Shimmery white card base: 4 1/4" x 5 1/2"
Mossy green layer: 4 1/8" x 5 3/8"
Designer paper layer: 3 7/8" x 5 1/4"
Blackberry panel (Layer 3) : 3/4" x 5 3/8"
I cut the basket and vegetables in cardstock colors that correspond to the vegetable image. I layered the basket on designer paper  (element 2 of sketch) that I embossed with a wood plank folder. Just for some added texture. 
Next, I stamped the happy harvest sentiment in blackberry bliss ink. 
Now that my elements are all prepared, I am ready to start card assembly. I attached the designer to the layering panel with double sided tape. The blackberry layer (element 3) is also attached with tape. 
I attached the image panel and also decided to add some gold ribbon. 
To finish off my card, I attached the panel to the white card base. I scattered a few blackberry enamel dots and also added a corner piece of greenery. 
That's it for me for this post. See you next Saturday.