Thursday, September 07, 2023

Spook-tacular Halloween

Hello Friends

It is Pam creating with you this wonderful Thursday! And before we get started I wanted you to know we have a SALE in the online store.  So be sure to check it out HERE.  

The card I am sharing today is another one for Halloween.  I usually send out about 20 Halloween/Fall cards so I have a few more to make.  Today's card features the Halloween Chair plus a couple of others dies for some added fun.


Design Steps:

1.  You will need a black horizontal A2 card base, purple DP 4 1/8 x 5 3/8, black checked DP 4 x 5 1/4 and an orange frame cut with the largest of the Pierced Frame Rectangle dies

2.  Glue the purple to the black card base then glue the black check to the purple and last add the orange frame to the middle.  Set aside

3.  Using the Halloween Chair cut out the following colors of card stock: orange, green, black, yellow and brown.  For the cat I used the Spooky Tree Gnome and cut it out of black
4.  Assemble the pieces using a fine tip, fast drying glue
5.  Using the largest Wacky Stitched Rectangle cut out a piece of the purple striped DP.  Build your scene on the rectangle
6.  I needed a little something in the upper right corner so I cut out a web using the Spooky Halloween Castle and spiders from the Spooky Tree Gnome.  Add your sentiment to the left of the chair
7.  Place dimension tape on the back of the purple panel and pop it to the center of the card.  This fun Halloween card is complete


We have more inspiration on our YouTube Channel check it out HERE

Thanks so much for stopping by!  And I will see you next Thursday.

Blessings and Take Care


Tuesday, September 05, 2023

Halloween Headband and Bow

Happy Tuesday Crafty friends,
If you live in the United States, I hope you were able to enjoy a nice holiday. Today I am sharing a fun project I created with some of the fun Cottage Cutz dies. Here's what I created.

I created a fun halloween themed headband and a bow.
I used some fun halloween dies from Cottage Cutz.


I unfortunately didn't take too many photos of my process. I started with a bow of glittery purple edge wired ribbon. I then made a puff from some bright green tulle. To that I added some orange tbing and some yellow yarn. I did ultimately cut the yarn loops to make them appear more abundant.


Here's a view of the headband. The star of the headband is the super fun halloween Jack O Lantern 

Here's another image of me holding the headband.


Now for the little bow with hair clip.
I cut out the web and the hat. I colored in the pieces of the hat. 


I added some glossy accents and then glitter to the hat. When it dries it hardens it very nicely.


Here's the hat and the spider web as they were drying. The Glossy Accents and the black paint on the web, allowed the die cuts to dry and be much harder an firmer.

Here's a top view of the cute little bow I made that has a little hair cliip on the back of it. I used some of the same materials as the headband. I used the same glittery purple ribbon. I used some pink tulle for a puff and then some Orange tubinTo all of that,, I added my hat, the spider web and a cute little purple gem back spider. I picked up the spiders from Dollar Tree.


Here's a side view of the bow. This shows the various layers.

Here's a photo of the back of the bow. I hot glued some black felt to the little hair clip and then glued that to the back of the bow.


Be sure to head over to the Cottage Cutz You Tube channel for some great inspiration from some of our Design Team. 

Well that about covers it. Until the next time, have a wonderfully crafty day!
-Melinda


Monday, September 04, 2023

Farm Cow Peeker Pocket

Happy Labor Day friends!

We are having a HUGE LABOR DAY SALE going on right now -- save up to 65%!  Great time to stock up on your favorite basic dies or nab some of the uber CUTE CottageCutz dies... even the Li'l Bluebird stamps/dies are on sale!!

Hello ~ Kris here to share some MOO-velous Monday inspiration with you!  


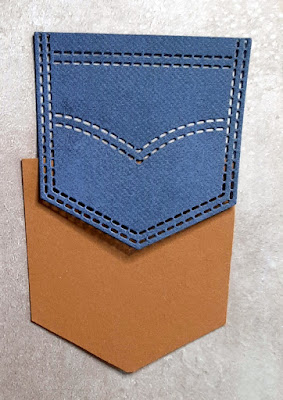
Have you seen these adorable pocket peekers?!  I've used this cute Farm Cow Peeker, and the Peeker Pocket along with the Hello w/ Shadow die.

I've used the Splitcoast Stampers Color Challenge #964 for this week which is

Copper Clay
Moody Mauve
Misty Moonlight

The colors in my photos below do look a bit off from the color challenge, but I did use Misty Moonlight for my card base, and I substituted Pecan Pie for the Copper Clay.  

DESIGN STEPS:

 I cut my card base at 6" x 8-1/2" and scored at 4-1/4" for a side-folding card.

I used another piece of MM cardstock and stamped a denim looking background stamp onto it with some grey ink (as I didn't have the Misty Moonlight ink and it gave it a more subtle effect).  Then I die cut it using the Peeker Pocket 

To back my pocket and to resemble the brown/tan stitching on jeans, I put a piece of Pecan Pie c.s. behind the pocket and cut it slightly smaller and then glued it behind the denim one.


I cut a piece of patterned paper (from the SU! Earthen Elegance pack as it reminded me of a sort of rustic cowboy print) at 5-3/4" x 4"and adhered to card front.  

I cut a piece of Pecan Pie ginham (from the Glorious Ginghams pack) at 5-3/8" x 3-5/8" and adhered to card front.

Next, I punched 2 small holes at top of pocket and added some rustic metal brads, then glued the sides and bottom of pocket to the lower gingham layer.
 

I die cut my Farm Cow Peeker from White, Sand, and Pecan Pie and then I cut small pieces of the Moody Mauve, Blackberry Bliss, and Mossy Meadow and die cut just the flowers and leaves.  


I added some coloring/shading with Distress Oxide inks and Copic markers and added white highlights on flowers & eyes with a white gel pen.  Then I assembled the cute cow with glue and tucked her head/body behind the pocket and her legs on top.


How stinkin' adorable is she?! ☺


I had this li'l buckle with some engraved detail and some braided twine that I thought would be cool on here, so I attached it with some double-sided tape behind the cow's head.


And lastly, I die cut a 'Hello' from the Moody Mauve c.s. and adhered to the pocket.  


Thanks for taking a PEEK!  Go check out these adorable PEEKERS and grab your favorites or take advantage of this AWESOME LABOR DAY SALE going on to stock up!!


Ink Something Crafty!
~Kris


Saturday, September 02, 2023

Sending Birthday Wishes

Hello CottageCutz friends! Thanks for taking the time to stop and visit with us today. It's Mary Marsh here bringing you the Saturday edition of the Blog.

Our new Folk Art release is still available in the online store at 35% off individual dies. There are 19 new designs that are so perfect for cardmaking, journaling, and scrapbooking.

In fact, we are having a big Labor Day sale going on now. The savings are up to 65%. Check it out here. 

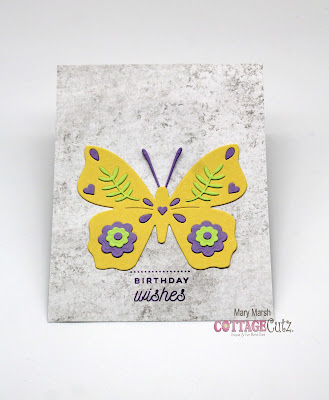
Today for your viewing pleasure, I am featuring the Folk Art Butterfly die on a birthday card. So, let's get started with some details of how I created this card. 

Design Steps:
I started my card this week using the colors from the Splitcoaststampers color challenge #963. We were to use highland heather, parakeet party and daffodil delight for her color trio. Optional was to make it a birthday card. I thought these would be perfect colors for the butterfly. 
highland heather, parakeet party, daffodil delight

I cut the butterfly in the three challenge colors and attached to a panel of designer paper. This one has a gray background and gray is an allowed neutral in this color challenge. I also stamped my birthday sentiment in highland heather ink. 
Gray Designer Paper: 4 1/2" x 5 1/2" 
Next, I cut all the elements that would surround my butterfly image and also my sending phrase. I used the Sending Hugs Bear, Folk Art Flowers Mixed and the Little Flowers dies. Again, all cut in the challenge colors. 
I attached the new pieces with a clear drying glue. 
To finish my card, I attached the image panel to the highland heather card base and scattered a few hearts. 
Card Base: 4 1/2" x 5 3/4"
Well, that's it for this post. See you next Saturday.

Reminder: Marla has a video up on the CottageCutz YouTube channel. Click here.