Tuesday, June 27, 2023

Patriotic Mini Home Decor Sign

Happy Terrific TuesDIE crafty friends!

Melinda here with you today. I hope you are having a wonderful day and enjoying great weather and getting your craft on! Today I am sharing another Patriotic project I created with dies from the new CottageCutz.com Patriotic release. Here is what I came up with.
This cute little patriotic sign for my work station.


I started by die cutting all of my die cuts out in white cardstock. I then proceeded to color them in with my blue and red markers.


Once I colored all of my die cuts in, I began to assemble them and attach them onto the base. The mini wooden slat sign is one I picked up at the dollar tree. It even included the little string holder of jute. Has so many uses. Once I was happy with where I put everything, I adhered it all down with wet glue and foam tape. Once they were all set up, I added touches of Red, White, Blue and Silver glitter to various areas.

Here's a closeup of the larger star. I covered it in Stardust Stickles.

Here's a close up of one of the fire crackers. I used Stardust stickles for these stars. You can also see I used Red Stickles for the top as well as silver for the bottom fire spark. Off to the side you can see where I used my blue glitter for one of the little stars.

Here is one last look at my super cute sign. I placed on top of the little tray I have in the corner of my workstation and get to enjoy it.


Here's a look at the complete release. All such super cute and versatile images.


Be sure to head over to the Cottage Cutz YT Channel and check out all the great crafty inspiration there as well! So many fun and inspiring projects!

Well that about covers it for today. Until the next time, have a wonderfully crafty day!
-Melinda

Monday, June 26, 2023

USA ☆ Pups

Hello and happy Monday!

It's Kris sharing with you today a cute and simple card featuring the Patriotic Pennants and the USA dies.  I can't believe it's almost JULY already, can you?!  


Design Steps:

I actually cut my card base last because I wasn't sure what size I wanted, but after die cutting my main panel and matting it, etc. I ended up with an unusual size for my base (6" x 5").  So we'll start there and build up!

White card base = 10" x 6"-- scored the 10" side at 5"
Plaid patterned paper = 4-3/4" x 5-3/4"
Blue layer = 4-1/8" x 5-1/8"


Next, I printed a digi sentiment onto white cardstock, then die cut it using the largest of the Nested Wacky Stitched Rectangles.  


I decided I wanted a red scalloped mat for it.  But the largest scalloped rectangle is exactly the same size, so I did some manipulating of the die... running it thru the machine 4x ... and just doing one corner and part of the sides at a time and moving the die in between each cut to extend the size both length-wise and width-wise.
 

I die cut the pieces from the Patriotic Pennants and the USA dies.  I hand cut the banners off of the string and glued the stars onto the string instead for a different look!  I then glued the bows from the pennants die onto the USA --- isn't it so cute?!  ☺  I also colored the dogs with Copic markers. 


Here's a close-up of the card front ☺


Wishing you all a blessed and safe holiday!!
- Kristine

Saturday, June 24, 2023

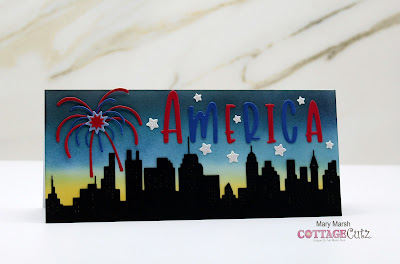
Patriotic City Skyline

Hello CottageCutz friends! Thanks for taking the time to stop and visit with us today. It's Mary Marsh here bringing you the Saturday edition of the Blog.

We have a brand-new release in the online store. It's our Patriotic 4th of July release with 12 amazing patriotic designs and bundle pricing at 40% off for a limited time. You can pick up the individual dies at 30% off . If you love making patriotic cards to honor a veteran, to celebrate the 4th of July or to display your love for America, we have you covered with this new release.

My card for today is featuring the Patriotic Rainbow & Fireworks dies in a slimline design. I love making patriotic cards and mail them out for the 4th of July celebration. So let's get started on some details on how I created my card. 

Design Steps:
I decided to make a nighttime city skyline card. I started off doing some ink blending of the sky using distress inks. I used Bristol smooth cardstock and prized ribbon, villainous potion, black soot, fossilized amber and wild honey inks. I think this cardstock blends the inks so smoothly. 
Panel: 8 1/2" x 3 3/4"
Then I cut the America phrase and the fireworks image in red and blue cardstocks. 
For the city skyline, I used the City Skyline Slimline die and cut it in black cardstock.
  
Now I am ready to start my card assembly. I attached the images with a clear drying liquid glue and double sided tape.  
I added some stars using a white glitter paper and mounted the image panel to a white card base measuring 8 1/2" x 3 3/4".  That finishes off my card for this week. See you next Saturday.


Wednesday, June 21, 2023

Travel the USA

 Hello Friends

We have a new release just in time to celebrate the 4th of July!  It is called Patriotic and the collections has 12 wonderful designs all perfect for our Nation's birthday! Check out this release HERE!

I am using 3 of the new dies the FireworksPatriotic Car, and Patriotic Camper.   I decided to use a slimline design to accommodate all the fun pieces.  


Design Steps:

1.  Using the Patriotic Camper cut all the pieces with the following card stock colors: light blue, navy, red, white and black 
2.  Assemble the pieces using a fine tip glue and I also found tweezers helpful
3.  Using the Patriotic Car cut out the pieces in the following colors of card stock: navy, white, red, black and light blue
4.  Assemble the pieces using a fine tip glue and tweezers
5.  Using the Fireworks die cut out the flowing pieces of glitter card stock: red and sliver.  Also cut out some regular navy card stock
6.  The card base is a white slimline measuring 3 1/2 x 8 1/2.  The star embossed card stock is 3 1/4 x 8 1/4.  Begin assembly on the embossed white piece gluing down the fireworks first
7.  After the fireworks are glued down pop up the car and camper.  Next add a strip of black for the road measuring 1/4 x 8 1/4 that has been stamped with sentiment and embossed in white

CottageCutz Products


Here is a peek at the new release and I must say I love all of them!

We have more inspiration on our YouTube Channel check it out HERE

Thanks so much for stopping by!  And I will see you next Thursday.

Blessings and Take Care