Saturday, November 20, 2021

Magic of Christmas

Hello CottageCutz friends! Thanks for taking the time to stop and visit with us today. It's Mary Marsh here bringing you the Saturday edition of the Blog.

IT'S NEW RELEASE TIME! The new Christmas dies are in the online store with 40 new designs from Christmas Part 1 and 19 new designs from Christmas Part 2.  

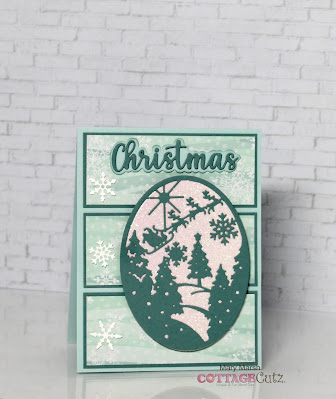
Today for your viewing pleasure, I have a design featuring The Magic of Christmas die. It made for such a cute and whimsical scene as so many of our dies do. Here are two other cards I made using our scene building dies.  So let's get started on some details of how I created my card. 

Design Steps:

I started my card this week with the layout. As I have said so many times before having the sketch in mind helps jumpstart the card making process for me. I find the sketches I use very easy to interpret. I liked the sketch #880 on Splitcoaststampers. I thought it would work well for the oval shape of the die. 
I looked through my designer paper for a background pattern that might fit and not overwhelm the die scene. I found this subtle snowflake pattern that I only had pieces of, but I had enough to use for the three horizontal layers. 
Blue Card Base: 4 1/4" x 5 1/2"
Designer Paper Layer: 3 7/8" x 3 11/16"
Layer under DSP: 4" x 3 11/16" 
Next, I cut the image from blue green (lost lagoon) cardstock. Then I used the 2nd largest die from the Oval die set to cut a snowy background from white glitter paper.  

I cut the Christmas sentiment using the Merry Christmas w/Shadow die. The shadow is the light blue (card base) and the Christmas phrase is the lost lagoon shade. 
Now that all my card elements are prepared, I am ready to start card assembly. I attached the designer paper layers to the card base using double sided tape. 
I attached the image panel to the white glitter panel with Art glitter glue. Then I attached to the card base with dimensional adhesive. 
To finish off my card I attached the Christmas phrase with glue dots and added a few snowflakes for element 4 of the sketch. 


Well that's it for me for this week. I hope I have given you a fresh idea for a way to use this new die. We are having a Black Friday release and the DT will begin showing samples starting tomorrow. See you next Saturday!

Reminder: The CottageCutz You Tube Channel is up and running again. We have new videos every Wednesday. Plus there is a giveaway on the channel. Details on the channel. Check it out here. 

dies I used to create card:


Friday, November 19, 2021

Peek a boo parcel


Happy Friday Cottagecutz fans.It’s Wendy bringing you the blog today. I hope you’ve had a great week. The weekend is nearly upon us as is Christmas so it’s making sure we are ready for the big day. 

I am bringing you a quick an easy card today. So to begin with I cut the ‘Lift Flaps Stitched Rectangle Slimline’ die to cut the apertures on my silver card. I stuck this onto a white folded card using 1mm foam pads for a bit of dimension. 

Next i cut out the ‘Santa gnome in Present’ 3 times, but I only cut out the gnome once. I wanted to give an affect of the box opening in each step. Once assembled I have attached the presents and Gnome to the card with 1mm foam pads. Here is a closer view for you


Next I printed out the words ‘Do Not Open Until Dec 25’. I split the words up and cut them out using the ‘Nested Stitched Scalloped Squares’ and attached behind each flap


To finish off the card I cut out some gold holly from ‘The Joyful Snowman Die’ and then added some diamantés and we’re done

I hope you enjoyed the card and have a wonderful weekend. Make sure that you have plenty of time to Christmas craft
Wendy


Dies I have used


Don’t forget to check out the latest video tutorial on our YouTube Channel


Thursday, November 18, 2021

Christmas Poinsettia

Hello Scrapping Cottage Friends

The design team is continuing to use our two new Christmas release dies.  The two releases are at 30% off but this great sale won't last long.  So make sure to take a peek before the prices go up.  I am using one of the very versatile dies the Woodland Christmas Set.  There are a number of great designs on this one die.  I am using the beautiful Poinsettia for this card.


Design Steps:


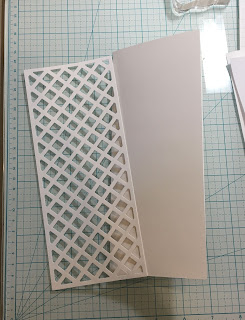
1.  Use a white slimline base measuring 3 1/2 x 8 1/2.  Cut a piece of white card stock using the Lattice Slimline die for the cards background.  Glue the Lattice to the front of the white slimline base card

2.  Next using the Woodland Christmas Set die cut out the red flowers, green leaves and the gold centers.  For the gold berries I used the Christmas Floral #2

3.  Use a stylus to give the flowers and leaves a little bend.  Rub the back of the petals and then flip over and make a circular motion in the cener of the flower.  For the leaves just rub the back of the leaves

4.  Make your arrangement just slightly below the center of the card.  I used glue dots for the flowers and tucked the leaves and gold berries in with glue
5.  Stamp your sentiment and layer with red card stock.  Glue the sentiment to the front of your card and your card is complete

CottageCutz Products


I want to remind everyone that the CottageCutz You Tube channel is up and running once again. We have new videos every Wednesday.  Check it out right HERE!

Take Care and Blessings

Pam


Wednesday, November 17, 2021

Hello again! 

It's Theary Chea here on the blog today. For today's post, I am sharing another video over on the CottageCutz Youtube Channel. 


For this video, I am sharing a card that I created using the Gingerbread Family Die from the most recent release. 

Sometimes, I find it difficult to find the right pattern paper for my projects. So, for this card, I decided to create my own pattern paper by using the Arctic Snowy Tree die. It was quite simple to make and I hope it will inspire you to create your own using the dies that you may have on hand.

Congratulations to Moe Creations!!
You are the lucky winner of the Penguin Decorating Tree Giveaway. Please send us an email to mrmarsh917@gmail.com.

And, if you missed out on that giveaway. We are also having another giveaway for this video! All that you have to do for entry is hop on over to our YouTube channel and become a subscriber, comment, and thumbs up! That's all! Good Luck! 😊

Until next time,


Supplies used:


Tuesday, November 16, 2021

Tree Ornament


Happy Tuesday Cottagecutz fans, I hope you had a good weekend and are looking forward to the week ahead. It’s Wendy bringing you the Tuesday blog today and my project is a fun Ornamente for your tree or it could be a shaker tag

I just love this die and I used it on my project last week. I am going to be sending all my family these decorations for their trees. The great thing is that you can personalise on the back with names and the year

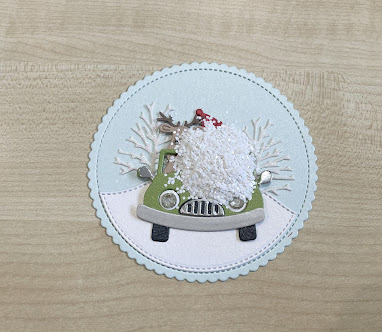
Ok, so lets get onto the tutorial. Firstly I took the largest ‘Scalloped Stitched Circle in both blue and twice in white. I’ll explain later why I cut the extra white pice


With the 3rd largest circle I cut an aperture in the white piece of card

Next I cut a piece of acetate that fitted the scalloped circle without hanging over the edge. You can do this by using the 2nd largest circle. Top Tip, if you are cutting acetate it’s worth having a piece of paper beneath the acetate to ensure a nice clean cut.

Next I attached the acetate to the back of the white scalloped hoop and attached 3mm foam pads as i want this ornament to be a shaker ornament


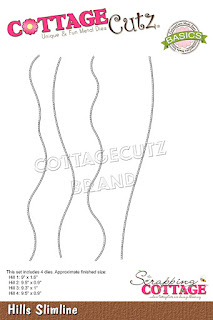
So you can put this to one side whilst we create the shaker scene. I cut the second largest circle in white card and then use the ‘Hills Slimline’ to crate a snowy background. I also cut some white glitter trees from the ‘Winter House’ Accessories’ die as I think these are super cute. I attached this to the scene with glue as I didn’t need the extra height on the scene


I then cut out the elements from the ‘Snowman Reindeer Car’. I have fallen in love with this die, it is too cute. Once assembled, I attached this to my winter scene with glue. Again, additional height is not necessary as I need room for the fun snow!


Next I added the faux snow. It’s just white chunky glitter and I really think it looks realistic. I put the glitter directly onto the scene


I then peeled off the foam tape from the other piece of card and tack over the base card


To finalise I cut a hole in the top of the ornament and threaded through some twine. The remaining white circle I cut I’m going to print on with my relatives name and also the year. So here’s the finished project.


I really hope you like this project. Cottagecutz have so many dies that could be used in this little winter ornament. 

I wish you a fantastic week and look forward to seeing you again on Friday with a super new idea
Wendy

Dies I used