Sunday, January 31, 2021

You Snuck Your Way Into My Heart

Hi!

It's Anja here. I have a Valentine's Day project for you today. 


 For this project I used:

- Cottage Cutz dies (Safari Elephant, Safari Hippo, Stitched Heart Set, Filigree Clouds),

- Distress Inks,

- blue, grey and white card stock for die cuts,

- black pen,

- white pen,

- sentiment stamp,

- black pigment ink,

- acrylic block,

- scissors,

- adhesive foam pads,

- paper glue. 


First I did the background. I cut two hearts and a bunch of clouds out of white and blue cardstock. I glued the clouds on the hearts. Next I cut the edges of the clouds using the heart die.


Then I colored the edges with Distress Ink.

Then I cut the elephant and the hippo out of the grey card stock. I used Distress Ink to emphasize the edges.


Next I stamped and cut the sentiments.

 
And then all I had to do was arrange both hearts together. And my Valentine's Day project was done. 


That's all from me for today. Have a nice Sunday and see you again next week. 
 
Anja Z. 


Cottage Cutz dies I used for this project:


Saturday, January 30, 2021

Balancing Elephant


Hello Scrapping Cottage friends! Thanks for taking the time to stop and visit with us today. It's Mary Marsh here bringing you the Saturday edition of the Blog. 

We have a brand new release of dies in the online store. It's our Circus release with 16 new designs. They are currently on sale at 25% off individual dies. The Safari release dies are also on sale at 25% off individual dies. This was our Black Friday release.

The Circus dies are so cute for Birthday, Valentine, Thinking of You or even Father's Day cards. Just let your creativity soar. The DT has been showing some great ideas & techniques for ways to use these dies. So if you missed any check back on the Blog.

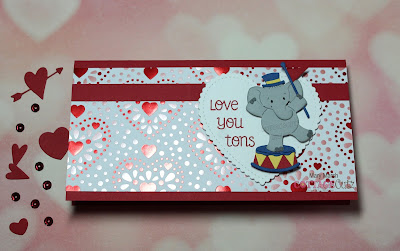
Today for your viewing pleasure, I am featuring the new Balancing Elephant die and I created a whimsical Valentine card. I plan on giving this to my hubby for Valentine's Day. 

So let's get started with some details on how I created my card.

Design Steps: 

I started my card this week with the layout. I saw this sketch #838 on Splitcoaststampers using a slimline design and decided to use it for my card. Slimline cards are so popular now and add such great eye appeal.  
Next, I cut the elephant image from various colored cardstock. I liked the colors on the packaging and they work well as Valentine colors. 
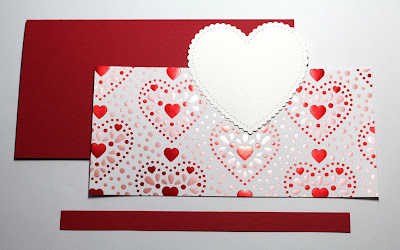
Then I chose my designer paper and card base colors. I really like this metallic heart paper from my Valentine collection for my card. I changed the circle image to a heart. It's from the 2019 "be my valentine puppies" die. 

Red Card Base: 7 1/2" x 4"
Heart Designer Paper: 7 1/2" x 3 1/2"
Red Strip (Element 3): 1/2" x 7 1/2"
I stamped my sentiment in red ink on the heart. It is a one line sentiment and I had to space it on the heart with my elephant. So I masked and with the help of my MISTI, I was able to stamp it vertically. 
Now I am ready to start card assembly. I attached the designer paper and the red strip to the card base with double sided tape. 
For the elephant, I used dimensional adhesive to lift the image off the heart background. And, I used the same adhesive to attach to the designer paper. 

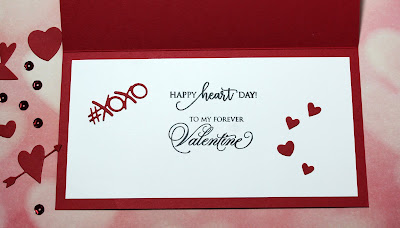
I also finished the inside of this card. Because I am giving this to my hubby, I wanted the inside to reflect my love for him. The #xoxo & hearts are from the 2019 Valentine Phrases & More die. 

And, that's my card for this week. I hope I have given you a fresh idea for a way to use this die. There is still time to order this die and get it to create Valentine's Day cards. And, you can get it on sale. 

dies I used to create card:


Friday, January 29, 2021

The Greatest Birthday on Earth

Happy Friday!  It's Jeanne today and I am LOVING these new Circus dies!  They are so versatile - great for so many occasions and male or female, young or old - they work.  My card today is a birthday card featuring the Balancing Elephant.   Another fun thing about these dies - you can go bright, or as I did here, a bit vintage.

 I started by picking my paper so I could get my colors.  I cut a base from the blue pattern (4 1/4 x 5 1/2 inches) then three panels each slightly larger than the next - 3 1/2 x 5 1/2, 3 5/8 x 5 1/2, 3 3/4 x 5 1/2 inches.

 I cut the elephant from white cardstock and used Distress Oxide inks to color, edging the pieces with Vintage Photo.

 These are the colors I used:

Using the third largest of the Stitched Oval dies I cut an oval from Vanilla cardstock and antiqued the edges with Vintage Photo.  Then I adhered the elephant.

 I stamped my sentiment on the uppermost panel in Versafine Onyx Black ink.  I used this ink because I was stamping on patterned paper and needed a very rich black ink.

 I centered all the panels and added the oval with the elephant.

I hope you've enjoyed my card today.  These dies are marvelous.  They can go many different directions in design and can be used for a variety of occasions! 

Be sure to visit the online store where these dies are on sale for a limited time!

Products used:


Thanks for visiting today.  I hope you have a fun and creative weekend!

Thursday, January 28, 2021

Galloping By!

Hello Scrapping Cottage Friends

It is Pam on the blog today!

I just love horses and so do many people especially little girls.  I could not resist making a card that showcased this beautiful Circus Pony.  I decided to use Valentine colors so that this could either be a February birthday, a Valentine or just a Hello.  


Design Steps:

1.  Use an A2 cream card base, silver card stock 4 1/8 x 5 3/8, and striped red DP 4 x 5 1/4.  Using the Stitched Scallop Rectangle die cut a silver rectangle using the second for the largest die and a cream colored rectangle using the third from the largest die
2.  Using a variety of card stock colors, as shown above,  and the Prancing Pony die cut out the Pony.  Shade the pony using a few different shades of ink then assemble the pony using a fine tip glue
3.  Prepare the base by adhereing the silver card stock to the card base, next add the striped DP.  Add pop dots to the back of the silver rectangle and stick to the striped DP.  Last add the cream colored rectangle to the center of the silver rectangle
4.  Use pop dots to place the pony and then stamp and layer the sentiment and glue flat.  You card is complete and ready for a number of different occasions 

CottageCutz Products
I want to thank you for stopping by today!  We have so many fantastic dies in the store make sure to check them out by clicking HERE!

Blessings and Take Care
Pam


Wednesday, January 27, 2021

Happy Birthday

Hello!  This is Sukie I have another card to share this week. I'm loving the versatility of the new Circus die release.  I created a simple birthday card which would be perfect for a younger child.

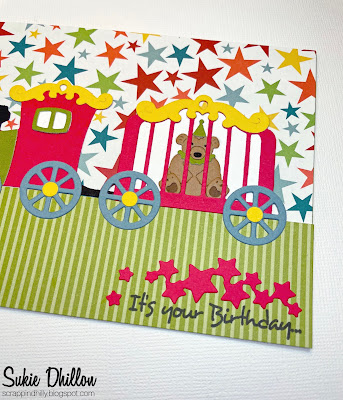
I cut out the Circus Train, the bear from the Circus Train Animals and the stars from the Circus Side Show die set.  I went with a cheerful color theme for my die cuts coordinating the colors to the background papers.
I found the star paper in my stash and paired it with a striped panel.  A simple Happy Birthday sentiment was stamped in the corner.
The Circus Train was placed along the edge of the striped paper which helped to align it.  The sweet bear was placed inside the cage with his eyes peeking out.  I added some solid white card stock behind him, it keeps him from blending into the patterned background.
The cluster of stars were affixed above the sentiment.  The extra stars were adhered to the left of the sentiment.
The stars around the sentiment were a fun finishing accent as they coordinate perfectly with the patterned paper!
Here are the die set used on my card, available in the store: