Sunday, July 05, 2020

Hello Baby

Hi!

It's Anja here. There's a baby boom going on among my friends this year. So I decided to make a few cards to welcome their babies.


For 4 cards I used:
- Cottage Cutz dies (Flying Stork, Fancy Bassinet, Fancy Baby Boder, Baby),
- Distress Inks and Oxides,
- 4 white card bases (15x15 cm),
- water color paper (4 backgrounds, 14,5x14,5 cm),
- white card stock for die cuts,
- black pen,
- sentiment stamp,
- black pigment ink,
- water spritzer,
- heat gun,
- 4 envelopes,
- paper trimmer,
- paper glue.

First I cut and colored the bassinets and baby phrases.


Next I did the same with the storks.


Then I started on the backgrounds. I used Distress Oxides. I put some color on my glass surface and spritzed it with water. Then I tapped watercolor paper on top. I used a heat gun to dry the paper. I used the same technique for all for papers.


I used the same technique to color baby borders. I used the borders to decorate the envelopes.


This is all the unique backgrounds and border I got.


Then I trimmed the paper and stamped the hello sentiment on top. Next to it I glued the baby sentiment. 

When all my pieces were ready I put the cards and envelopes together.


This is all from me for today. Have a nice week and see you again next Sunday.

Anja Z.


Cottage Cutz dies I used:


Saturday, July 04, 2020

You're a Treasure

Hello Scrapping Cottage friends! Thanks for taking the time to stop and visit with us today. It's Mary Marsh here bringing you the Saturday edition of the Blog. Happy 4th of July to all our American friends. Hope you are getting to enjoy the day and celebrating the founding of our great nation.

We have a brand new release of dies in the online store. This one is all about the sea with Pirates and undersea creatures. There are 14 new whimsical designs and each one is cuter than the next. These cards would be ideal for so many occasions. The entire bundle is currently 60% off and you can pick it up for less than $100. Each individual die is also 25% off

For my card today, I am featuring the new Treasure Chest Island and I created a card of encouragement for a friend who is always doing something special for me. I thought I would make her a card and let her know how special she is to me. So let's get started with some details on how I created my card.

Design Steps:
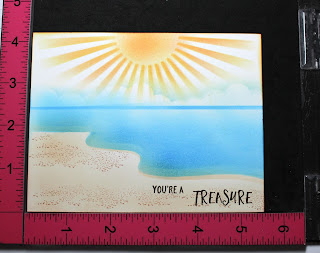
Since I was using the Treasure Chest Island die I wanted to do some ink blending to create an ocean scene. I use jumbo daubers for my ink blending technique. I started off with the sandy shore. I cut 2 templates and used crumb cake and old paper distress inks for the sand.  

Image Panel: 4 1/4" x 5 1/2"
Next I sponged in the water using salty ocean distress ink. I laid my 2nd template over the sand and began sponging the blue ink. I used the other end of my template and sponged more salty ocean ink to create the horizon line. I wanted it just a bit darker than the water. 
I used a sun ray stencil and sponged the sun with wild honey and abandoned coral inks. I took a cloud stencil and lightly stenciled in some clouds using tumbled glass distress ink.
I stamped a few sand granules on the sandy shore just to add a bit of texture. My stamp had lots more than just the sand so I taped off what I didn't want. Then, with the help of my stamp-a-ma-jig I was able to stamp the sand where I wanted it. 
 I decided to stamp my sentiment directly on the sandy shore. I used a medium brown ink and my MISTI for placement. I did stamp the sentiment 3 times to get the color intensity I wanted.  

Now that my background is completed I am ready to cut the die images. I used different colors of cardstock to cut the palm tree, treasure chest, oyster and the mound of sand. I attached it to the background using dimensional adhesive. 
I used a royal blue cardstock for the layering panel and attached this with double sided tape to my image panel. Then attached to the yellow card base. To finish off the card I added 3 enamel dots to highlight the sentiment. 

Well, that's it for me for this week. I will see you next Saturday! There is a 4th of July sale in progress at our online store with savings up to 60%. Check it out here for some great deals. 

die I used to create card:


Friday, July 03, 2020

You're My Harbor

Happy Friday!  It's Jeanne today with a card from the new Pirates and Sea Creatures release.  The release has a wide variety of wonderful images - all with a seafaring theme.  And they are on sale right now for a limited time!
I made this card for the Clean and Simple card challenge this week at Splitcoaststampers.  The theme is "Sail Away" - use a sailing or nautical theme.

I used the new Lighthouse die and a sentiment that is perfect for any close friend.  I think this could also make a good masculine card.
To begin, I die cut the pieces from various colors of cardstock.  I inked the edges for some shading and used white craft ink to add whitecaps to the waves.
In order to ink just the tips of the waves, I slid a piece of paper into the cuts and used a sponge dauber with the white ink.  It worked very well.  For the rest of the shading I used Buckaroo Blue, Gray Granite and Crumb Cake dye inks.
I assembled the lighthouse.

I cut a panel 4 1/4 x 5 1/2 from white and laid a piece of striped washi tape down the left side.  To add some interest I masked off the tape and used a splatter stamp.  I did not stamp before I added the tape, since it is very then and I did not want the splatters to show through.
I stamped the sentiment in Misty Moonlight ink.
I still wanted a bit more to the card but had to be careful not to stray too far away from clean and simple, so I added some linen thread and navy blue baker's twine.
The lighthouse is popped up from the card using foam dots and the panel adhered to an A2 card base.
I hope you enjoyed my card today.  Be sure to visit the online and check out the July 4 sale on select designs!

Dies used:

Thanks for visiting today.  I hope you have a fun and creative holiday weekend!


Thursday, July 02, 2020

New Summer Release!! Ahoy Matey!

Hello My Scrapping Cottage Friends!

It is Pam having fun with you on the blog today!

It is always exciting when a new release comes and this one is no exception! It is just perfect for summer!  And super fun for all of those pirate loving fans!  This release features 14 different designs and the bundle is a whopping 60% off right now!!  You can't go wrong with this special pricing!!  There is also a 4th of July sale going on too featuring many of the other dies.  Now is the time to stock up on all those essential dies you have been waiting for!!

I am using the new Ahoy Matey! die.  And the parrot is just adorable!!

Background Photo by Giga Khurtsilava on Unsplash
Design Steps:
1.  Cut out all of the pieces using the Ahoy Matey! die.  I used green, blue, black, white yellow and purple card stock 
2.  Shade the pieces using a small applicator and TH inks.  Assemble the pieces using a fine tip glue and a white gel pen for the eye.  I cut the Ahoy and Matey words twice and glued them together for some strength
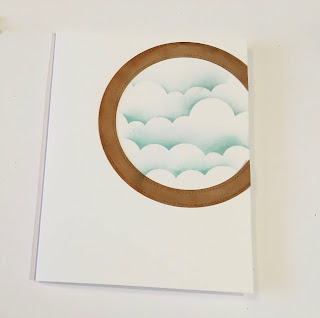
3.  For the background of this card I cut a port hole using the Pierced Wide Circle Frame die.  I inked it and then glued it slightly off  an A2 white card base as shown. Next cut off the part that hangs over the card edge.  I then masked around it and stenciled in the clouds using a cosmetic blender brush and TH ink
4.  Lastly I used the LawnMower dies inner wheels for the black port hole accents.  Glued them down and added Glossy Accents to them for some shine.  I glued down the Ahoy Motey! as shown and then pop up the parrot.  Your card is complete

CottageCutz Products


DON'T MISS THIS FANTASTIC SALE!!! THE PRICES ARE PHENOMENAL!!
I hope you have a wonderful 4th of July celebrating this awesome country we live in!

Blessings and see you next Thursday!
Pam

Wednesday, July 01, 2020

Mermaid Kisses and Starfish Wishes

Hello!  This is Sukie and today I'm sharing a fun card for my design team day. There's a brand new release of Cottage Cutz dies featuring underwater and pirate themed designs. These magical dies are currently on sale in the store.
I was immediately drawn to the new Mermaid and Tropical Fish die sets.  I cut out all of the pieces and shaded them with my Oxide Inks.  The mermaid is so sweet with the adorable starfish in her hair.
I created an ink blended background for my card, splattered it with water and with some white paint.  I hand cut the sea floor and adhered it along the bottom of my card panel.  The whimsical sentiment was perfect for this under the sea card!
All of the die cuts were adhered to the card base building the ocean step by step with all of the elements.
The larger fish filled in the open areas in the water while the smaller fish were adhered to the ocean bottom.
The bubbles were randomly affixed to my card base.  I added some Stickles to the bubbles for a bit of sparkly fun.
Here are the dies used on my card, available in the store: