Thursday, January 18, 2018

Fox and Friend!


Good Morning Scrapping Cottage Family!

It is Pam sharing ideas with you today!

I can honestly say I am almost done with my Valentine's Day cards!  I can't wait to send them off to friends and family!
The one I created for you today is one of my favorites!  I love the little fox and his birdie friend!

Designer Steps:
1.  Start by using the Sweet Fox die and cut out a rust colored fox and a light tan fox.
2.  Use the rust colored body of the fox and ink the edges for depth.  Use the light tan for the chest and tip of the tail.  Also ink the edges of both of those pieces.  With your makers color the tan bird blue and the wing dark blue.  Color the heart red, the nose and eyeball black
3.  Assemble the pieces as shown above.  I used a white gel pen for the eye dot
4.  Next cut out the grass using the Spring Grass die and green card stock.  Cut out the fence in white using the Victorian Fence die.  Cut out the piece of cloud DP with the largest Double Stitched Rectange die.  Glue all pieces to the DP
5.  Add the fox to the DP by tucking it into the grass
6.  Use an A2 white card base with an embossed inset
7.  Place a piece of fun foam on the DP panel and pop it to the card front.  Add the sentiment and your Valentine is complete
Cottage Cutz Products


This card is such a sweet Valentine and it was very quick and easy!

Blessings
Pam

Wednesday, January 17, 2018

Get To Know Anja Zurga

Hello Scrapping Cottage friends! Thanks for taking the time to stop and visit with us. We started a new feature several weeks ago that we are continuing with today on the Blog.  We would like to give you a closer look at our designers.  It's  a "get to know the design team"  and today we are featuring Anja Zurgman.

As you know my name is Anja. I'm 31 years old and I come from a small village in the center of Slovenia. I'm a psychologist by profession and in September I started working for a small NGO that helps victims of road accidents and their relatives. We are also doing educational workshops on road safety for kids, teenagers and their parents. 

I’m not married yet and I don’t have any kids. But I have a border coli named Oxi, a cat Oli and a house bunny Toni. They are great inspiration sometimes. I love reading books and watching sports. I’m a big tennis fan, I also like to watch winter sports and handball. 

When I don't work (which is very rare as of lately) I craft. I mostly create cards and explosion boxes. I love working in 3d. I always listen to music when I’m crafting. It feels strange if I work in silence.
I specialized in paper crafting approximately five year ago when I found Pinterest and bought my first Big Shot (it is still the one I'm using today). Before that I was mostly making jewelry and crafting with felt. But now paper is the material I use most. 

I prefer using white paper and coloring it my way. I always use 300 g paper that I color with Distress Inks and Oxides. I could not craft without those. One of my favorite crafting supplies are also Cottage Cutz dies. When I was little, my favorite toys were Lego bricks. And putting together all the small pieces from Cottage Cutz dies reminds me of building the bricks.

I started writing my blog Ideje od A do Ž (Ideas from A to Z) last year when I met some of my crafty friends from Slovenia. Before that I used Google + to publish my work. 
My crafting role models are definitely Vladka Šerbinek and Janja Albreht. I remember how I was eagerly waiting for every new blog post they published. I still  am :)

Here are some of my favorite projects made with Cottage Cutz dies:


Monday, January 15, 2018

HOPE

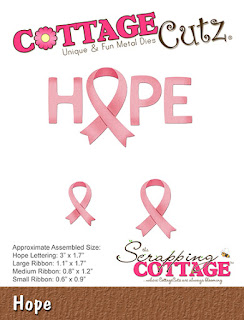
Hi, Lois here with another card using one of the dies in the CottageCutz get-well release.  There is
a card-making technique that is currently popping up all over the place -- the Eclipse technique.   Basically, it involves stacking layers of die-cuts for a raised, camouflaged sentiment or image.  I used this technique today on my Joy Fold Card, in which I used the CottageCutz HOPE die.


The cardstock and patterned paper for my card was cut as follows:

Pink - 4 1/4" x 8 1/2"
Brown - 4" x 8"
Patterned paper:
     1 piece - 4" x 5 1/4"
     1 piece - 2 3/4" x 4"
     2 pieces - 2 3/4" x 3 3/4"
Pieces of white and dark pink cardstock


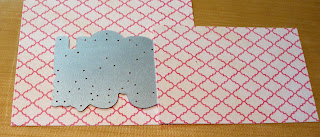
I used a second, larger sheet of patterned paper the same as the paper I will be using on the front of my small panel.  I matched up the pattern of the smaller piece and placed my die so that the word would be centered on the smaller panel and the patterns would line up.


I then found a piece of darker pink cardstock and cut five of the large ribbons from the dark pink cardstock (as well as the small "inside of the ribbon") and the rest of the letters from white cardstock.


I then ran the letters through my Xyron sticker maker so that it would be easy to stack them.


I colored the small "inside" of the ribbon with a Copic marker (see small photo in upper left-hand corner) and stacked the letters, making sure the patterned paper was the top layer.


To construct my card, I scored the 4 1/4" x 8 1/2" pink cardstock at 5 1/2" and the 4" x 8" brown cardstock at 4".  I then added the patterned paper, as shown.


The small panel is centered on the inside panel of the card base, so that the small top panel folds over the left hand panel of the base.


I then carefully added the letters, making sure that the pattern on the letters lined up with the designer paper.


For the inside, I cut a brown and a white oval shape, using the CottageCutz Double-Stitched Oval.


I stamped an encouraging sentiment on the white oval and carefully trimmed it down by cutting on the inside stitch marks . . .


. . . glued the white oval onto the brown oval and adhered it to the inside of the card.


I added the photo clip to the bottom left-hand corner with a matching brad to hold the small panel closed, and I was finished.


CottageCutz dies used on this card are:

http://www.scrappingcottage.com/cottagecutzhope.aspx

http://www.scrappingcottage.com/cottagecutzdouble-stitchedovalsetbasics.aspx

Sunday, January 14, 2018

Get Well Soon

Hi!

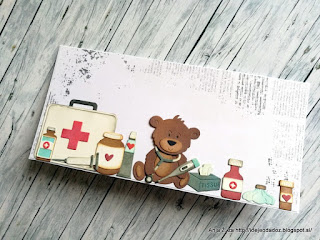
It's Anja here again. Today I made a card for my brother. He was sick for the last few days and went to the doctors yesterday. He had his appendix removed last night. Luckily everything is OK with him, but he will have to stay in the hospital for a few more days. So I had him in my mind when I was making this card. It's actually a simple one. I just combined a few different dies from the latest Cottage Cutz release.


For this card I used:
- Cottage Cutz dies (Bear Patient, Nurse Puppy, First Aid Kit, Get Well Phrase),
- Distress Oxides (Black Soot, Walnut Stain, Vintage Photo, Fired Brick, Broken China),
- white card base (10x21 cm),
- white and craft card stock for die cuts,
- patterned paper (9,7x20,7 cm),
- black pen,
- paper glue.

First I die cut all the small pieces. I used craft card stock for darker pieces (like the bear and the bottles) and white card stock for lighter pieces. I colored everything with Distress Oxides. When I had everything colored the way I liked it, I glued it together.


I cut a piece of patterned paper for the background. It is a bit smaller than the card base.


I glued the patterned paper on the card base and then added the bear and all the bottles and other pieces of first aid kit.


I first planned to add the get well phrase on the front side of the card, but taught it was to crowded. So I decided to put it inside instead. 


Now I'm on my way to visit my brother. Thank you for visiting and have a nice Sunday.
Anja Z.


Cottage Cutz dies I used: