Sunday, June 04, 2017

Bee cards

Hi!

It's Anja here. I played with bees today. I combined new phrases with this beautiful beehives die and made two cards. One can be used as a valentines card or even a little different wedding card. And the other can be sent to a friend on different occasions. I love this word games that can be done in English :)


For these two cards I used:
- Cottage Cutz Dies (BeehivesBaby Doll Girl Clothes, Sweet Phrase, Happy Phrase, Love Phrase),
- Distress Inks (Vintage Photo, Peeled Paint, Walnut Stain, Squeezed Lemonade, Wild Honey, Black Soot),
- Distress Oxides (Broken China, Fossilized Amber, Spiced Marmalade),
- white card base (21 x 10 cm and 12,5 X 12,5 cm),
- watercolor paper (20,5 x 9,5 cm and 12 x 12 cm),
- white card stock for die cuts,
- white foam,

- glossy accenst,
- adhesive foam pads,
- glue,

- heat gun.

I started with die cutting first. Then I colored and glued all the parts for the bees and beehives together. I used Distress Inks for the beehives and Distress Oxides for the bees. 


I made the background with smooshing technique. I used Distress Oxide Broken China and tapped it on some acetate foil. Then I sprayed water over it and smooshed it over the watercolor paper. I dried it with heat gun. 


Then I die cut the phrases. I cut them twice. First from white card stock and then from white foam. 


I colored the phrases using a bit of an ombre effect and glued the paper on top of the foam. 


I also die cut a few hearts to add as embellishments on one of the cards. I colored them in the same way as the phrases. I put a bit of glossy accents on top of them.


And then I just glued all parts on the white card stocks. I used adhesive glue pads for the bees. 


We also have a new  Instagram account. Don't forget to check and follow us :)

Thank you for stopping by and join me again next Sunday. 

Anja Z. 


Saturday, June 03, 2017

Sweet Bundle of Love

Hello Scrapping Cottage friends! Thanks for taking the time to stop and visit today. It's Mary Marsh here bringing you the Saturday edition of the Blog.

Hope you have been enjoying all the different cards from the DT using the new Expressions Plus word dies. With 35 word phrases in these dies, there is so much you can do with them in your own card making.

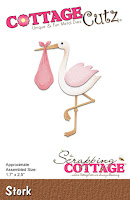
Combining the word die phrases with a stamped sentiment is just one idea. That's the direction I am going with my card today.  I used the Sweet Phrase and the Stork die to make a baby card. So let's get started with some details on how I created my card.

Sugarplum Card Base: 4 1/4" x 5 1/2"
White Stenciled Panel: 4 1/8" x 5 3/8"

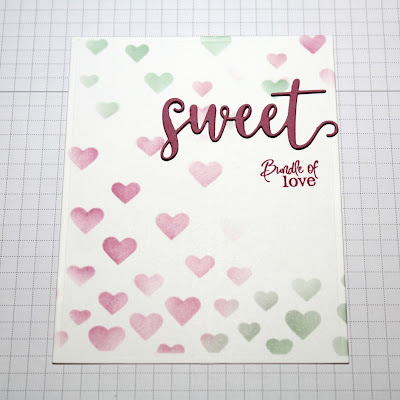
Step 1: I started my card this week by stenciling a heart background. I used sweet sugarplum and mint macaron ink. This photo was my first attempt (I did 3). My 3rd attempt was the one I chose to use. But I forgot to photo it before I added my sentiment and phrase.
 Step 2: I cut the stork image. I found some cardstock in my stash that was various shades of orange from very light to dark. That's what I used for the stork body and legs. His wing is cut in white and I lightly sponged it with some pink ink. I used some sugarplum patterned paper for the bundle he is carrying.
Step 3: I cut my sweet word phrase 2x with sugarplum cardstock. I did this to give it some dimension against the stenciled hearts. Used Ranger multi-matte medium to adhere the 2 words. This dries clear and is a strong adhesive.
Step 4: I adhered the word phrase and then stamped my "bundle of love" sentiment with sugarplum ink.  I am happy with the look of the card so far.
Step 5: Time to attach the stork to the card. I used dimensional adhesive to lift him slightly off the background. I wanted to use ribbon and played around with several variations before I decided on this white scallop ribbon. I didn't want to cover up my stenciling and I thought this one was narrow enough and also open enough to allow the hearts to still be seen. Plus it fit well with the baby theme of the card.

Here is a close-up photo of my card. You can see all the detail in the stork. Love that about all the CottageCutz dies. Click on the photo to get a larger view.

That completes my card for this week. I hope I have given you a baby card idea as well as a way to use the new Expression Phrases with stamps you already have in your collection.

Did you know that we are now on Instagram and you can follow us over there as well? Check us out here.

 
Dies I used to create card:
http://www.scrappingcottage.com/cottagecutzexpressionsplussweetphrase.aspx
 
http://www.scrappingcottage.com/cottagecutzstork.aspx


Friday, June 02, 2017

Pretty Blooms on a card and Expression Plus phrase


Hello to all !!!!

This is Anita here with spring flowers for you. These flowers are so pretty that they can make any project look awesome.
But before that , let me show you some new Expression Plus dies from CottageCutz recently released at the store.
There is a phrase for each occasion. Here is a video showing the different phrase.


Here is my card with 3D flowers.


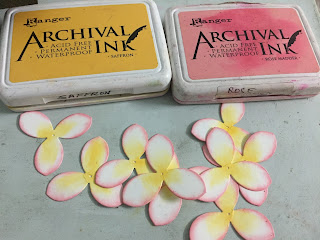
To make this card, cut out the flowers from 3D flower#4 and colour with Archival inks.

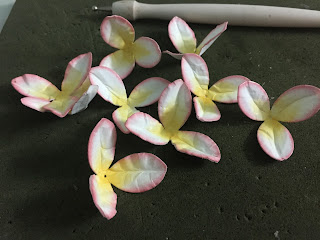
Emboss the flowers on an embossing pad with a tool

Cut the stamen centre as shown and roll to make the centres


Cut a card base 4.75" x 6.75" and add splatters of Worn Lipstick distress oxide ink.

Cut out the leaves and colour 

Add a panel with pattern paper and round stitched rectangular frame. 
Add a sentiment and some label tags

Add the flowers and leaves.

 Prills are added to flower centres.

The finished card

Here is another card using the Expression Plus phrase die.


CottageCutz dies used


Do follow us on Instagram where we have loads of inspiration.

Thursday, June 01, 2017

Wish!

Good Morning Scrapping Cottage Fans!

Pam, here today and I am really excited to show you our new release Expressions Plus Dies!  Here is my Design Teammate to show you how wonderful these dies are!!
We gave you a small sample in the video of the 35 dies that where released so I am including a picture of all the new release dies!

Now on to the card for today! I needed to replenish my supply of birthday cards.  And I wanted them to be great for either guys or gals so I came up with this festive design that I think would fit for both genders and just about any age too!


Design Steps:

1.  Start with an A2 white card stock base and cut a 4 x 5 1/4 inch piece of white card stock and run it through the dotted embossing folder.
2.  Wrap a piece of black and white polka dot washi tape around the right side of the embossed white card stock and set aside


3.  Next cut a piece of white card stock using the largest Cottage Cutz Pierced Rectangle.  Using white card stock again cut out Wish using Cottage Cutz Words Expressions


4.  Sponge green onto the rectangle to create a background for the word wish


5.  Using small dimension dots place them on the back of the word wish then glue to the center of the rectangle.  Use purple, green, yellow and black card stock to cut out the balloons from the die Baby Monkey with Balloons.  Glue the strings to the balloons


5.  Add dimension tape to the back of the sponged rectangle and glue to the embossed white card stock

6.  Glue the balloons as shown

7.  Add sequins to complete the card
Here are the Cottage Cutz Products I used:


We now have an instagram account check it out here. As always thanks so much for stopping by and I hope you get crafty today!

Blessings
Pam