Saturday, November 11, 2023

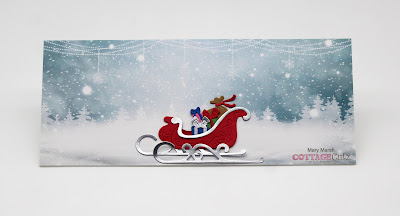
Santa's Sleigh

Hello CottageCutz friends! Thanks for taking the time to stop and visit with us today. It's Mary Marsh here bringing you the Wednesday edition of the Blog.

It's new release time!!! We have our Christmas 2023 release in the online store that has 40 designs. It's an old-fashioned Christmas theme. You can pick up the individual dies at 30% off for a limited time.

We also have a new Fall 2023 release in the online store with 15 designs. You can also pick up these individual dies at 30% off for a limited time.

Today for your viewing pleasure, I am featuring the new Vintage Sleigh die to create an outdoor scene in the slimline design. 

Even though it is a vintage sleigh design you can use it for a card with a more modern appeal. So, let's get started with some details of how I created this one.

Design Steps:

When I saw this Vintage Sleigh die, I thought it would show well on a slimline format. So, I looked through my designer paper for a background that would work for my idea. 

When I came across this pack of slimline card fronts (from Divinity Designs), I knew this pattern would be perfect for my outdoor scene. I liked the snowy landscape and the subtle white pine trees in the background. 

The designer paper is 3 3/4" x 8 3/4". I decided to keep that size and cut my white cardstock the same size. This will fit in a #10 business size envelope and it's flat for mailing. 
Next, I cut my sleigh in the usual red color and used a metallic silver for the runners and trim. I cut the presents in different colors of cardstock. I kept Santa's bag in a brown shade. 
I cut some of the pine trees from the Santa & Reindeer die for added embellishments. 
And for a sentiment I used the Tis the Season die from the Christmas 2022 collection. It's a larger sentiment but for a slimline design it works well to fill in the top part of my card. And I cut it in red cardstock for a bolder appeal. 
Now that my card elements are prepared I am ready to start assembly. I attached the designer paper to the card base with double sided tape and the sleigh with the same adhesive.  
Next, I attached the trees with clear drying glue. 
To finish off my card I attached the sentiment with clear drying glue.
That's my sample for this week. See you next Saturday!

Reminder: Marla has a new video and a giveaway on the CottageCutz YouTube channel. Click here.


 

Friday, November 10, 2023

Shiny Christmas Fun Fold

Happy Friday friends!

Kris here to share a fun fold Christmas card featuring the NEW Christmas Ornament and Holly Frame from our 2023 Christmas Release!

There are 40 cute designs in this release and they are all 30% OFF for a limited time, so be sure to check it out here.  There's something for everyone to create your holiday greetings!


I really like this A2 sized Holly Frame!  I decided it would be fun to cut the middle out of my card front and have the focal image inside my card - not only inside, but on a pull out panel ☺


DESIGN STEPS:


I started by die cutting my Holly Frame from white cardstock and added twisted citron and mowed lawn Distress Oxide Inks.

I then cut a black card base at 8-1/2" x 5-1/2" and scored at 4-1/4" and glued frame to the front. 

Next, I cut out the black cardstock in the middle of my frame with a craft knife and ruler, leaving a tiny bit of a black border inside. 


Next, I cut the inside from white cardstock at 5-1/4" x 8" and scored the long side at 2" and 4" then mountain fold outer score line and valley fold center score line.  Glue just the larger section to the inside of card.  


I die cut the Christmas Ornament from white cardstock and sponged the same green ink to the top and bottom pieces.   I cut just the bow from red c.s. and the flower from holographic c.s.  I cut a tiny piece of gold foiled c.s. and die cut just the topper of the ornament, and the smaller flower was cut from green glittered c.s. 

 I printed out some lines of Christmas text on my laser printer, then used my minc with some red toner reactive foil to hot foil the main ornament piece (using the negative) .


I assembled the ornament and then glued another one to the back just to make it more sturdy for the next part.  


I closed my card up, then I positioned my ornament right in the center of the window opening and glued JUST the right half of ornament to the right of score line.


This is how it looks when it's open.


I foiled a Holly Jolly Holidays sentiment in sparkly green foil on black cardstock and added to my card front.  


Done!


 Hope you are inspired today to get crafty with your favorite CottageCutz dies!

There's more inspiration and giveaways on our YouTube Channel!

~Kris

Thursday, November 09, 2023

Fall Leaves

Hello Friends 

It is time to show off our new RELEASE!  It is our Fall Designs for 2023.  Perfect for those Thanksgiving cards and fall birthdays. The new dies are in the online store.  There are 15 designs and they are currently 30% off! 

I am sharing a card using the Fall Branch.  I am really excited about the technique I used for the leaves!  They turned out so realistic!  And it was so easy!!!


Design Steps:
1.  To create the leaves and branch I used a piece of Alcohol Ink Yupo paper and an applicator.  I put several of the colors of alcohol ink on the applicator and then dabbed it onto the Yupo paper.  I changed the applicator cotton rectangle and tried a few different colors.  I did this 3 times as you can see on the Yupo sheets
2.  Next I used the Fall Branch die and cut it out of the brown tones sheet and then the red and yellow sheet.  I left the brown tones branch in tact.  I then cut off the leaves from the red and yellow branch
3.  I matched up the leaves and then glued the red and yellow ones onto the brown branch as shown above
4.  Cut a piece of watercolor paper 4 1/4 x 5 1/2.  Place some blue reinker onto an acrylic block add just a touch of water then painted onto the paper.  Let dry and then add some splatters with the same color of ink
5.  The card base is a white A2 size, watercolor panel and then I cut 2 of the Wide Frame Rectangles from the watercolor paper and glued together 
6.  Before I assembled the card I stamped and embossed my sentiment in gold
7.  Glue the watercolor panel to the card front, next glue down the frame and finally add the branch as pictured below.  Your card is complete


We have more inspiration on our YouTube Channel check it out HERE

Thanks so much for stopping by!  And I will see you next Thursday.

Blessings and Take Care


Wednesday, November 08, 2023

One Last Hoorah


Happy Wednesday!  As a card maker, I struggle with the emergence of fall.  I want to create many cards using all of the beautiful fall products.  Then suddenly I realize, I need to get all of my Christmas cards completed and have a limited amount of time.  When I sat down to create my video today, I set aside all things Christmas to give fall one last hoorah. 

The "Fall Centerpiece" is a gorgeous die that demands center stage on a card.  My vision was to create another clean and simple design, with texture.  Keeping the background white allowed the elegance of the die cut image to shine.

If you head over to watch the video, you will see how this card came together and can enter to win this beauty.  I hope to see you there.
Until next time..... Marla


Tuesday, November 07, 2023

Easy DIY Placecards For Thanksgiving

Happy Tuesday crafty friends,
I hope your day is going well. Today I am sharing some super cute, fun and easy place cards for our upcoming Thanksgiving dinner table. Here's what I have.


I started by cutting out all my pieces in white so that I could color them in. I used most of the cute little critters from the Autumn Friends Die.

I knew I would need a total of 6 place cards so I cut them out in quantities and then colored the pieces in quantities. 

I then cut out my mats and the base. The base pieces are 4.25 x 4. I fold and scored them along the 4" side to make the finished "tent" a 4.25 x 2 size.

Here is a closer look at the "Dad" one. I used the cute little bear, tree trunk, pumpkin and acorn from the  Autumn Frinds die set. I also used the Wagon Wheel and then the Double stitched mat and the funky stitched mat. I then hand wrote the names.

Here is a closer look at the Grandpa place card.

Here is a closer look at Jason.


Here is one last look at all the cards again. I think they turned out super cute! I may have a few more to make if some additional guest come.


Dies Used


Autumn Friends


Wagon Wheel

Double-Stitched Rectangle

Wacky Stitched Rectangle Set

Well that about covers it for today, Be sure to come back by and see what the rest of the designers are creating! Until the next time, have a wonderfully crafty day!

-Melinda