Happy Tuesday crafty friends!
I hope your day is off to a great start and you are enjoying the new season we just hit...FALL! It is our collective households favorite season! I am outvoted 3-1. All of my family members love fall most of all! I love it, because I love them! Anyway, the fall feasts are a lot of fun. One of the celebrations is halloween. While as a family we do not participate in halloween, I do have a couple of halloween events I do for my job. So I wanted to make something that I could used to decorate the booth. Here is what I created.
Here is my project. It is super cute. It is a free standing decor piece.
I started with a plain haunted house from the Dollar Store.
I painted the house with some purple paint. I made a base for it by gluing some jenga type wood blocks to both sides. I then painted them with some black paint.
With the black paint, I painted some "roof tops" While the paint was still wet, I sprinkled some glitter on them.
For the moon die cut, I used some wire and sandwhiched a couple of the dies together with some foam tape between them.
I then went to work adding in all the super cute die cuts I used. As with most of my projects, I started by die cutting all my pieces from white cardstock. I then colored them in with my markers.
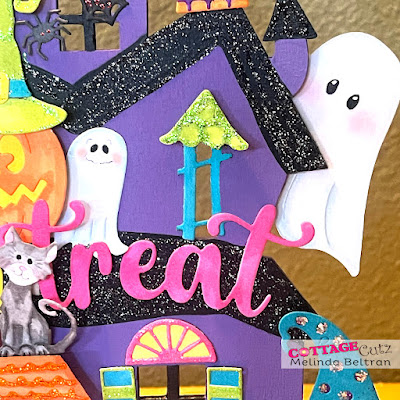
In this close up you can see the following dies: The tops of the cake sho
Here is one last look at my completed project. Below are the dies I used.
Vintage Lamp Post
From the new Christmas Release
Holiday Door
Used the bottom base, door, and columns for the door are of my project.
Used the oval window top for the two windows on each side of door.
Snowman w/ Country Shed
Used the shed wood base for the background of my door area.
Cake Shoppe
Used the Roof top and the awning of the front window. The roof top piece is over the door and over the left second story window. The awning piece is over the third story window.
Candy Cart
Used the Top for the awning on the seccond floor to the left window. It is layered underneath the roof top piece of the cake shoppe die.
Lemonade Stand
Used the base of the stand for the window box planters on the bottom windows. Also used the little penant. it is on the second story window on the left.
Cute Ghosts
Halloween Victorian Gate. Used at the front of the house.
Jack-O-Lantern Witch. Used the Jack O Lantern and the hat on one of the pumpkins
Spooky Fence Mini
Used a cut piece from this for the 2nd floor skinny window on the right side.
Spooky Kitties
Used the little pumpkins
Used te spiders and some of te web pieces
Used the roof top on the 2nd floor side piece as window awnings on the small windows and also used the 2nd floor as my chimney.
Trick or Treat Phrase
Witch Hat
Witch Legs
Used the legs as "Shutters" for my first floor windows.
Well that about covers it for this project.
Be sure to head over to
CottageCutz.com and pick up the two new fantastic releases!
They are amazing and on sale now for a limited time!
Until the next time, have a wonderfully crafty day!
-Melinda


