Monday, May 01, 2023

Mother's Day Vase Pop Up Card

Happy May Day, crafty friends!

Kris here to share with you a pretty pop up card with a vase and bouquet!  This one is called a Vase Pop Up card... so the wow factor is on the inside of your card.  I decided to make it a Mother's Day theme featuring the NEW Spring Daffodils. 

I'll show you the inside of my card first ☺

and below is the front of my card...

Here's a short clip of how the vase pops up when you open the card ☺  
If you can't see it here, please click HERE.

I followed a video tutorial on Splitcoast Stampers by Gloria here.  It may be most helpful to watch that video (or there are others on YT if you search Vase Pop Up ☺)

The patterned paper I used is called Sunshine and Rainbows from SU!

DESIGN STEPS:

I started with a white A2 card base:  5-1/2" x 4-1/4"

INSIDE RIGHT:
Mango Melody mat = 5-1/4" x 4"
White cardstock = 3-3/4" x 5" 

INSIDE LEFT:
 • Blue patterned paper (same DSP) = 5-1/4" x 4"
• Rainbow striped patterned paper = 2-1/4" x 5"  
- then score along the 5" side at 1" and 4"
- then score along the 2-1/4" side at 3/4" and 1-1/2" just up to the scored line!
- then cut as shown in photo 
• white cardstock = 3/4" x 2"
• white cardstock = 3/4" x 3-7/8" 
- then scored at  3/8" on just one end


It's best to watch the video to see how to create the vase with moving mechanism ;)  


I die cut the Daffodils from yellow (Daffodil Delight), orange (Mango Melody) and green cardstock then gave some shadowing with Copics.


I glued a few of the flowers/stems to the blue layer above the vase, and some I glued to the top back-side of the vase so they pop out along with the vase when the card is open. 

I then decided to print a poem for the right side of my card since I didn't have any big Mother's Day sentiment stamps.  So I cut my white piece down to 3-1/4" x 4-1/4", then I matted it with a piece of blue/white patterned paper that I first die cut with largest Nested Scalloped Rectangle.


For the front, I die cut the Stitched Alphabet in oranges and yellow, and the Daffodils in green and yellow, then I used Copic markers to give the orange shade into it.  The li'l hearts were die cut from the Celebrate Banner die.  And the blue inverted scallops frame is just what was left after I die cut the scalloped rectangle from the middle of it for the inside mat!  


I hope I've inspired you to try something NEW to you using your favorite CottageCutz dies! 

~Kristine

PRODUCTS I USED:


Saturday, April 29, 2023

Mother's Day Easel Card and Treat Box

Hello CottageCutz friends! Thanks for taking the time to stop and visit with us today. It's Mary Marsh here bringing you the Saturday edition of the Blog.

We have a brand-new Easter release with 17 new designs available in the online store. There is something for every card maker with faith-based dies, beautiful floral images, whimsical with bunnies and frogs and several lovely birds and butterflies.

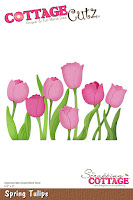
You will be able to take the images beyond the Easter or Spring season. And for a limited time you can get individual dies at 30% off. Today for your viewing pleasure I am using the new Spring Tulips die and I created an easel card with a treat box. It's a new fun fold design type for me and I really like how it turned out.  

I plan on giving this to one of my friends for Mother's Day. So let's get started on some details of how I created my card. There are lots of photos and details so you can create your own. 

Design Steps:
I used a card base from my stash and cut off  ½" on the solid part of the base. Then I scored at 2-3/4", 5-1/2" (is already scored), 6-1/2" and 7-1/2". If you're using other designer paper or card base, once you cut off the 1/2" your 2nd score line would be at 3 3/4".
I used Scor-Tape on the dotted end of the card base and then folded on all the score lines. The small tab gets taped to the inside to form a box shape.
Easel Card Assembly: 
I used a curry shade of cardstock measuring 10" x 2 1/4" and scored at 2 1/2" and 5". I used double sided tape and attached to the top of the box. 
Then a 2nd piece of the curry cardstock (5" x 2 1/2") that will be for the image panel. I attached this to the easel panel with double sided tape to the bottom half of the panel only.
Inside Drawer Box:
Yellow cardstock measuring 9" x 6 1/8" and scored at 3/4" x 1 3/4" on all 4 sides.  
Then you are going to cut the shorter ends only to form tabs. Cut the first 2 squares off each corner. Then cut the 1st square in the 2nd row. On the 2nd square in the 2nd row you will cut at an angle to form tabs. Add Scor Tape to the panels as shown in this photo. 
Peel the backing from the tape on the short sides first and fold over each tab on the score lines towards the inside. Next remove the backing from the long sides and fold these over the angled tabs. The box will look like this photo when folded. 

Decorating the image panel:
I cut a piece of white cardstock 4 7/8" x 2 3/8". This panel is decorated with the Spring Tulips in a grape cardstock. I also used the Fence & Grass die on this panel.  I cut the fence in white for a background but I didn't want it prominent. Stamped a Mother's Day sentiment.
To make a stop for the easel, I used a banner from my stash and stamped a sentiment in grape ink. This is secured with dimensional adhesive. This is the easel image standing up. I used the celebrate with shadow die and added another tulip and greenery.
This is a photo showing the box with the chocolate kisses inside.
Whew! This was a long post but I hope I have given you an idea for a Mother's Day card and treat box. See you next Saturday.
Reminder: We have a new video up on the CottageCutz YouTube channel from Linh Van. It's a cute shaker card. Click here. 

Dies I used to create card:


Friday, April 28, 2023

Let's Make an Infinity Shaker Card!


Hi everyone! Linh here and I have a new video up on the Cottage Cutz YouTube channel These awesome car dies from the Easter collection don't just have to be for Easter. Today I'm sharing an infinity shaker birthday card featuring one of the cars and both adorable bunnies! You'll see just how easy it is to make an infinity shaker without any special dies or shaker pocket products!


Thursday, April 27, 2023

Froggie Birthday

 Hello Friends,

I have a few younger relatives so I thought I would make a card for one of those special kids! I am using two of the new dies and a fun fold.  The fun fold is from a YouTube video I saw by Karen Aicken.  The dies are Spring Frog w/Mushroom and Spring Party Car.

Design Steps:

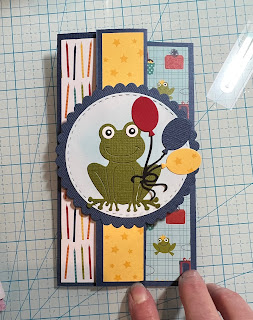
1.  Cut a piece of navy card stock 7 x 6 1/4
  • Score along the 7 inch side at 1 1/4 and 3 1/2 
  • Valley fold the card at the 3 1/2 inch score and then mountain fold at the 1 1/4 inch score as shown above
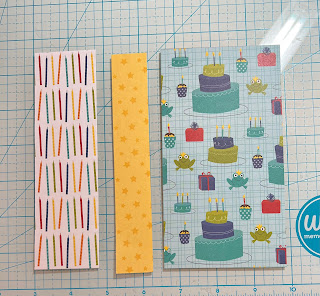
2.  Cut the candle DP at 1 3/4 x 6
  • Yellow Star DP at 1 x 6
  • Birthday cake DP at 3 1/4 x 6
3.  Glue the yellow star DP to the fold as shown and the cake DP to the inside of the card as shown
4.  Flip the card over and glue the candle DP to the front of the card as shown.  Add dimension dots to the flap and then close the flap
5.  Cut 2 piece of white card stock with the second from the largest stitched die and one navy circle with the largest scallop die
6.  Using the Spring Frog w/Mushrooms cut out the frog in green, white and black.  Using the Spring Party Car cut out the pieces in red, yellow star DP, navy and black.  Assemble the pieces and ink the white circles with blue
7.  Attach the circle with glue and a dimension dot on the left side
8.  Stamp your sentiment for the front and layer onto navy card stock.  Stamp the sentiment for the inside of the card
9.  Glue down the frog ( I cut the front leg to slip on the balloons)

10.  Glue the inside cricle directly behind the front circle.  Add the sentiment on the front and your card is complete


We have more inspiration on our YouTube Channel check it out HERE

Thanks so much for stopping by!  And I will see you next Thursday.

Blessings and Take Care


Wednesday, April 26, 2023

Spring Tulips - Scrapbook Layout


Hey Krafty Friends, Jen from Katahdin Krafts, back with another CottageCutz YouTube video on the CottageCutz Channel.  For my layout this week I used the "Spring Tulips" and the "Spring Butterflies" dies, from the latest release.


The black cardstock base is 8" x 8", the background scene I created is 7.75" x 7.75". 
 The photo mat size is 3.5" x 3.5".


I love the how easy it is to make layouts with the Cottage Cutz dies!  Now, I'm all ready to put a photo of my spring tulips (if they finally decide to make an appearance here in northern Maine) on a page, and document how happy they make me feel every year.  

You can find all the layout details over on the  YouTube Channel!

The winner of the "Spring Bunny Car" die from my last video is Marz S., the details for collecting your giveaway prize are over on YouTube!  

Thanks for stopping in and krafting with me, this will be my last Design Team post for now.  I have enjoyed this team so much, and appreciate the opportunity to share this space with such wonderful people.  I wish everyone a very happy summer, and I hope that I will be able to guest design this fall.  

Until then, happy krafting everyone!!!