Sunday, June 20, 2021

Happy Father's Day

Hi!

It's Anja here. For today's post I made a Father's Day card. I used one of the dies from the Christmas release. It seemed perfect for the occasion.


For this card I used:

- Cottage Cutz dies (Christmas Pets, Rounded Rectangles Slimline, Oval Set), 

- Distress Inks and Oxides,

- white card base (9,5x22,5 cm),

- white and patterned card stock for die cuts,

- white pen,

- black pen,

- plastic stencil,

- heat gun,

- washi tape,

- tape,

- water spritzer, 

- printer,

- vellum paper,

- adhesive foam pads,

- paper glue. 


First I cut and colored the pets.


Next I started on the background. I used the smooching technique. I dried the paper with the heat gun. 

 
Next I added more interest to the background using the plastic stencil. I used the same Distress Oxide for coloring.


Next I cut an oval out of patterned paper and placed it on the background. I used rounded rectangle slimline die over it and adhered it with the washi tape to prevent moving. I cut it with my cutting machine.
 

I printed the sentiment on the vellum paper and teared the paper on both sides. I adhered the paper to the background using tape on the back side. 


I placed and adhered the background to the card base and added the pets using adhesive foam pads. And my card was done.


And that's all from me for today. Have a nice week and see you again next Sunday. 

Anja Z.


Cottage Cutz dies I used:


Saturday, June 19, 2021

Welcome Baby

Hello Scrapping Cottage friends! Thanks for taking the time to stop and visit with us today. It's Mary Marsh here bringing you the Saturday edition of the Blog.

IT'S NEW RELEASE TIME! The collection is called COUNTRY FARM! It has the most delightful dies from Tractors to Cowboy Chicks! Each die is just full of awesome details and can be used for so many different occasions. All of the new dies are on sale at 25% off.

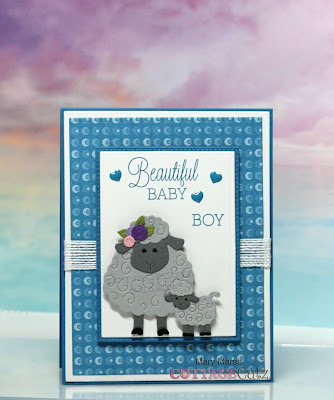
Today for your viewing pleasure, I am featuring the new Curly Sheep & Lamb die and created a card to welcome a new baby boy. A young couple from church just had their 3rd baby and I want to send them a card. So let's get started with some details on how I created my card.

Design Steps:
I started my card this week by picking the colors. I wanted to use some colors that are typical boy colors. I found this cute designer paper in a royal blue and decided to go with it. I decided to add some ribbon and went with this white flax ribbon. 

Blue Card Base: 4 1/4" x 5 1/2"
White Layering Panel: 4" 1/8" x 5 3/8"
Designer Paper Layer: 3 7/8" x 5 1/4"
White image panel: 2 3/4" x 3 3/4"
Blue Image Layering Panel: 2 7/8" x 3 7/8"  
Next, I cut my sweet Mama sheep and Baby lamb dies. They are so, so cute. I just love how they turned out.
Then I stamped my "beautiful baby boy" sentiment on the white cardstock die cut image panel. I used the 3rd largest die from the rectangle set and stamped in the royal blue ink to match the cardstock and designer paper panels. 
Now that my card elements are prepared, I am ready to start card assembly. I attached the sheep & lamb image with dimensional adhesive. Then the blue layering panel that was cut with the 2nd largest Stitched Rectangle die was attached with double sided tape to the image. 
I attached the designer paper to the white layering panel and the white flax ribbon with double sided tape. I used a foam adhesive sheet to attach the image panel. I wanted that lifted slightly off the designer paper. 
To finish off my card, I attached the panels to the card base and scattered a few royal blue hearts. I am happy with how the card turned out and I think my friends will like it as well. I hope I have given you an idea of how to use this new die. I will be back on Tuesday with another sample using these new dies. 

Dies I used to create card:


Friday, June 18, 2021

Howdy Friend!

Happy Friday!  It's Jeanne posting to day with a great thinking of you card featuring the Dog in Cowboy Boot die from the new Country Farm release!  This release features 16 adorable dies with a great variety of farm images.  Everything from tractors to cows to chickens!  Be sure to check them all out in the online store.

Today's card went fast thanks to a sketch from Splitcoaststampers.  To accommodate the boot I rotated the sketch 90 degrees.

 
I knew I had some bandana designer paper and then I found this paisley embossing folder in my stash. It coordinates beautifully!

To start I cut the dog from white cardstock and used Distress Oxide ins to color him.

For my sentiment I cut two ovals using the second largest of the Stitched Scallop Ovals and the third largest of the Stitched Ovals.  After stamping the sentiment I layered these; the blue scallops just peek out from underneath.

The trickiest part of this card was the angle.  I cut a base panel 4 1/4 x 5 1/2 inches from a denim color and then two panels 4 x 5 1/4 inches from white and the DP.  I embossed the white with the paisley folder.

To get my angle I trimmed the bandana panel to 3 x 5 1/4 and marked half way up the long side at 2 3/4 inches.

I used my paper trimmer to cut a line from the lower left corner to the pencil mark giving me the angle.  I assembled my panel pieces.

To finish the card I glued down the oval and used foam dots to pop up the pooch!  Don't forget to check out this adorable release.  It's on sale for a limited time!

Products used:


Thanks for visiting today!  I hope you have a fun and creative weekend!


Thursday, June 17, 2021

Hay There

Hello Scrapping Cottage Friends 

IT IS NEW RELEASE TIME! The collection is called COUNTRY FARM! It has the most delightful dies.  Everything from Tractors to Cowboy Chicks!  Each die is just full of awesome details and can be used for so many different occasions.  Today, I am using the Country Farm Stable.  This fun fancy fold hello card will be going to someone that loves horses!


Design steps:

1.  Start with a white piece of card stock 8 1/2 x 5 1/2.  Score at 1 3/8 and 2 1/2.  Flip the card over and repeat the scoring on the other end of the card. Valley fold the first score line and then mountain fold the next two and the final score line is a valley fold as shown above
2.  Using the Country Farm Stable cut out all the pieces with a variety of colors: green, brown, cream, silver, light brown, red, and yellow.  Shade the pieces and glue together using a fine tip glue
3.  For the front of the card cut a piece of cloud DP 3 1/4 x 4 1/4 and a piece of green card stock 3 1/4 x 1 1/2.  Use the Slimline Grass die for the background grass.  Cut a rectangle of brown using the second from  the largest Double Stitched Rectangle die and shade with ink
4.  Glue the cloud DP down add the grass strip and then glue down the brown rectangle.  Next pop up the stable door with the horses.  Add the green grass piece to the bottom of the stable door
5.  For the sides of the fold cut 2 pieces of cloud DP 1 1/4 x 5 3/8 and 2 pieces 1 x 5 3/8
6.  Use some small pieces of green cut with the Slimline Grass die.  2 cut at 1 1/4 x 1 and 2 cut at 1 x 1 mine are just slightly different as you can see because the grass die has a slope in it

7.  Add the red flowers with little pearl centers and the butterflies.  Stamp and layer the sentiment and your card is complete.  Just for your info you sign your card on the back!

CottageCutz Products


Thanks so much for stopping by today.  I hope you take some time to get crafty.  And please don't forget to check out the new Country Farm release!

Blessings and Take Care
Pam


Wednesday, June 16, 2021

Happy Father's Day!

Hello!  This is Sukie and today I'm sharing a Father's Day card featuring the new Country Farm die release.  I love that I was able to use these adorable die cuts for a Father's Day card.

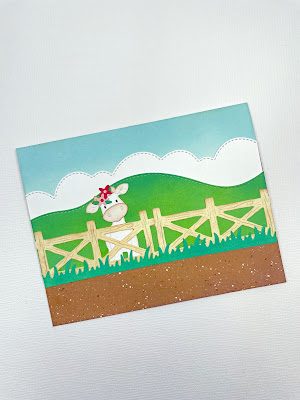
I might have gotten a bit carried with incorporating so many dies into this one card but I couldn't resist the adorable farm scene.  I used basic card stock for all of the die cuts and shaded them with my Oxide Inks.  The die cuts are from the following die sets:  Grass Slimline, Clouds Slimline, Hills Slimline, Country Farm Cows and the Farm Tractor w/Trailer.

A portion of my card base was darkened with some ink and splattered with paint to give the appearance of a dirt road.  I shaded a strip of white card stock with blue ink and adhered it to the card background.  The cloud border was layered on top.
The next step in my design process was to layer the die cut hills on top of the cloud border with the clouds slightly peeking above the hills.  I also prepared the fence for my card by glueing the 2 pieces together.  The grass was adhered along the bottom edge of the fence.

The fence pieces were affixed on my card with the sweet cow behind the fence.  I ended up slightly trimming off the edges of the fence so that it would fit perfectly on my card.
The farm tractor and trailer was placed in the dirt section of my card slightly overlapping the fence.
To finish off my card, I added the 2 milk cans on top of the fence and the stamped sentiment tag in the corner.
Here are the die sets used on my card, available in the store: