Tuesday, June 15, 2021

Just For You

Hi!

It's Anja here for my Throwback Tuesday post. For today's post I used three dies from Springtime release and made a simple and classy card.

For this card I used:

- Cottage Cutz dies (Spring Flowers in Jar 1, Spring Flowers in Jar 2, Spring Flowers in Jar 3, Scalloped Stitched Rectangle Slimline, Nested Rectangles Slimline),

- grey card base (9x23 cm),

- white and patterned card stock for die cuts,

- sentiment stamp,

- black pigment ink,

- acrylic block,

- scissors,

- washi tape,

- adhesive foam pads,

- paper glue. 


First I cut all the flowers. I cut two sets of each. I arranged it and glued it on patterned paper. Then I cut the rectangle out of the paper. I used the third largest die from the set. I also cut a scalloped rectangle from white card stock. I used washi tape to help me die cut the slimline dies. I glued both cuts on the grey card base. Last I added the stamped sentiment. I adhered it with adhesive foam pads. And my card was done.


And that's all from me for today. Have a nice week and see you again on Sunday. 

Anja Z.


Cottage Cutz dies I used:


Sunday, June 13, 2021

Happy Birthday

Hi!

 It's Anja here. I have a birthday card for you today. Again, I used a few circus die to create the scene below. 

For this card I used:

- Cottage Cutz dies (Circus Ringmaster, Circus Lion, Circus Side Show, Nested Rectangles Slimline, Nested Stitched Rectangles Slimline),

- Distress Inks,

- red card base (10x23 cm),

- white and light blue card stock for die cuts,

- black pen,

- white pen, 

- sentiment stamp,

- black pigment ink,

- acrylic block,

- scissors,

- paper glue. 


First I cut and colored the ringmaster.

Next I cut and colored the lion.

Last I cut and colored all the pieces for the side show.

 
Next I cut both rectangles, one from white and the other from light blue card stock. 

I also stamped and cut the sentiment. 

 
Last I arranged all the pieces to the card base and glued it together. And my card was done. 


That's all from me for today. Have a nice Sunday and see you again next week. 

Anja Z.


Cottage Cutz dies I used:


Saturday, June 12, 2021

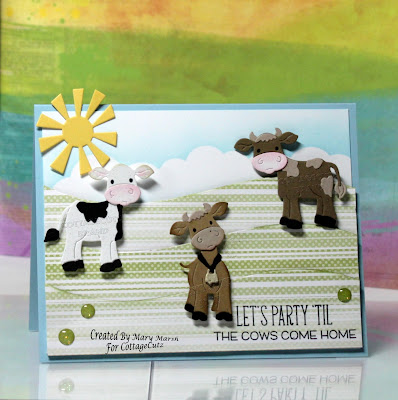
Party Till The Cows Come Home

Hello Scrapping Cottage friends! Thanks for taking the time to stop and visit with us today. It's Mary Marsh here bringing you the Saturday edition of the Blog.

IT'S NEW RELEASE TIME! The collection is called COUNTRY FARM! It has the most delightful dies from Tractors to Cowboy Chicks! Each die is just full of awesome details and can be used for so many different occasions. All of the new dies are on sale at 25% off.

Today for your viewing pleasure, I am featuring the new Country Farm Cows and created a birthday card for a fun loving friend.. So let's get started with some details on how I created my card. 

Design Steps:

I started my card design by cutting the cow images. I used different shades of cardstock. You could also cut in white cardstock and then color the cows with your favorite coloring medium. 
Next, I cut 3 grassy slopes from designer paper. On the bottom slope I stamped my sentiment in black ink. I used my MISTI for placement and also because sometimes the clear stamps require a second inking. In this case it did. 
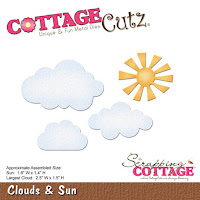
I stenciled some clouds onto my image panel with tumbled glass distress ink. I cut 3 grassy slopes from designer paper and the sun is from the clouds & sun die. 

Now I am ready to start card assembly. I attached the slopes to the image panel with double sided tape and dimensional adhesive. 
Next, I attached the cows to the grassy slopes using dimensional adhesive. 
To finish off the card I attached the image panel to a blue card base. The base is 5 3/4" x 4 1/2". I scattered a few enamel dots and the card is complete. 
I hope I have given you an idea for the Country Farm Cows die. See you next Saturday!

dies used to create card:


Friday, June 11, 2021

Tickled Pink

Happy Friday!  It's Jeanne posting today.  I am in love with all the little pigs from the new Country Farm release.  This release features the most delightful dies.  Everything from Tractors to Chicks to Cows!  Each die is just full of awesome details and can be used for so many different occasions. 

I started this card by cutting out the Piggy w/ Crate from white cardstock and used Distress Oxide inks to color.

I colored the pig using the Tattered Rose and then used a sponge dauber to add some shading with the Vintage Photo.

I cut a panel 4 1/4 x 5 1/2 inches from floral designer paper.  Using the largest of the Nested Stitched Scallop Squares and Stitched Squares I cut out two white squares.  I used the banner from the Windows Slimline die to cut the striped banner.

I stamped my sentiment centered on the bottom of the plain stitched square and then ran it through an embossing folder to add texture and contrast with the scallops.

I mounted the floral paper on a card base and added the squares.  I tied a coordinating ribbon around the center.

My last step was to add the banner and pop up the pig using foam dots.

This little pig is super cute and can be used for many occasions.  I picked this sentiment since I could used it as a congratulatory or birthday card.

Be sure to visit the online store where the new release is on sale for a limited time.

Dies used:


Thanks for visiting today. I hope you have a fun and creative weekend!


Thursday, June 10, 2021

Udderly Adorable

 Hello Scrapping Cottage Friends 

It is Pam sharing with you today!

IT IS NEW RELEASE TIME! The collection is called COUNTRY FARM! It has the most delightful dies.  Everything from Tractors to Cowboy Chicks!  Each die is just full of awesome details and can be used for so many different occasions.  Today, I am using the Country Farm Cows. 


Design Steps:

1.  Cut out all of the pieces using the Country Farm Cows die.  I used dark brown, white, tan, green gray, black and gold.  Shade the pieces and assemble them using a fine tip glue
2.  For the base card I used a kraft A2 card.  The DP is milk bottles cut at 4 x 4 with a red layer an 1/8 inch larger.  The red gingham is cut at 2 x 5 1/8 with a red layer an 1/8 inch bigger.  A rectangle cut on kraft card stock using the third from the largest Double Stitched Rectangle die
3.  Glue the DP to it's coordinating red layer.  Glue the gingham layer to the center of the card as shown.  Then on top of the gingham layer glue the milk bottles layer slightly to the left of center as shown.  Glue the double stitched rectangle slightly to the right as shown below
4.  Working on the kraft retangle glue down the fence and little clumps of grass first.  Add the milk bottles to the top of the fence.  Pop up the cow and the bucket.  Cut out a few flowers and leaves then glue them on top of the bucket as shown.  Add the sentiment and bow and your card is complete


5.  I decided to decorate the inside with left over scraps of the DP and an addition piece of fence

CottageCutz Products


I am so glad you were able to stop by today!  And I hope you can check out the new release in our online store.  Just click HERE!
Take Care and Blessings
Pam